How To Charge Ac System With Gauges
The summer sun beats down, turning your car into a mobile sauna. The culprit? A malfunctioning air conditioning system. While professional AC service is always recommended for complex issues, understanding how to diagnose and even recharge your AC system using gauges can be a rewarding DIY project. This guide will walk you through the process, the science, and the potential pitfalls, equipping you with the knowledge to tackle this task responsibly.
The Problem: A Warm Breeze When You Need an Ice Blast
Imagine this: You're stuck in rush hour traffic, the asphalt shimmering with heat. You crank up the AC, expecting that refreshing chill, only to be greeted by a lukewarm gust. Most likely, your AC system is low on refrigerant. Refrigerant, often referred to as Freon (though modern systems use different refrigerants like R-134a or R-1234yf), is the lifeblood of your car's cooling system. It absorbs heat from the cabin and releases it outside. When the refrigerant level is low, the system can't efficiently perform this heat exchange, leaving you sweltering.
Think of your AC system like a bicycle pump. The refrigerant is the air being pumped, the compressor is your arm pushing the pump, and the condenser and evaporator are the valves that control the flow of air. If the pump has a leak (low refrigerant), you'll have to pump harder and faster (compressor working harder) to get the same result (cooling effect), and eventually, you won't be able to pump enough air at all (no cooling).
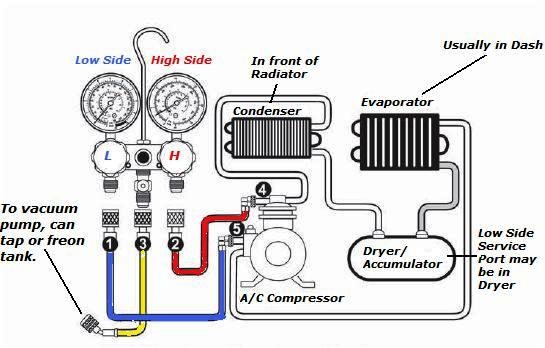
The Mechanics of Cool: How Your Car's AC System Works
Before diving into the charging process, let's understand the four key components of your car's AC system and their roles:
- Compressor: This is the heart of the system. Driven by the engine, the compressor pressurizes the refrigerant gas, raising its temperature. This high-pressure, high-temperature gas is then sent to the condenser.
- Condenser: Located in front of the radiator, the condenser resembles a smaller radiator. It cools the high-pressure refrigerant gas, causing it to condense into a high-pressure liquid. As the refrigerant changes state, it releases the heat it absorbed from the car's interior.
- Expansion Valve (or Orifice Tube): This small but crucial component meters the high-pressure liquid refrigerant into the evaporator. As the liquid passes through the valve, it expands rapidly, causing a significant drop in pressure and temperature.
- Evaporator: Located inside the car's dashboard, the evaporator is another heat exchanger. The cold, low-pressure refrigerant absorbs heat from the air blowing across it, cooling the air that enters the cabin. As the refrigerant absorbs heat, it turns back into a low-pressure gas, which is then drawn back to the compressor to start the cycle again.
The refrigerant, in a closed-loop system, continuously cycles through these components, absorbing and releasing heat. The gauges you'll use measure the pressure within this loop, providing valuable information about the system's health and refrigerant level.
The Tools of the Trade: AC Manifold Gauge Set
The AC manifold gauge set is your diagnostic and charging tool. It typically consists of:
- Two Gauges: A high-pressure gauge (usually red) and a low-pressure gauge (usually blue). These gauges measure the pressure in the high and low sides of the AC system, respectively.
- Manifold: The central block that connects the gauges, hoses, and service ports on the car's AC system.
- Hoses: Three hoses, typically red (high pressure), blue (low pressure), and yellow (center hose, used for refrigerant charging or vacuuming).
- Couplers: Quick-connect fittings that attach the hoses to the service ports on the car's AC system. These are often different sizes to prevent accidental cross-connection.
You'll also need the correct type of refrigerant for your vehicle, safety glasses, gloves, and potentially a vacuum pump if the system has been completely discharged.
Step-by-Step: Charging Your AC System with Gauges
Safety First! Refrigerant can cause frostbite. Always wear safety glasses and gloves when working with AC systems.
- Identify Service Ports: Locate the high-side and low-side service ports on your car's AC lines. The low-side port is usually larger and located on a larger diameter pipe. Consult your vehicle's service manual for specific locations.
- Connect the Gauges: Attach the blue hose to the low-side service port and the red hose to the high-side service port. Make sure the couplers are securely connected.
- Read the Initial Pressures: With the engine off, observe the pressure readings on both gauges. These readings provide a baseline.
- Start the Engine and Turn on the AC: Set the AC to maximum cool and the fan to maximum speed. Allow the engine to idle.
- Observe the Gauge Readings: The low-side pressure should drop, and the high-side pressure should rise. Normal readings vary depending on ambient temperature and humidity, but generally, the low-side pressure should be between 25-45 psi, and the high-side pressure should be between 150-250 psi. Refer to your vehicle's service manual for specific pressure ranges.
- Charging the System: If the low-side pressure is too low, you need to add refrigerant. Connect the yellow hose to a can of refrigerant (or a refrigerant tank) and purge the air from the hose by slightly loosening the fitting at the manifold.
- Slowly Add Refrigerant: With the engine and AC running, slowly open the low-side valve on the manifold, allowing refrigerant to enter the system. Monitor the pressure gauges. Add refrigerant in short bursts, allowing the system to stabilize between each burst.
- Monitor the Pressures: Continue adding refrigerant until the low-side and high-side pressures are within the recommended ranges specified in your vehicle's service manual.
- Observe the Cooling Performance: Check the air temperature coming from the vents. It should gradually decrease as you add refrigerant.
- Disconnect the Gauges: Once the pressures are correct and the cooling performance is satisfactory, close both valves on the manifold and disconnect the hoses from the service ports.
Pros and Cons of DIY AC Charging
Pros:
- Cost Savings: Charging your AC yourself can save you money compared to professional service.
- Learning Opportunity: You gain a better understanding of how your car's AC system works.
- Convenience: You can recharge the system at your own pace and on your own schedule.
Cons:
- Potential for Overcharging: Overcharging the system can damage the compressor and other components.
- Refrigerant Release: Improper handling of refrigerant can release harmful greenhouse gases into the atmosphere.
- Diagnosis Difficulty: Low refrigerant may be a symptom of a larger problem, such as a leak. Simply recharging the system may not solve the underlying issue.
- Safety Concerns: Refrigerant can cause frostbite.
Use Cases and Manufacturer Examples
Use Cases:
- Minor Refrigerant Loss: If your AC system is only slightly low on refrigerant, recharging it yourself can be a quick and effective solution.
- Older Vehicles: Older vehicles may be more prone to minor refrigerant leaks due to aging seals and hoses.
- Preventative Maintenance: Checking your AC system's pressures periodically can help you identify and address potential problems before they become major issues.
Manufacturer Considerations:
Different car manufacturers use slightly different AC systems and refrigerants. For example:
- General Motors (GM): GM vehicles often use R-134a refrigerant in older models and are transitioning to R-1234yf in newer vehicles. Their AC systems are generally robust, but leaks can occur at hose connections and the compressor seal.
- Toyota: Toyota vehicles are known for their reliable AC systems. However, problems can arise with the evaporator core, which is located inside the dashboard and can be difficult to access.
- Ford: Ford vehicles have used various refrigerants over the years. Some older models may require retrofitting to use newer refrigerants. Ford's AC systems are generally well-designed, but issues can occur with the blend door actuator, which controls the flow of air between the heater and AC.
Always consult your vehicle's service manual for specific information about its AC system and refrigerant requirements. Ignoring these recommendations can lead to damage or inefficiency.
Real-World Insights and Recommendations
Charging an AC system with gauges is a skill that empowers you to maintain your vehicle's comfort. However, it's crucial to approach this task with caution and a thorough understanding of the process. Before attempting to recharge your AC, consider these points:
- Leak Detection: If your AC system is consistently low on refrigerant, you likely have a leak. Before recharging, consider using a UV dye and a UV light to pinpoint the leak. Addressing the leak will prevent the need for frequent recharging.
- Vacuuming the System: If the system has been completely discharged (e.g., after replacing a component), it's essential to vacuum the system before recharging. This removes air and moisture, which can contaminate the refrigerant and reduce cooling efficiency. A vacuum pump is required for this step.
- Overcharging is Dangerous: Adding too much refrigerant can damage the compressor and other components. Always monitor the pressures closely and avoid exceeding the recommended ranges.
- Proper Disposal: When handling refrigerant, always follow proper disposal procedures. Never vent refrigerant into the atmosphere. Many auto parts stores offer refrigerant recycling services.
- When in Doubt, Consult a Professional: If you're unsure about any aspect of the charging process, it's best to consult a qualified AC technician. They have the expertise and equipment to diagnose and repair complex AC problems.
Ultimately, a well-maintained AC system ensures a comfortable driving experience. By understanding the principles of AC operation and using the right tools and techniques, you can keep your car cool and comfortable for years to come.