How To Check Alternator On Car
Alright, let's talk about how to check your alternator. This is a critical component for keeping your car running, and understanding how to diagnose its health is a valuable skill for any DIYer. Whether you're experiencing dimming headlights, a constantly dying battery, or just want to perform routine maintenance, knowing how to test your alternator can save you time and money. This guide will equip you with the knowledge to accurately assess your alternator's performance and pinpoint potential issues.
Purpose
Why bother checking your alternator? Simply put, a faulty alternator can leave you stranded. The alternator's primary job is to recharge the battery while the engine is running and to provide power to all of your car's electrical systems. If it fails, the battery will eventually drain, and your car will stop running. Regularly checking your alternator allows you to identify potential problems *before* they lead to a complete breakdown. This can save you from costly emergency repairs and the inconvenience of being stuck on the side of the road. Furthermore, understanding the system is crucial when upgrading electrical components such as a powerful sound system, winch or auxiliary lights. You need to make sure your alternator can handle the increased load or you'll be back to square one.
Key Specs and Main Parts
Before we dive into testing, let's cover the basics. Knowing the key specifications and components will make the process much smoother.
- Voltage Output: A healthy alternator should typically produce between 13.5 and 14.8 volts while the engine is running. This is the sweet spot needed to both charge the battery and power all the electrical components.
- Amperage Output: This varies depending on the alternator's size and your car's electrical demands. A typical passenger car alternator might output anywhere from 60 to 150 amps.
Here are the main parts of an alternator:
- Rotor: The rotating part of the alternator, which includes the field windings that create a magnetic field.
- Stator: The stationary part of the alternator, containing the windings that generate the AC voltage.
- Rectifier (Diode Bridge): This converts the AC voltage produced by the stator into DC voltage, which your car's electrical system needs. Diodes are one-way valves for electricity.
- Voltage Regulator: This controls the amount of voltage the alternator produces, preventing overcharging of the battery.
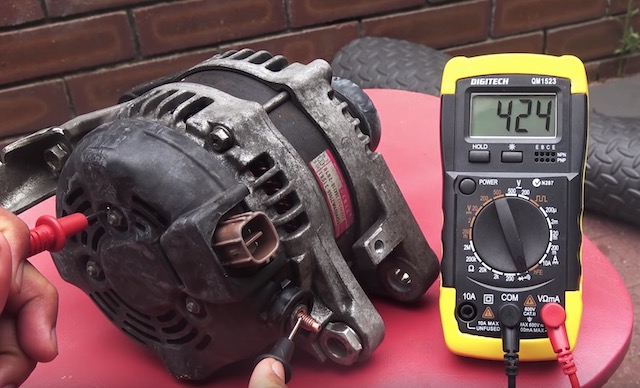
- Brushes: These make electrical contact with the rotor's slip rings, allowing current to flow to the field windings. Brushes wear over time.
- Pulley: Driven by the engine's serpentine belt, this spins the rotor.
How It Works
The alternator works on the principle of electromagnetic induction. Here's a simplified explanation:
- The engine turns the alternator's pulley via the serpentine belt.
- The rotating rotor creates a magnetic field.
- This magnetic field induces an alternating current (AC) in the stator windings.
- The rectifier (diode bridge) converts the AC voltage into DC voltage.
- The voltage regulator controls the output voltage to maintain a steady charge for the battery and power the car's electrical systems.
Think of it like this: the engine provides the mechanical energy, the rotor and stator convert it to electrical energy, and the rectifier and regulator make it usable for your car.
Real-World Use – Basic Troubleshooting Tips
Here's how you can troubleshoot your alternator. These steps assume you have a basic understanding of using a multimeter.
- Visual Inspection: Start with a visual check. Look for loose wires, corroded terminals, a slipping or damaged serpentine belt, and any signs of physical damage to the alternator itself. A burning smell can indicate a short circuit or overheating.
- Battery Voltage Test (Engine Off): Use a multimeter to check the battery voltage with the engine off. A fully charged battery should read around 12.6 volts. A reading below 12 volts indicates a discharged battery, which could be caused by a faulty alternator or another electrical drain.
- Alternator Voltage Test (Engine Running): Start the engine and let it idle. With the multimeter still connected to the battery terminals, check the voltage. A healthy alternator should produce between 13.5 and 14.8 volts. If the voltage is significantly lower (e.g., below 13 volts) or higher (e.g., above 15 volts), the alternator is likely faulty.
- Load Test: Turn on the headlights, air conditioning, and other electrical accessories. The voltage should remain within the 13.5-14.8 volt range. A significant drop in voltage under load indicates that the alternator is not producing enough current.
- Diode Ripple Test (AC Voltage Test): Set your multimeter to AC voltage (VAC). With the engine running, measure the AC voltage at the battery terminals. A reading above 0.5 VAC indicates a faulty diode in the rectifier. This test confirms that the alternator is converting AC to DC poorly.
Example Scenario: Your headlights are dimming, and the battery keeps dying. You perform the battery voltage test (engine off) and get 11.8 volts. After starting the car and doing the alternator voltage test (engine running), you only get 12.9 volts. This indicates the alternator isn't charging properly and needs further investigation or replacement. Following the load test by turning on headlights and A/C you see a voltage drop to 12.0V. This clearly shows your alternator is not operating correctly.
Safety
Working on your car's electrical system can be dangerous if you're not careful. Here are some key safety precautions:
- Disconnect the Battery: Always disconnect the negative (-) battery cable before working on any electrical components. This prevents accidental short circuits and electrical shocks.
- Avoid Contact with Moving Parts: Keep your hands, clothing, and tools away from the serpentine belt and other moving parts while the engine is running.
- Wear Safety Glasses: Protect your eyes from debris and battery acid.
- Work in a Well-Ventilated Area: Batteries can produce explosive hydrogen gas, so work in a well-ventilated area.
- Be Aware of the Charging System's High Voltage: The alternator can produce significant voltage. Although it's DC voltage, it can still give you a shock. Make sure you know where your hands are and use insulated tools.
Crucially, be extra careful when working around the battery and alternator connections. These components carry high currents and can cause serious burns or even explosions if short-circuited.
Caveats and Further Diagnostics
It's important to note that these tests provide a general indication of alternator health. A failing alternator can exhibit intermittent problems that may not be immediately apparent. Sometimes, the problem lies elsewhere in the charging system, such as a faulty voltage regulator or a bad connection. Also the problem may exist external to the charging system. A parasitic draw could cause the battery to go flat which might lead you to falsely suspect that the alternator is at fault. Further diagnostics may require specialized equipment, such as an oscilloscope, to analyze the alternator's waveform. If you're unsure about any of these tests, it's always best to consult with a qualified mechanic.
Download the Diagram
A visual aid can be incredibly helpful. We have a detailed schematic diagram illustrating the components and wiring of a typical automotive charging system. This diagram will further clarify the connections and relationships between the alternator, battery, and other electrical components. You can download it here (replace # with the actual link). We are sure that with the download, this guide will help you fully understand and be able to quickly and easily check your alternator.