How To Check Brake Pad Thickness
Maintaining your vehicle's braking system is paramount for safety. One of the most crucial aspects of brake maintenance is regularly checking the thickness of your brake pads. Worn brake pads can significantly reduce braking performance and, if neglected, lead to costly damage to other brake components. This guide provides an in-depth look at how to assess brake pad thickness, offering insights that will be valuable for experienced DIYers.
Purpose of Checking Brake Pad Thickness
Checking brake pad thickness serves several vital purposes:
- Safety: Thin brake pads compromise your vehicle's stopping power, increasing stopping distances and the risk of accidents.
- Preventing Rotor Damage: When brake pads wear down completely, the metal backing plate can come into direct contact with the brake rotor. This will result in scoring and damage to the rotor which leads to costly repairs/replacement.
- Optimizing Brake Performance: Maintaining adequate brake pad thickness ensures consistent and reliable braking performance.
- Scheduled Maintenance: Regularly checking your brake pads as part of your routine maintenance schedule helps you anticipate and plan for necessary replacements, preventing unexpected brake failures.
Key Specs and Main Parts of a Disc Brake System
To effectively check brake pad thickness, it's essential to understand the key components of a disc brake system and their specifications. Here's a breakdown:
Main Parts:
- Brake Pad: A friction material bonded to a metal backing plate. This material presses against the rotor to slow the vehicle.
- Brake Rotor (Disc): A rotating metal disc attached to the wheel hub. The brake pads grip the rotor to generate friction and slow the vehicle.
- Caliper: Houses the brake pads and pistons. It uses hydraulic pressure to press the brake pads against the rotor.
- Piston: A cylindrical component within the caliper that pushes the brake pads against the rotor.
- Brake Lines: Hoses that carry hydraulic fluid from the master cylinder to the calipers.
- Brake Fluid: A hydraulic fluid that transmits pressure from the master cylinder to the calipers.
Key Specifications:
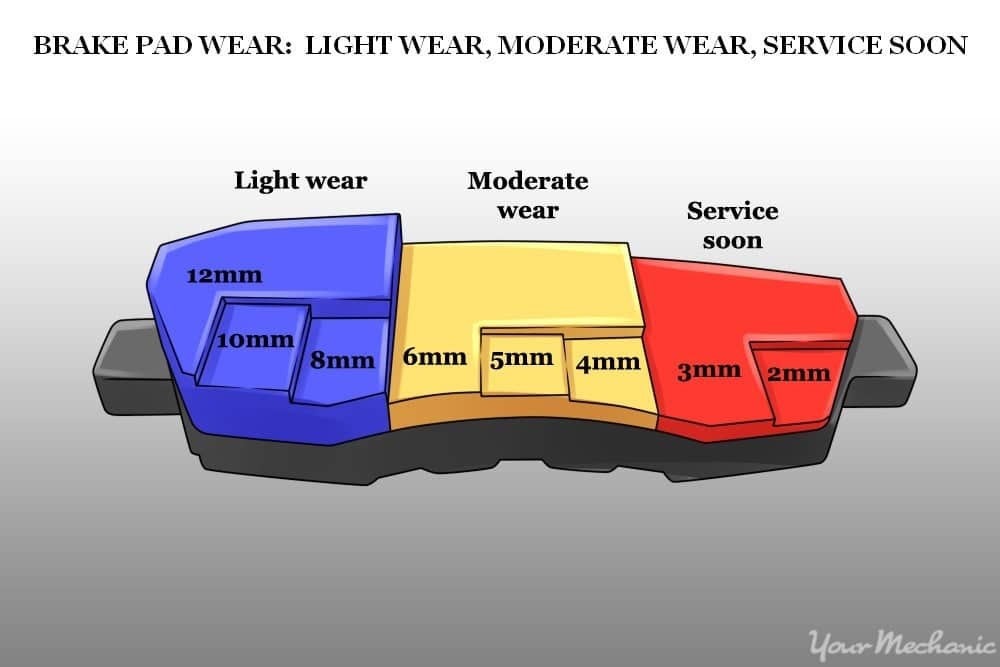
- Minimum Brake Pad Thickness: This is the thinnest a brake pad can be before it needs replacement. The recommended minimum thickness is typically 2-3 mm (or about 1/8 inch). Always consult your vehicle's service manual for the manufacturer's specific recommendation.
- Brake Rotor Thickness: Rotors also have a minimum thickness specification. Excessive wear thins the rotor and reduces its ability to dissipate heat, potentially leading to brake fade.
- Friction Material: The material that makes up the brake pad. There are different types with different friction characteristics (e.g., organic, semi-metallic, ceramic).
How Brake Pad Thickness is Measured
Brake pad thickness is typically measured in millimeters (mm) or inches. You're measuring the thickness of the friction material itself, not including the metal backing plate.
How It Works: Checking Brake Pad Thickness
There are several methods for checking brake pad thickness. Here are the most common approaches:
1. Visual Inspection (Without Wheel Removal):
This is the simplest method, but it might not provide the most accurate measurement. Locate the brake caliper behind the wheel. In many cases, you can see the outer brake pad through the wheel spokes. Estimate the thickness of the friction material. If it appears thin (close to the backing plate or around 3mm), it's time for a more accurate measurement and likely a replacement.
Limitations: Visibility can be obstructed by the wheel design or other components. It's difficult to accurately assess the inner brake pad's thickness with this method.
2. Visual Inspection (With Wheel Removal):
This method provides a clearer view and more accurate assessment.
- Safety First: Loosen the lug nuts on the wheel. Jack up the vehicle safely, using jack stands for support. Never work under a vehicle supported only by a jack.
- Remove the Wheel: Fully unscrew the lug nuts and remove the wheel.
- Inspect the Brake Pads: With the wheel removed, you have a clear view of the brake caliper and pads. Examine both the inner and outer pads.
- Measure the Thickness: Use a ruler or a dedicated brake pad thickness gauge to measure the amount of friction material remaining on each pad. Measure at the thinnest point.
3. Using a Brake Pad Thickness Gauge:
This is the most accurate method. A brake pad thickness gauge is a specialized tool designed to measure the remaining friction material without disassembling the brakes. There are two main types:
- Mechanical Gauge: These gauges typically have a series of stepped blades or prongs with different thicknesses marked on them. You insert the blades between the backing plate and the rotor until you find the blade that fits snugly. The corresponding measurement on the gauge indicates the pad thickness.
- Digital Gauge: Digital gauges provide a direct numerical readout of the brake pad thickness. They are easy to use and offer accurate measurements.
How to Use a Brake Pad Thickness Gauge:
- Access the Brake Pads: Remove the wheel as described in the previous method (Visual Inspection with Wheel Removal).
- Position the Gauge: Place the measuring end of the gauge perpendicular to the brake pad surface, ensuring it makes contact with both the backing plate and the rotor.
- Take the Measurement: Read the measurement indicated on the gauge.
- Compare to Specifications: Compare the measured thickness to the manufacturer's recommended minimum thickness. If the pad is at or below the minimum, it needs replacement.
Real-World Use: Troubleshooting Tips
- Uneven Wear: If you notice that one brake pad is significantly thinner than the other on the same axle, it could indicate a problem with the caliper, such as a sticking piston.
- Squealing Brakes: Squealing brakes can be a sign of worn brake pads or contaminated rotors. However, some brake pads are designed to squeal slightly as they near their wear limit.
- Grinding Noises: Grinding noises are a serious warning sign. It usually means the brake pads are completely worn and the metal backing plate is rubbing against the rotor. This requires immediate attention to prevent further damage.
- Pulsating Brakes: Pulsating brakes can indicate warped rotors.
- Soft Brake Pedal: A spongy or soft brake pedal can be caused by air in the brake lines or a failing master cylinder.
Safety Considerations
Working on brake systems involves inherent risks. Here are some key safety precautions:
- Hydraulic Fluid: Brake fluid is corrosive and can damage painted surfaces. Clean up spills immediately. Avoid getting brake fluid on your skin or in your eyes.
- Jack Stands: Always use jack stands to support the vehicle when working underneath it. Never rely solely on a jack.
- Proper Tools: Use the correct tools for the job to avoid damaging components.
- Contamination: Keep brake components clean. Contamination from grease or oil can reduce braking performance.
- Brake Dust: Brake dust can contain hazardous materials. Wear a dust mask when working on brakes to avoid inhaling it.
- Brake System Integrity: After any brake work, bleed the brakes to remove air from the system and ensure proper pedal feel.
Remember, if you are not comfortable performing brake work yourself, it's always best to consult a qualified mechanic. Improperly installed brakes can be extremely dangerous.
We hope this detailed guide helps you confidently assess your brake pad thickness and maintain your vehicle's braking system. We have a helpful brake system diagram available for download. It illustrates the various components and their relationships, providing a valuable visual reference for your work. Understanding your car's brake system is empowering and contributes significantly to road safety.