How To Check Brake Pads On Car
Brake pads are a critical safety component in your vehicle's braking system. Regularly inspecting them is essential for maintaining safe driving conditions and preventing costly repairs down the line. This article will guide you through the process of checking your brake pads, offering an expert's perspective while remaining approachable for the experienced DIY enthusiast.
Purpose of Brake Pad Inspection
Regular brake pad inspections serve several crucial purposes:
- Safety: Ensuring sufficient brake pad thickness is paramount for effective braking and preventing accidents. Thin or worn pads significantly reduce braking performance.
- Preventative Maintenance: Early detection of wear allows for timely replacement, preventing damage to rotors (or drums) and calipers. Replacing pads is significantly cheaper than replacing these other components.
- Cost Savings: Addressing minor issues early prevents them from escalating into major, expensive repairs. Neglecting brake pads can lead to rotor damage, caliper damage, and even brake fluid leaks.
- Performance: Maintaining optimal brake pad condition ensures consistent and reliable braking performance, especially important for high-performance driving or towing.
Key Specs and Main Parts
Understanding the components of your braking system is crucial for effective inspection. The main parts involved in checking brake pads are:
- Brake Pads: Friction material pressed against the rotor to slow the vehicle. Composed of a friction material bonded to a metal backing plate. The friction material is what wears down over time.
- Rotor (or Disc): A rotating metal disc connected to the wheel hub. The brake pads clamp against the rotor to create friction.
- Caliper: The housing that contains the brake pads and pistons. The caliper pistons push the brake pads against the rotor.
- Brake Lines: Hydraulic lines that carry brake fluid from the master cylinder to the calipers.
- Brake Fluid Reservoir: Holds the brake fluid and allows for topping off as needed.
Key Specs:
- Minimum Pad Thickness: Typically, the minimum safe brake pad thickness is 2-3mm (0.08-0.12 inches). This is often indicated by a wear indicator or a metal tab that screeches when the pad reaches its wear limit. However, always consult your vehicle's service manual for the specific recommended minimum thickness.
- Rotor Thickness: Rotors also have a minimum thickness specification. Using a micrometer to measure rotor thickness is important to ensure the rotors are within the safe operating range. This information is often stamped on the rotor itself.
How To Inspect Your Brake Pads
There are two primary methods for checking your brake pads: visual inspection through the wheel and removal of the wheel for a more thorough inspection.
Visual Inspection Through the Wheel
- Safety First: Park the vehicle on a level surface, engage the parking brake, and chock the rear wheels for added safety.
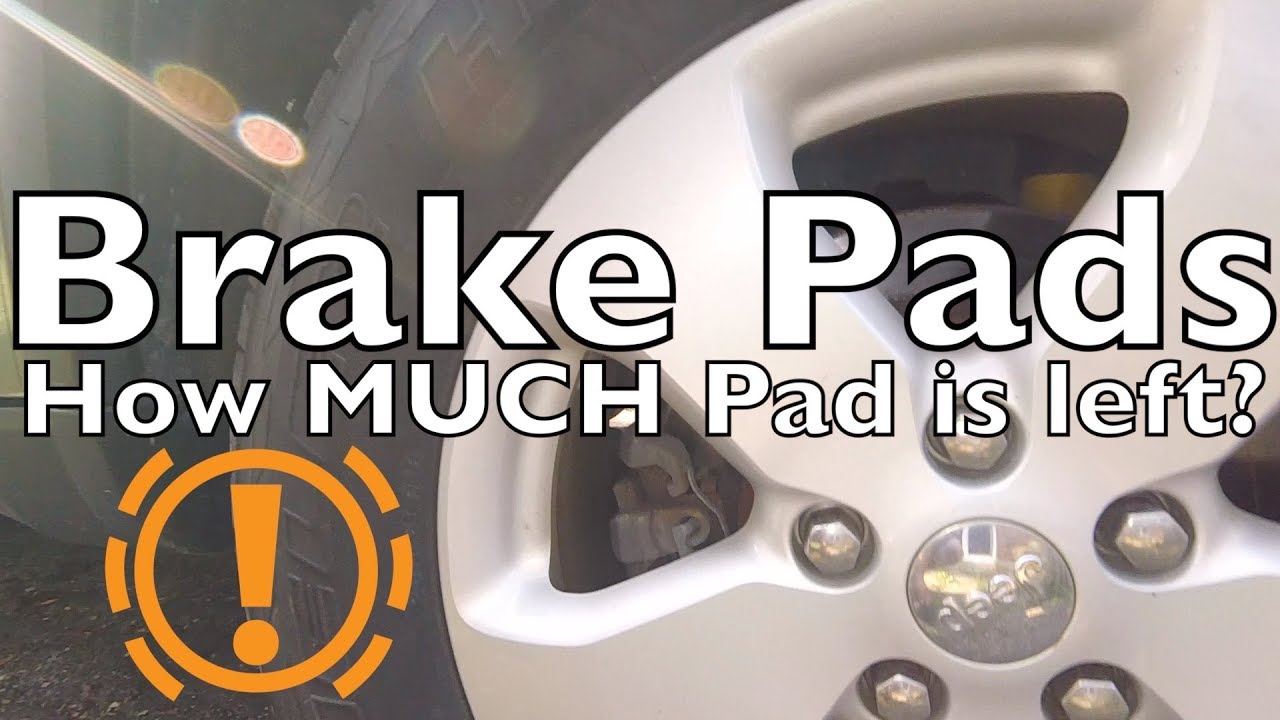
- Locate the Caliper: Identify the brake caliper behind the wheel. Depending on the wheel design, you might be able to see the brake pads directly.
- Visual Assessment: Look for the amount of visible brake pad material between the backing plate and the rotor. If you can see less than 3mm of material, it's time for replacement.
- Check Wear Indicators: Many brake pads have a wear indicator, a small metal tab that rubs against the rotor when the pad is worn down, producing a squealing sound. If you hear this noise while braking, your pads likely need replacing.
Wheel Removal for Thorough Inspection
- Safety First: As above, park on a level surface, engage the parking brake, and chock the rear wheels. Loosen the lug nuts on the wheel you'll be removing.
- Lift the Vehicle: Use a jack to lift the vehicle and securely support it with jack stands. Never work under a vehicle supported only by a jack.
- Remove the Wheel: Remove the lug nuts completely and take off the wheel.
- Inspect the Pads: Now you have a clear view of the brake pads. Measure the pad thickness with a ruler or caliper (the measuring tool). Pay close attention to the amount of friction material remaining.
- Inspect the Rotors: While the wheel is off, inspect the rotor surface for signs of damage such as scoring, cracks, or excessive rust.
- Caliper Inspection: Check for any signs of brake fluid leaks around the caliper and brake lines. A leak indicates a serious problem requiring immediate attention.
How It Works
The braking system operates on a simple principle: converting kinetic energy into heat through friction. When you press the brake pedal, the master cylinder pressurizes brake fluid. This fluid travels through brake lines to the calipers at each wheel. The calipers then force the brake pads against the rotors, creating friction and slowing the vehicle.
As the brake pads wear, the distance the caliper piston needs to travel to engage the pads increases. Eventually, the pads become too thin, and the braking performance degrades. Continued use of worn pads can damage the rotors, requiring their replacement as well.
Real-World Use – Basic Troubleshooting Tips
- Squealing Brakes: Often indicates worn brake pads or the presence of a wear indicator contacting the rotor. It can also be caused by debris caught between the pad and rotor.
- Grinding Brakes: Suggests that the brake pads are completely worn down, and the metal backing plate is rubbing against the rotor. This requires immediate attention to avoid rotor damage.
- Pulsating Brakes: Can indicate warped rotors. This can often be felt in the brake pedal and steering wheel during braking.
- Spongy Brake Pedal: Often caused by air in the brake lines. Bleeding the brakes can resolve this issue.
- Uneven Brake Wear: Can indicate a problem with the caliper, such as a stuck piston. This requires caliper inspection and potentially rebuilding or replacement.
Safety – Highlight Risky Components
Working on brakes involves several potential safety hazards:
- Brake Dust: Brake dust can contain asbestos (especially in older vehicles) and is harmful if inhaled. Wear a dust mask or respirator when working on brakes and clean components with a brake cleaner specifically designed to minimize dust.
- Brake Fluid: Brake fluid is corrosive and can damage paint and skin. Wear gloves and eye protection when handling brake fluid. Clean up any spills immediately.
- Suspension Components: Be aware of other suspension components when working on brakes. Improperly disconnecting or handling these components can be dangerous.
- High Temperatures: After driving, brake components can be extremely hot. Allow them to cool down before working on them to avoid burns.
- Jack Stands: Never work under a vehicle supported only by a jack. Always use jack stands to securely support the vehicle. A jack failure can result in serious injury or death.
It's crucial to remember that the braking system is a critical safety component. If you are not comfortable performing brake repairs yourself, it's best to consult a qualified mechanic.
We have a detailed diagram available for download that illustrates the braking system components and wear points discussed in this article. It's a valuable resource for visual learners and can help you better understand the anatomy of your vehicle's braking system.