How To Check Coil Pack With Multimeter
Diagnosing ignition problems can be a frustrating experience, often leading to misfires, rough idling, and a noticeable drop in engine performance. One of the key components in modern ignition systems is the coil pack. Knowing how to properly test a coil pack with a multimeter is a valuable skill that can save you time and money by allowing you to pinpoint the source of the issue quickly. This article will guide you through the process, providing a clear understanding of how coil packs work and how to effectively use a multimeter to diagnose potential problems.
The Ignition System: A Quick Overview
Before diving into the testing procedure, let's briefly review the workings of a typical ignition system. In a gasoline engine, air and fuel are mixed, compressed, and then ignited to produce power. This ignition is initiated by a spark plug, which requires a high-voltage electrical pulse to create the spark. The coil pack's primary function is to transform the relatively low voltage from the car's battery (typically 12V) into the high voltage (often 20,000 - 40,000 volts) needed to fire the spark plug.
Older vehicles used a distributor-based system with a single ignition coil. Modern cars often employ a coil-on-plug (COP) or coil-near-plug system. In a COP system, each cylinder has its own dedicated coil pack that sits directly on top of the spark plug. In a coil-near-plug system, the coil pack is located close to the spark plug, often with a short spark plug wire connecting them. This arrangement enhances ignition timing accuracy and overall efficiency, reducing the chance of ignition loss.
How a Coil Pack Works: A Technical Breakdown
A coil pack is essentially a type of transformer. Inside the coil pack, you'll find two sets of wire windings: the primary winding and the secondary winding. The primary winding consists of a relatively small number of turns of thick wire, while the secondary winding contains a significantly larger number of turns of thin wire.
Here's a simplified explanation of the process:
- The Ignition Control Module (ICM) or Powertrain Control Module (PCM): The ICM or PCM sends a signal to the coil pack, causing the primary circuit to be energized. This allows current to flow through the primary winding.
- Magnetic Field Generation: As current flows through the primary winding, it creates a magnetic field around the coil.
- Circuit Interruption: The ICM or PCM then rapidly interrupts the current flow in the primary circuit. This rapid change in current causes the magnetic field to collapse.
- Voltage Induction: As the magnetic field collapses, it cuts across the secondary winding. Due to the significantly larger number of turns in the secondary winding, a much higher voltage is induced (based on the principle of electromagnetic induction). The voltage step-up ratio is directly proportional to the ratio of turns in the secondary and primary windings.
- Spark Plug Firing: This high voltage is then sent to the spark plug, creating a spark that ignites the air-fuel mixture in the cylinder.
The speed at which the current in the primary circuit is switched on and off is crucial for efficient voltage transformation. This switching is controlled by the ICM or PCM based on engine timing and sensor inputs.
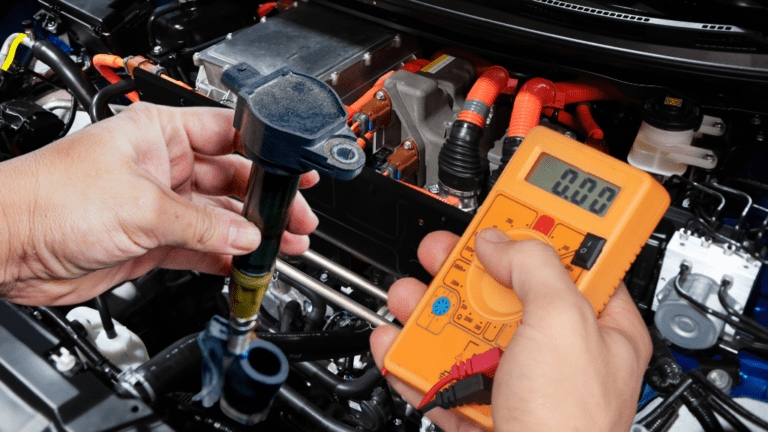
Testing the Coil Pack with a Multimeter: The Step-by-Step Guide
Using a multimeter, also known as a volt-ohm meter (VOM), you can test several aspects of the coil pack to determine its condition. You'll primarily be measuring resistance (in ohms, represented by the Ω symbol) to check for continuity and shorts.
Before You Start: Safety First
- Disconnect the Negative Battery Terminal: This is the most important step! Always disconnect the negative (-) battery terminal before working on any electrical component. This prevents accidental shorts and potential electrical shock.
- Refer to Your Vehicle's Service Manual: Your vehicle's service manual is your best resource for specific testing procedures and resistance values for your particular coil pack. These values can vary between makes and models.
- Wear Safety Glasses: Protect your eyes from potential debris.
Step-by-Step Testing Procedure
- Gather Your Tools: You'll need a multimeter, your vehicle's service manual, and potentially some small screwdrivers or pliers to disconnect the coil pack connectors.
- Set the Multimeter: Set your multimeter to measure resistance (Ω). Start with a relatively low range (e.g., 200 Ω) and increase it if necessary. Some multimeters have an "auto-ranging" feature, which automatically selects the appropriate range.
- Test the Primary Winding Resistance: Locate the primary terminals on the coil pack. These are usually the terminals that connect to the ICM or PCM wiring harness. Place the multimeter probes on these terminals. The resistance should be very low, typically less than 1 ohm (often 0.3 - 1.0 ohm). A reading of zero ohms indicates a short circuit, while a reading of infinity (or "OL" on some meters) indicates an open circuit. Both indicate a faulty primary winding.
- Test the Secondary Winding Resistance: Remove the spark plug from the cylinder associated with the coil pack (if you're testing a COP coil). Connect one multimeter probe to one of the primary terminals and the other probe to the spark plug terminal (the terminal that connects to the spark plug). Consult your service manual for the expected resistance range, which is usually in the thousands of ohms (e.g., 6,000 - 15,000 ohms). Again, a reading of zero ohms indicates a short, and infinity indicates an open circuit. Note: Some coil packs may have slightly different terminal configurations, so always refer to your vehicle's specific service manual.
- Test for Ground Short (Coil Pack to Ground): This test checks if there is an unwanted electrical path between the coil pack windings and the coil pack housing (ground). This can cause misfires or other electrical issues. Set your multimeter to a high resistance range (e.g., 2 MΩ). Connect one probe to one of the primary terminals and the other probe to the coil pack's metal housing. The resistance should be very high (ideally infinity). A low resistance reading indicates a short to ground, meaning the insulation on the windings has failed. Repeat this test with the secondary terminal.
Interpreting the Results
Here's a summary of how to interpret your multimeter readings:
- Normal Resistance: If the measured resistance is within the range specified in your vehicle's service manual, the coil pack is likely functioning correctly.
- Open Circuit (Infinite Resistance): Indicates a broken wire or a failed winding within the coil pack. The coil pack needs to be replaced.
- Short Circuit (Zero Resistance): Indicates that the wires within the coil pack are touching each other, bypassing the intended electrical path. This can cause excessive current draw and damage to the coil pack or other components. The coil pack needs to be replaced.
- Short to Ground (Low Resistance to Ground): Indicates that the coil pack windings are making contact with the coil pack housing, creating an unintended path to ground. This can cause weak spark or no spark. The coil pack needs to be replaced.
- Resistance Out of Range: Even if the resistance isn't exactly zero or infinite, a reading significantly outside the specified range suggests a degraded coil pack that is likely to fail soon. Consider replacing the coil pack.
Common Coil Pack Issues and Maintenance Concerns
Coil packs are exposed to high temperatures and electrical stress, which can lead to various failures over time.
- Cracked or Damaged Housings: Heat and vibration can cause the plastic housing to crack, allowing moisture and contaminants to enter the coil pack, leading to shorts or corrosion.
- Worn or Corroded Connectors: The electrical connectors can become corroded or damaged, resulting in poor electrical contact and intermittent misfires.
- Insulation Breakdown: The insulation around the windings can break down due to heat and electrical stress, leading to short circuits or arcing.
- Overheating: Excessive heat can damage the coil pack and shorten its lifespan. This can be caused by engine overheating, improper spark plugs, or other engine problems.
Regular maintenance can help prevent coil pack failures. This includes:
- Replacing Spark Plugs Regularly: Worn spark plugs require more voltage to fire, putting extra stress on the coil pack. Follow your vehicle's recommended spark plug replacement interval.
- Checking for Loose Connectors: Ensure that the electrical connectors are securely attached to the coil pack.
- Inspecting for Cracks and Damage: Regularly inspect the coil pack for any signs of cracks, damage, or corrosion.
- Addressing Engine Issues Promptly: Addressing engine overheating or other engine problems promptly can prevent damage to the coil pack.
Do's and Don'ts / Best Practices
Do's
- DO refer to your vehicle's service manual for specific testing procedures and resistance values.
- DO disconnect the negative battery terminal before working on the electrical system.
- DO use a high-quality multimeter for accurate readings.
- DO carefully inspect the coil pack for any signs of physical damage.
- DO replace coil packs in pairs or as a set, especially if one has failed. This can help prevent future problems.
Don'ts
- DON'T touch the coil pack terminals while the engine is running. This can result in a severe electrical shock.
- DON'T assume that a coil pack is good just because it passes a basic resistance test. Other factors, such as insulation breakdown, can still cause problems.
- DON'T use excessive force when disconnecting or connecting electrical connectors.
- DON'T ignore warning signs such as misfires, rough idling, or poor fuel economy. These could be signs of a failing coil pack.
Conclusion
Testing coil packs with a multimeter is a valuable skill that can help you diagnose ignition problems and save money on repairs. By understanding how coil packs work, following the proper testing procedures, and interpreting the results correctly, you can effectively troubleshoot ignition issues and keep your engine running smoothly. Remember to always prioritize safety by disconnecting the battery and consulting your vehicle's service manual. If you are not comfortable performing these tests yourself, it's always best to consult a qualified mechanic. However, with a little knowledge and the right tools, you can confidently tackle this common automotive repair.