How To Check For Bad Struts
So, you're thinking your struts might be on their way out? Good call checking. Worn struts can negatively impact handling, braking, and even tire wear. We're going to walk through a comprehensive guide on how to diagnose bad struts, focusing on visual inspections, road tests, and even understanding the internal workings. Consider this your advanced DIY strut inspection 101.
Why Check Your Struts?
Before we dive into the specifics, let's clarify the purpose of this inspection. Identifying failing struts early can save you money in the long run. Neglecting worn struts can lead to uneven tire wear, reduced braking effectiveness (especially in emergency situations), and compromised vehicle stability. This guide empowers you to diagnose the problem yourself, saving on potentially unnecessary mechanic bills and allowing you to make informed decisions about your vehicle's suspension.
A thorough strut inspection, combined with understanding how they function, provides a clear picture of your vehicle’s suspension health. It also gives you the knowledge to discuss any needed repairs intelligently with a mechanic, ensuring you're getting the right service at the right price.
Key Specs and Main Parts
Let's break down the anatomy of a strut and some key specifications to keep in mind.
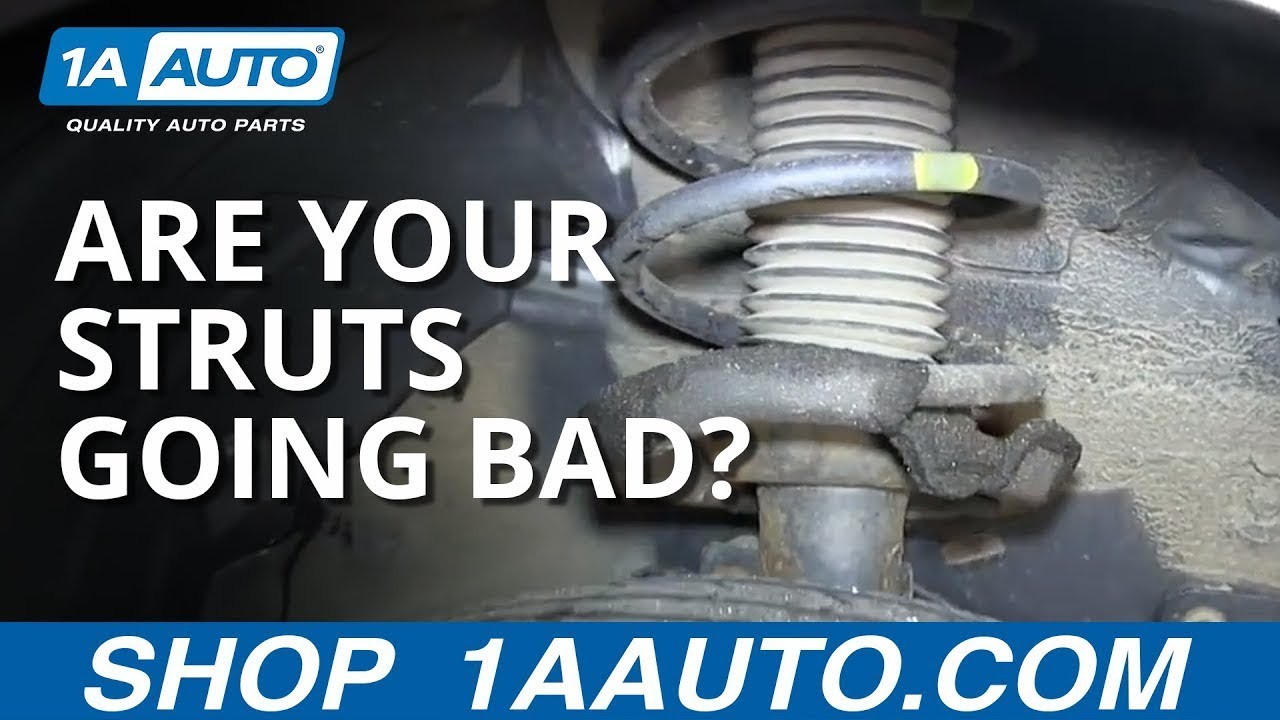
Strut Components:
- Strut Body: This is the main structural component, typically a steel cylinder.
- Piston Rod: A polished rod that extends and retracts into the strut body. It's connected to the vehicle's suspension knuckle.
- Piston: Located inside the strut body, the piston moves through hydraulic fluid, providing damping.
- Hydraulic Fluid: Fills the strut body, providing resistance to the piston's movement.
- Seals: Prevent hydraulic fluid leakage.
- Strut Mount: Connects the strut assembly to the vehicle's chassis. Often includes a bearing for smooth steering.
- Coil Spring: Encircles the strut body and supports the vehicle's weight. Note: some vehicles use leaf springs or torsion bars instead of coil springs.
- Bump Stop: Prevents the suspension from bottoming out, protecting the strut from damage.
- Dust Boot: Protects the piston rod and seal from debris and contaminants.
Key Specifications to Consider:
While you might not be rebuilding your struts yourself (unless you're a truly advanced DIYer), understanding these specs can help you interpret diagnostic information and choose replacement parts.
- Strut Length: The overall length of the strut assembly.
- Stroke Length: The distance the piston rod can travel.
- Damping Force (Compression & Rebound): The resistance the strut provides to compression and extension. This is often expressed in Newtons (N).
- Spring Rate: The amount of force required to compress the coil spring a certain distance (e.g., lbs/inch or N/mm).
How It Works
The primary function of a strut is to control spring oscillations and maintain tire contact with the road. When the vehicle encounters a bump, the coil spring compresses, absorbing the impact. Without a strut, the spring would continue to bounce up and down excessively, leading to a bumpy ride and loss of control.
The strut dampens this oscillation by forcing hydraulic fluid through small orifices within the piston. The resistance to this flow converts kinetic energy (the spring's movement) into heat, which is dissipated by the strut body. This controlled damping prevents the spring from bouncing excessively, resulting in a smoother, more stable ride and improved handling. The damping force differs between compression (when the wheel moves upwards) and rebound (when the wheel moves downwards), optimizing ride and handling characteristics.
Real-World Use: Troubleshooting & Inspection
Here's how to put this knowledge into practice.
Visual Inspection:
- Oil Leaks: This is a major red flag. Look for signs of oil leaking down the strut body. A small amount of weeping might be normal on older struts, but a steady drip or visible pooling of oil indicates a failed seal and a need for replacement.
- Damage to the Strut Body: Inspect for dents, bends, or corrosion. Any structural damage can compromise the strut's integrity.
- Dust Boot Condition: Check for cracks, tears, or missing dust boots. A damaged dust boot allows debris to contaminate the piston rod and seal, accelerating wear.
- Strut Mount Condition: Look for cracks, tears, or excessive movement in the strut mount bushing. A worn mount can cause clunking noises and affect steering precision.
- Coil Spring Condition: Inspect the coil spring for cracks, breaks, or excessive rust. A broken coil spring is a serious safety hazard.
- Bump Stop Condition: The bump stop should be intact and in good condition. Deteriorated or missing bump stops allow the suspension to bottom out, damaging the strut.
Road Test:
- Bounce Test: Push down firmly on each corner of the vehicle above the wheel. Release and observe how many times the vehicle bounces. A healthy suspension should rebound once and then settle. Excessive bouncing (more than twice) indicates weak damping.
- Ride Quality: Pay attention to the ride quality. Is it excessively bumpy, bouncy, or harsh? Do you feel every bump in the road? These are signs of worn struts.
- Handling: Does the vehicle feel unstable or "floaty" when cornering? Does it lean excessively in turns? Worn struts can negatively affect handling and make the vehicle feel less responsive.
- Braking: Under heavy braking, does the vehicle nose dive excessively? Worn struts can contribute to nose dive and increase braking distance.
- Noise: Listen for clunking, rattling, or squeaking noises coming from the suspension. These noises can indicate worn struts, strut mounts, or other suspension components.
- Tire Wear: Inspect your tires for uneven wear patterns. Cupping (scalloped wear around the tire's circumference) is often a sign of worn struts.
Advanced Diagnostics (If Equipped):
Some vehicles, particularly those with electronic suspension systems, may provide diagnostic trouble codes (DTCs) related to the struts. Use an OBD-II scanner to check for any such codes. Consult your vehicle's service manual for information on interpreting these codes.
Safety Considerations
Working with suspension components can be dangerous. Coil springs are under tremendous pressure and can cause serious injury or death if mishandled. Never attempt to disassemble a strut assembly without the proper spring compressors. If you are not comfortable working with coil springs, it is best to leave strut replacement to a qualified mechanic. Also, always wear safety glasses when working on suspension components to protect your eyes from flying debris.
Additionally, be aware of the potential for stored energy in the suspension system. Even after the vehicle is lifted, components may be under tension. Take care when loosening bolts and nuts to avoid sudden releases of energy.
When lifting the vehicle, use jack stands to support the weight. Never work under a vehicle supported only by a jack.
Conclusion
By following these steps, you can effectively diagnose the condition of your struts and make informed decisions about their replacement. Remember to prioritize safety and consult a qualified mechanic if you are unsure about any aspect of the inspection or repair process.
We have a detailed diagram outlining all the components mentioned in this article, along with their corresponding functions and potential failure points. You can download it and use it as a reference guide during your inspection.