How To Check For Leaking Fuel Injectors
Fuel injectors, the unsung heroes of your engine, are responsible for precisely delivering fuel into the combustion chamber. When they work flawlessly, your engine runs smoothly, efficiently, and with optimal power. However, when they leak, the consequences can range from poor fuel economy to serious engine damage. This article will guide you through the process of diagnosing leaking fuel injectors, providing you with the knowledge and techniques necessary to tackle this problem yourself. We'll cover the technical aspects, common pitfalls, and best practices to ensure accurate diagnosis and prevent further complications.
Background: The Engine's Fuel Injection System
Before diving into the diagnosis, it's crucial to understand the basics of the fuel injection system. Modern gasoline engines predominantly use electronically controlled fuel injection. A fuel pump, typically located in the fuel tank, delivers fuel under pressure to the fuel rail. The fuel rail is a manifold that distributes fuel to each individual injector. The Engine Control Unit (ECU) precisely controls the opening and closing of each injector, based on various sensor inputs like engine speed (RPM), throttle position, manifold absolute pressure (MAP), and oxygen sensor readings. This precise control ensures the correct air-fuel mixture for optimal combustion.
There are primarily two types of fuel injection systems: port fuel injection (PFI) and direct injection. In PFI, injectors spray fuel into the intake port, just upstream of the intake valve. This allows for some mixing of fuel and air before entering the cylinder. Direct injection, also known as Gasoline Direct Injection (GDI), injects fuel directly into the combustion chamber, allowing for even greater control over the combustion process and enabling higher compression ratios for improved efficiency.
Technical Breakdown: How Fuel Injectors Work
A fuel injector is essentially a sophisticated solenoid valve. When the ECU sends an electrical signal, the solenoid energizes, lifting a needle valve off its seat. This allows fuel to flow through a precisely designed nozzle, creating a fine spray or mist. The duration the injector is open is called the pulse width, and the ECU precisely controls this pulse width to deliver the correct amount of fuel. When the electrical signal is removed, the solenoid de-energizes, a spring pushes the needle valve back onto its seat, and fuel flow stops. A healthy injector seals tightly, preventing any fuel leakage when closed.
Leaking fuel injectors occur when the needle valve doesn't seat properly, allowing fuel to seep or drip into the cylinder even when the injector is supposed to be closed. This can be caused by dirt, debris, corrosion, or wear and tear on the injector's internal components.
Diagnosing Leaking Fuel Injectors: Step-by-Step
Several methods can be used to diagnose leaking fuel injectors, ranging from simple visual inspections to more sophisticated pressure testing. Here's a breakdown of common techniques:
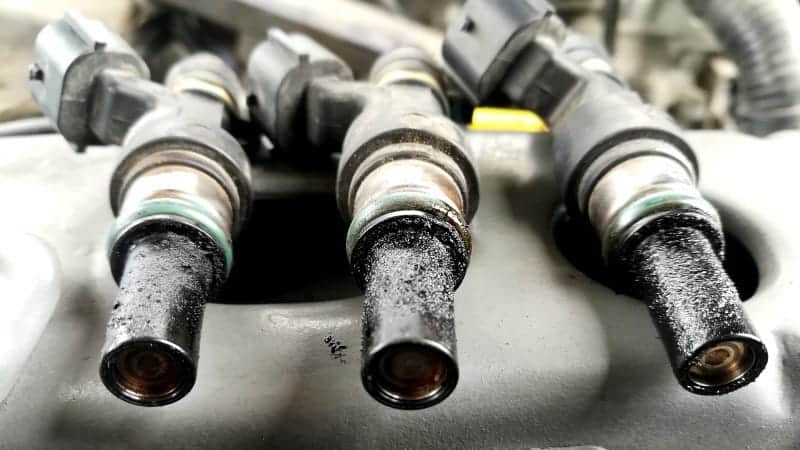
1. Visual Inspection (with precautions!)
WARNING: Fuel is highly flammable. Work in a well-ventilated area, disconnect the negative battery terminal, and have a fire extinguisher nearby. Never smoke or use open flames when working with fuel systems.
Procedure: Carefully inspect the fuel rail and injectors for any signs of fuel leakage. Look for wet spots, fuel odors, or residue around the injector body and fuel line connections. This is easier to do with port fuel injection since the injectors are more accessible. For direct injection, the injectors are located under the intake manifold, making visual inspection more difficult.
Limitations: Visual inspection may only reveal significant leaks. Minor leaks might be difficult to detect, especially if the fuel evaporates quickly. Also, access to the fuel injectors can be limited depending on the engine design.
2. Fuel Pressure Leak-Down Test
This test relies on the principle that the fuel system should maintain pressure for a certain period after the engine is turned off. A rapid drop in fuel pressure indicates a leak somewhere in the system, and the injectors are a prime suspect.
Tools Required: Fuel pressure gauge, safety glasses, rags.
Procedure:
- Locate the fuel pressure test port on the fuel rail (typically a Schrader valve, similar to a tire valve).
- Connect the fuel pressure gauge to the test port.
- Start the engine and let it idle for a few minutes.
- Note the fuel pressure reading. Consult your vehicle's repair manual for the correct fuel pressure specification.
- Turn off the engine and immediately observe the fuel pressure gauge.
- The pressure should hold steady for at least 15-20 minutes. A rapid drop in pressure indicates a leak.
Interpretation: If the fuel pressure drops quickly, a leak is present. To isolate the leak to the injectors, you can try the following:
- After turning off the engine and observing the pressure drop, clamp off the fuel supply line (use a fuel-rated clamp, not a regular hose clamp). If the pressure now holds steady, the leak is likely in the fuel tank or fuel pump area.
- If the pressure still drops with the fuel supply line clamped, the leak is likely in the fuel rail or injectors.
3. Cylinder Drop Test (Requires caution and specific tools)
This test identifies which cylinder is being affected by a leaking injector. The idea is that a leaking injector will cause that cylinder to run rich, leading to a misfire or rough idle.
Tools Required: OBD-II scanner with live data capabilities, or a specialized cylinder balance tester.
Procedure (OBD-II Scanner Method):
- Connect the OBD-II scanner to the diagnostic port.
- Start the engine and let it idle.
- Access the live data stream and monitor the "misfire counts" for each cylinder.
- A cylinder with a significantly higher misfire count than the others may have a leaking injector.
Procedure (Cylinder Balance Tester Method):
- This involves temporarily disabling each injector, one at a time, and observing the change in engine RPM or smoothness. WARNING: Disabling injectors can be dangerous and can damage the catalytic converter if done incorrectly. It's best left to experienced technicians.
- If disabling a particular injector doesn't change the engine's behavior, it may indicate that the cylinder was already running rich due to a leaking injector.
Interpretation: A significant increase in misfire counts on one cylinder or a lack of change when disabling an injector suggests a problem with that specific injector or cylinder.
4. "Noid Light" Test (Electrical Confirmation)
This test verifies that the ECU is sending the correct electrical signal to the injectors. It doesn't directly detect leaks, but it helps rule out electrical problems before suspecting mechanical injector failure.
Tools Required: Noid light set (specific to your vehicle's injector connector type).
Procedure:
- Disconnect the electrical connector from the injector you suspect is leaking.
- Connect the correct noid light into the injector connector.
- Start the engine and observe the noid light.
- The noid light should flash on and off as the ECU pulses the injector.
Interpretation: If the noid light doesn't flash, there's an electrical problem preventing the injector from firing. This could be a faulty ECU, wiring issue, or a bad injector connector. If the noid light flashes correctly, the electrical circuit is likely working, and the injector itself is the likely culprit.
Common Issues and Maintenance Concerns
Several factors can contribute to leaking fuel injectors:
- Dirt and Debris: Small particles can clog or damage the injector's needle valve, preventing it from sealing properly.
- Fuel Additives: Some fuel additives can corrode or damage injector components.
- Age and Wear: Over time, the injector's internal components can wear out, leading to leaks.
- Ethanol Content in Fuel: Ethanol can degrade rubber and plastic components in older fuel systems, leading to leaks.
Preventive maintenance can help prolong the life of your fuel injectors:
- Use high-quality fuel from reputable sources.
- Consider using a fuel injector cleaner periodically (follow the manufacturer's instructions).
- Replace the fuel filter regularly to prevent dirt and debris from reaching the injectors.
Do's and Don'ts / Best Practices
Do's:
- Prioritize safety when working with fuel systems.
- Use the correct tools and procedures.
- Consult your vehicle's repair manual for specific instructions and specifications.
- Thoroughly clean the area around the injectors before disconnecting them to prevent dirt from entering the fuel system.
- Replace the injector O-rings whenever you remove an injector.
Don'ts:
- Don't smoke or use open flames near fuel systems.
- Don't use excessive force when removing or installing injectors.
- Don't use harsh chemicals to clean injectors (use a fuel injector cleaner specifically designed for this purpose).
- Don't ignore the symptoms of leaking fuel injectors. Early detection can prevent more serious engine damage.
Conclusion
Diagnosing leaking fuel injectors can be a challenging but rewarding task for the experienced DIYer. By understanding the principles of fuel injection, following the step-by-step diagnostic procedures outlined in this article, and adhering to safety precautions, you can accurately identify and address this issue. While some repairs, like replacing O-rings or cleaning injectors, can be tackled at home, more complex issues might require the expertise of a professional mechanic. If you're unsure about any aspect of the diagnosis or repair, it's always best to consult with a qualified technician. Addressing leaking fuel injectors promptly can improve fuel economy, restore engine performance, and prevent costly engine damage. If you suspect a leak, it's highly recommended that you perform a fuel pressure leak-down test and/or a visual inspection as a first step. Good luck!