How To Check For Oil Pressure
Maintaining proper oil pressure is absolutely critical for the longevity and performance of your engine. Low oil pressure can lead to catastrophic engine failure in a remarkably short time, turning a minor inconvenience into a major headache. This article will guide you through the process of checking your oil pressure, both through visual inspection and using diagnostic tools, empowering you to catch potential problems early and keep your engine running smoothly.
Understanding the Engine's Lubrication System
Before diving into the diagnostic process, let's quickly review how your engine's lubrication system works. This system is responsible for delivering oil to all the moving parts within the engine, reducing friction and dissipating heat. Think of it as the lifeblood of your engine.
Key Components
Here are the main players in the oil pressure game:
- Oil Pan: The reservoir that holds the engine oil.
- Oil Pump: A positive-displacement pump (typically a gear or gerotor type) that draws oil from the oil pan and circulates it throughout the engine. The oil pump's performance directly affects the pressure within the system.
- Oil Filter: Removes contaminants from the oil, preventing them from damaging engine components. A clogged filter can restrict oil flow and reduce pressure.
- Oil Galleries/Passages: Internal channels within the engine block and cylinder head that distribute oil to various components, such as crankshaft bearings, connecting rod bearings, camshaft bearings, and valve train components.
- Pressure Relief Valve: A spring-loaded valve designed to limit maximum oil pressure. When pressure exceeds a predetermined level, the valve opens, diverting excess oil back to the oil pan. This prevents over-pressurization, which can damage seals and other components.
- Oil Pressure Sensor/Sending Unit: A device that measures oil pressure and transmits this information to the vehicle's instrument cluster or engine control unit (ECU). The sending unit can be a simple on/off switch or a variable resistance sensor.
The Lubrication Cycle
The process is quite simple: The oil pump sucks oil from the pan, forces it through the oil filter, and then pushes it through the oil galleries to lubricate all the vital engine parts. The pressure relief valve ensures the system stays within safe pressure limits. The oil pressure sensor monitors the pressure and provides a reading to the driver or the ECU.
Checking for Oil Pressure: A Step-by-Step Guide
There are several methods to check oil pressure, ranging from simple visual checks to more involved diagnostic procedures using specialized tools.
1. The Dashboard Warning Light
The most basic indicator of low oil pressure is the oil pressure warning light on your dashboard. This light (often shaped like an oil can) illuminates when the oil pressure drops below a critical threshold, typically around 5-7 psi. This is an emergency signal! If this light comes on while driving, safely pull over as soon as possible and shut off the engine. Continuing to drive with low oil pressure can cause severe and irreparable engine damage.
Important Note: The dashboard light is usually a simple on/off switch. It doesn't provide a precise pressure reading; it only indicates that the pressure is below a certain minimum level. Also, sometimes the light can flicker or come on intermittently due to a faulty sensor or wiring issue, even if the actual oil pressure is adequate. This requires further investigation.
2. The Dashboard Oil Pressure Gauge
Many vehicles are equipped with an oil pressure gauge on the instrument cluster. This gauge provides a continuous indication of oil pressure in psi or bar. Normal oil pressure readings vary depending on the engine, operating temperature, and engine speed. Consult your vehicle's owner's manual or repair manual for the specific pressure range for your engine. Generally, expect to see higher pressure at cold start and at higher RPMs, and lower pressure at idle when the engine is warm. Watch for any significant deviations from the normal range or sudden drops in pressure.
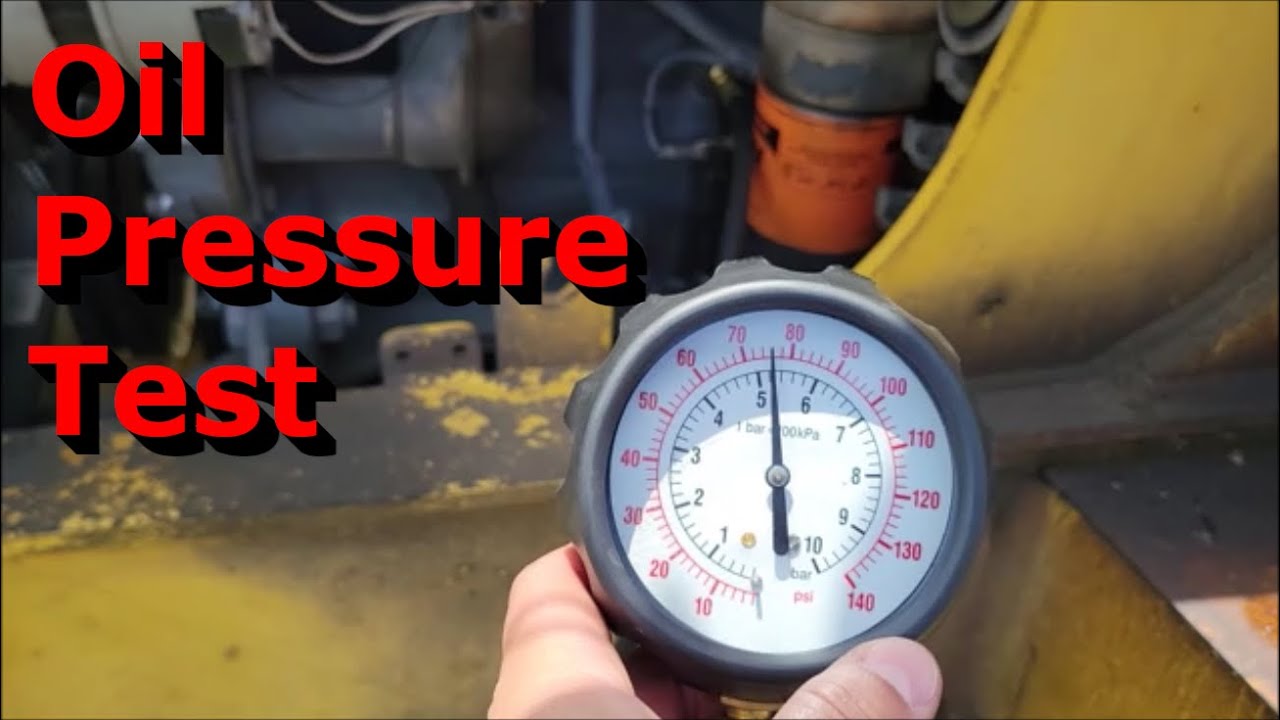
3. Manual Oil Pressure Testing
For a more accurate assessment of oil pressure, especially if you suspect a problem or your vehicle only has a warning light, you'll need to perform a manual oil pressure test using a mechanical gauge.
Required Tools:
- Mechanical Oil Pressure Gauge: A gauge with a hose and fittings to connect to the engine's oil pressure sending unit port.
- Wrench Set: To remove the existing oil pressure sending unit.
- Teflon Tape or Thread Sealant: To seal the threads of the gauge adapter.
- Rags: To clean up any spilled oil.
- Safety Glasses: Protect your eyes.
Procedure:
- Locate the Oil Pressure Sending Unit: The location varies depending on the engine, but it's typically found on the engine block, near the oil filter, or on the cylinder head. Consult your vehicle's repair manual for the specific location.
- Disconnect the Electrical Connector: Disconnect the electrical connector from the existing oil pressure sending unit.
- Remove the Sending Unit: Using the appropriate wrench, carefully unscrew and remove the oil pressure sending unit. Be prepared for a small amount of oil to spill.
- Install the Mechanical Gauge: Apply Teflon tape or thread sealant to the threads of the adapter fitting on the mechanical oil pressure gauge. Screw the adapter into the oil pressure sending unit port. Then, attach the gauge hose to the adapter.
- Start the Engine: Start the engine and let it idle. Observe the oil pressure reading on the mechanical gauge.
- Check Oil Pressure at Different RPMs: Slowly increase the engine speed to around 2000-2500 RPM and observe the oil pressure reading. Compare the readings to the specifications in your vehicle's repair manual.
- Shut Off the Engine: Turn off the engine.
- Remove the Mechanical Gauge: Carefully remove the mechanical oil pressure gauge. Reinstall the original oil pressure sending unit, using new Teflon tape or thread sealant. Reconnect the electrical connector.
- Clean Up: Clean up any spilled oil.
Common Issues and Maintenance Concerns
Several factors can contribute to low or fluctuating oil pressure:
- Low Oil Level: The most common cause. Always check your oil level regularly and top it off as needed.
- Worn Oil Pump: Over time, the oil pump can wear out, reducing its pumping capacity and pressure output.
- Clogged Oil Filter: A clogged oil filter restricts oil flow, reducing pressure. Replace the oil filter at the recommended intervals.
- Worn Engine Bearings: Worn crankshaft bearings, connecting rod bearings, or camshaft bearings increase oil clearances, allowing oil to leak out and reducing pressure. This is often a sign of significant engine wear.
- Faulty Oil Pressure Sending Unit: A malfunctioning sending unit can provide inaccurate readings, leading to false alarms or misdiagnoses.
- Internal Oil Leaks: Leaks within the engine, such as a leaking oil cooler or oil cooler lines, can reduce oil pressure.
- Incorrect Oil Viscosity: Using an oil with the wrong viscosity (too thin) can result in lower oil pressure, especially at operating temperature.
- Sludge Buildup: Oil sludge can clog oil passages and restrict oil flow, leading to low pressure. Regular oil changes are crucial to prevent sludge buildup.
Do's and Don'ts / Best Practices
- DO check your oil level regularly, at least once a week or before long trips.
- DO use the correct oil viscosity recommended by the manufacturer.
- DO change your oil and oil filter at the recommended intervals.
- DO address any oil leaks promptly.
- DO investigate any oil pressure warning light or gauge reading immediately.
- DON'T ignore low oil pressure. It's a serious problem that requires immediate attention.
- DON'T continue driving with low oil pressure. This can cause catastrophic engine damage.
- DON'T assume a faulty oil pressure sending unit is the only problem. Always verify the actual oil pressure with a mechanical gauge.
- DON'T overfill the engine with oil. This can damage the engine and cause other problems.
- Best Practice: Keep detailed maintenance records, including oil change dates, oil types used, and any oil pressure readings. This will help you track the health of your engine and identify potential problems early.
Conclusion
Checking your oil pressure is a crucial part of maintaining your engine's health. By understanding the lubrication system, knowing how to interpret your dashboard gauges, and performing manual oil pressure tests when needed, you can proactively identify and address potential problems before they lead to major engine damage. If you're unsure about any aspect of this process, consult a qualified mechanic. Prioritizing oil pressure monitoring will significantly contribute to the longevity and reliability of your vehicle's engine.