How To Check Key Fob Battery
So, your key fob's acting up, huh? Maybe it's got that dreaded lag when you try to unlock your car, or worse, it's completely unresponsive. Nine times out of ten, the culprit is a simple dead or dying battery. Before you shell out for a new fob or a trip to the dealer, let's walk through how to check and replace that battery yourself. It's a relatively easy task, but knowing what you're doing and understanding the components involved can save you time, money, and a whole lot of frustration.
Understanding Your Key Fob and Its Battery
Think of your key fob as a miniature radio transmitter. When you press a button, it sends a specific radio frequency (RF) signal to your car's receiver, which then performs the requested action (unlocking doors, activating the alarm, etc.). Powering this transmission is a small, button-shaped battery, typically a lithium coin cell battery. These batteries are known for their long shelf life and relatively consistent voltage output, but they aren't immortal.
Key Specs and Main Parts
Let's break down the typical components you'll find inside your key fob:
- Housing: The outer shell, usually made of plastic, protecting the internal components. Often secured with screws or clips.
- Circuit Board (PCB): This is the "brains" of the fob, containing the microcontroller, RF transmitter, and other essential circuitry.
- Buttons: Actuate switches on the PCB to initiate signals.
- Battery Compartment: Holds the battery securely, often with metal contacts to ensure a good electrical connection.
- Battery: Usually a CR2032, CR2025, or CR1620 lithium coin cell. Always double-check your fob's manual for the correct battery type.
- LED Indicator: A small light that illuminates when a button is pressed, confirming that the fob is transmitting a signal.
The specific battery type is crucial. Using the wrong voltage or physical size can damage the fob or prevent it from working correctly. The "CR" designation indicates a lithium coin cell, followed by a four-digit number. The first two digits represent the diameter in millimeters, and the last two digits represent the thickness in tenths of a millimeter. So, a CR2032 is 20mm in diameter and 3.2mm thick.
Reading the Schematic (Optional, but Helpful)
While you may not have a full schematic diagram for your specific key fob, understanding basic electronic symbols can still be helpful. Here are a few common ones:
- Battery Symbol: A long and a short parallel line. The long line represents the positive (+) terminal, and the short line represents the negative (-) terminal.
- Resistor Symbol: A zigzag line or a rectangle. Resistors limit the flow of current.
- Capacitor Symbol: Two parallel lines, often curved. Capacitors store electrical energy.
- Switch Symbol: A line with a small break and a lever that can connect or disconnect the circuit.
- LED Symbol: A diode symbol (triangle pointing to a vertical line) with two arrows emitting from it.
While most DIY battery replacements won't require you to delve into the schematic, having a basic understanding can help you identify components and understand the flow of electricity within the fob.
How It Works: The Battery Replacement Process
Now for the fun part! Here’s a step-by-step guide to checking and replacing your key fob battery:
- Gather Your Tools: You'll need a small flathead screwdriver or a plastic pry tool (a guitar pick can work in a pinch), a new battery of the correct type, and a clean workspace.
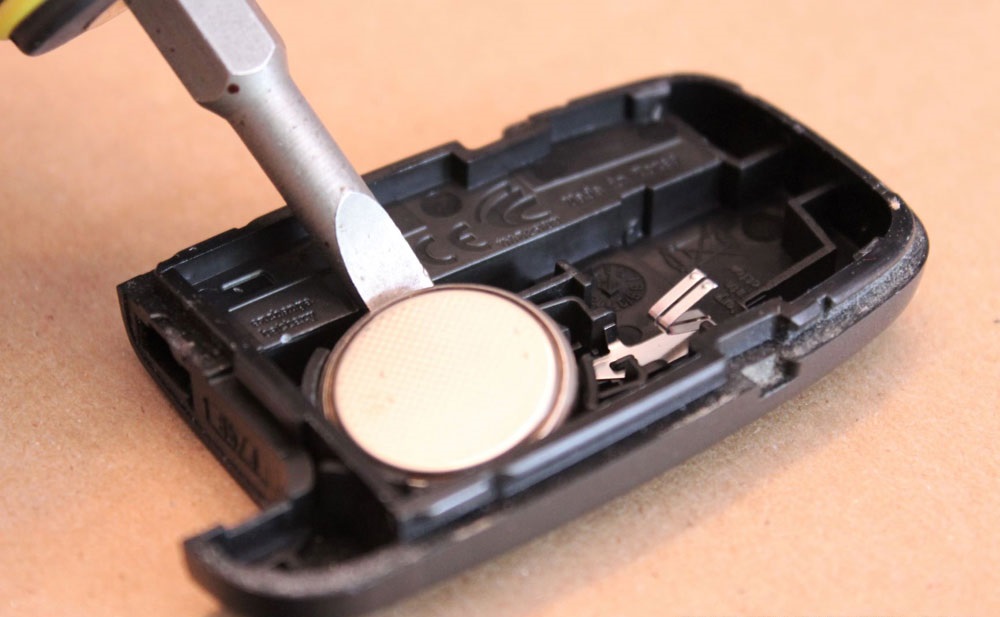
- Open the Fob: Examine the fob closely. Look for a small slot or seam where the two halves of the housing meet. Insert your flathead screwdriver or pry tool into the slot and gently twist or pry to separate the halves. Be careful not to use excessive force, as you could damage the plastic housing. Some fobs may have small screws securing them – remove these first.
- Locate the Battery: Once the fob is open, you'll see the circuit board and the battery compartment. The battery is usually held in place by metal clips or a small plastic retaining mechanism.
- Remove the Old Battery: Carefully pry out the old battery. In some cases, you might need to use the screwdriver to gently push it out from the back. Note the orientation of the battery – the positive (+) side is usually marked.
- Install the New Battery: Insert the new battery into the compartment, ensuring that the positive (+) side is facing the correct direction. It should snap or slide into place securely.
- Test the Fob: Before reassembling the fob, press a button to see if the LED indicator lights up. If it doesn't, double-check the battery orientation and ensure that the contacts are clean.
- Reassemble the Fob: Carefully snap or screw the two halves of the housing back together. Make sure all the clips are securely fastened.
- Test the Functionality: Go to your car and test all the fob's functions (unlocking, locking, panic alarm, etc.) to ensure everything is working correctly.
Real-World Use: Troubleshooting Tips
Sometimes, even with a new battery, things don't go as planned. Here are some common issues and how to address them:
- Fob Still Doesn't Work:
- Check Battery Orientation: Double-check that the battery is installed with the correct polarity (+/-).
- Clean Contacts: Use a cotton swab and a small amount of isopropyl alcohol to clean the battery contacts on the circuit board. Corrosion can prevent a good electrical connection.
- Resync the Fob: Some cars require you to resync the fob after replacing the battery. Consult your car's owner's manual for the specific procedure. This often involves turning the ignition on and off a certain number of times or pressing a sequence of buttons on the fob and in the car.
- Battery Voltage: Use a multimeter to check the voltage of the new battery. A brand new CR2032 should read around 3.2 volts. If it's significantly lower, the battery might be defective.
- Fob Range is Reduced:
- Battery Type: Ensure you're using the correct battery type specified for your fob.
- Interference: Radio frequency interference from other electronic devices can sometimes reduce the fob's range. Try testing it in a different location.
- Fob Housing is Damaged:
If the fob housing is cracked or broken, consider purchasing a replacement housing online. You can then transfer the internal components from your old fob to the new housing.
Safety Considerations
While replacing a key fob battery is generally safe, here are a few things to keep in mind:
- Small Parts: Keep small parts, like the battery and screws, away from children and pets. They can be a choking hazard.
- Static Electricity: Electronic components are sensitive to static electricity. Before handling the circuit board, ground yourself by touching a metal object to discharge any static buildup.
- Battery Disposal: Dispose of the old battery properly. Many retailers that sell batteries also offer recycling programs. Do not throw lithium batteries in the regular trash.
- Sharp Objects: Be careful when using a screwdriver or pry tool to open the fob. Avoid applying excessive force that could cause the tool to slip and injure you.
- Avoid Moisture: Keep the internal components of the fob dry. Moisture can damage the circuit board and cause corrosion.
Replacing your key fob battery is a simple and cost-effective way to keep your car running smoothly. By understanding the components involved and following these steps, you can confidently tackle this task yourself. And remember, if you run into any problems or feel unsure about any part of the process, don't hesitate to consult a professional mechanic.
We have a detailed diagram of a typical key fob internals available for download. It provides a visual representation of the components discussed and can be a helpful reference during the battery replacement process.