How To Check Resistance On A Coil Pack
Coil packs, those unassuming but vital components in your car's ignition system, are often overlooked until misfires start plaguing your ride. Diagnosing a faulty coil pack can save you a hefty mechanic's bill and get your engine purring again. This article will walk you through how to check the resistance of a coil pack, a key diagnostic step, providing you with the knowledge and confidence to tackle this task yourself. We’ll cover the essential theory, practical steps, and crucial do's and don'ts to ensure a successful outcome.
Understanding the Ignition System and Coil Packs
Before diving into the testing procedure, let's briefly review the ignition system's role and the coil pack's function. Modern engines, especially those with electronic fuel injection (EFI), rely on a sophisticated ignition system to ignite the air-fuel mixture in the combustion chamber. This process initiates the power stroke, driving the pistons and ultimately propelling your vehicle.
The ignition system’s primary components include the Engine Control Unit (ECU), crank/camshaft position sensors, and, of course, the coil packs. The ECU determines the precise timing for spark ignition based on sensor inputs (engine speed, load, etc.). It then sends a signal to the coil pack. The coil pack’s job is to transform the relatively low voltage from the car's battery (typically 12V) into a very high voltage (often 20,000-40,000 volts) required to create a spark across the spark plug gap.
Early ignition systems used a single coil and a distributor to route the high-voltage spark to the correct cylinder. Modern engines, however, typically employ coil-on-plug (COP) or coil-near-plug (CNP) systems. COP systems have individual coil packs mounted directly on top of each spark plug, eliminating the need for spark plug wires in some cases. CNP systems locate the coil packs close to the spark plugs, using short spark plug wires.
Technical Breakdown: How a Coil Pack Works (and Why Resistance Matters)
A coil pack is essentially a transformer, comprising two sets of wire windings: the primary winding and the secondary winding, wrapped around an iron core. When the ECU signals the coil pack to fire, it switches off the power to the primary winding. This sudden interruption of current induces a high-voltage surge in the secondary winding due to electromagnetic induction. This high voltage is then discharged through the spark plug, creating the spark.
Resistance, measured in ohms (Ω), is the opposition to the flow of electrical current. In a coil pack, resistance exists in both the primary and secondary windings. This resistance is inherent to the wire material and length. A healthy coil pack will have resistance values within a specified range, as determined by the manufacturer.
Checking the resistance of a coil pack helps determine the integrity of the windings. If the resistance is significantly higher than the specified range, it could indicate a break in the winding, corrosion, or internal damage. Conversely, a very low resistance (near zero) could signal a short circuit, where the windings are touching each other.
Resistance readings are influenced by temperature. Therefore, it's crucial to test the coil pack when it's at room temperature (ideally around 68-77°F or 20-25°C) for accurate results. Also, it’s important to consult your vehicle's service manual or repair database for the specific resistance values for your particular coil pack model.
Step-by-Step Guide to Checking Coil Pack Resistance
Here's a detailed procedure for checking coil pack resistance:
- Safety First: Disconnect the negative terminal of your car battery. This prevents any accidental electrical shocks during the testing process.
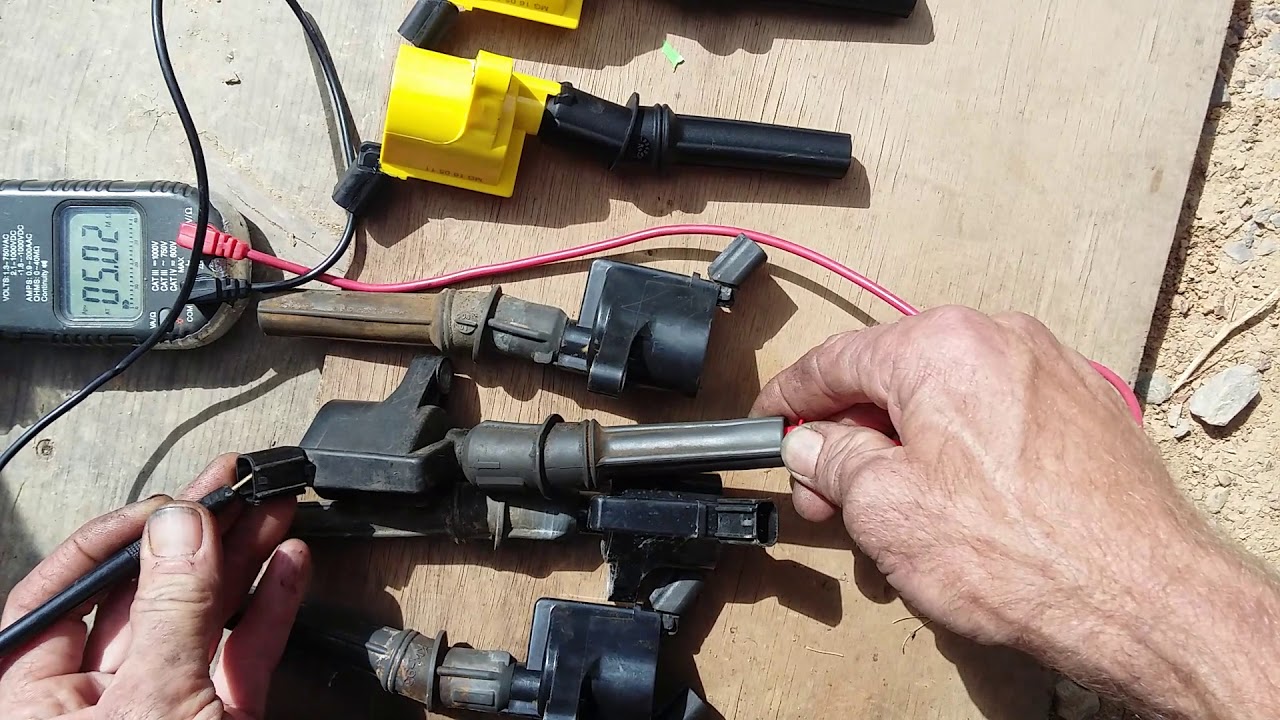
- Gather Your Tools: You'll need a digital multimeter (DMM), also known as a multi-tester. Make sure it's capable of measuring resistance in ohms.
- Identify the Terminals: Locate the primary and secondary terminals on the coil pack. The primary terminals are typically the ones connected to the wiring harness. The secondary terminal is usually the spring-loaded contact that connects to the spark plug (for COP systems) or the output terminal for the spark plug wire (for CNP systems). Refer to your vehicle’s repair manual for specific terminal identification, as they vary between models.
- Setting Up the Multimeter: Set your multimeter to measure resistance (Ohms – Ω). You may need to select the appropriate range on the multimeter. Start with a higher range and then lower it for more accurate readings. If your meter is auto-ranging, it will select the proper range automatically.
- Testing the Primary Winding: Touch the multimeter probes to the two primary terminals of the coil pack. Note the resistance reading displayed on the multimeter.
- Testing the Secondary Winding: For COP systems, touch one probe to the secondary terminal (the spring-loaded contact) and the other probe to one of the primary terminals (usually the ground terminal, check the service manual). For CNP systems, you will need to use a long, insulated probe to reach down into the spark plug wire terminal on the coil pack. Be careful not to damage the coil pack. Note the resistance reading.
- Compare Readings to Specifications: Compare the resistance readings you obtained to the values specified in your vehicle's service manual or a reputable repair database.
- Repeat for Other Coil Packs: If your engine has multiple coil packs (as most modern engines do), repeat the testing procedure for each one. This allows you to compare the readings and identify any outliers.
Common Issues and Maintenance Concerns
Coil packs are exposed to high temperatures, vibrations, and voltage surges, making them susceptible to failure over time. Some common issues include:
- Cracked or Damaged Housings: Physical damage can allow moisture and contaminants to enter the coil pack, leading to corrosion and electrical shorts.
- Internal Shorts or Open Circuits: Heat and age can cause the windings to break down, resulting in shorts or open circuits within the coil pack.
- Weak Spark: A coil pack might still function, but produce a weak spark, leading to misfires, poor fuel economy, and reduced performance. This can be difficult to detect with a simple resistance test.
- Corrosion on Terminals: Corrosion can increase resistance and impede the flow of electricity.
Regular maintenance can help prolong the life of your coil packs. Keeping the engine bay clean and free of debris can help prevent overheating and damage. Inspect the coil packs regularly for any signs of cracking, damage, or corrosion. Replacing spark plugs at the recommended intervals is also crucial, as worn spark plugs increase the voltage demand on the coil packs, accelerating their wear.
Do's and Don'ts / Best Practices
Here are some crucial do's and don'ts to keep in mind when checking coil pack resistance:
Do's:
- Do consult your vehicle's service manual for the correct resistance values for your specific coil pack.
- Do disconnect the battery before working on the electrical system.
- Do use a high-quality digital multimeter for accurate readings.
- Do test the coil packs at room temperature.
- Do compare readings between multiple coil packs (if applicable) to identify outliers.
Don'ts:
- Don't test coil packs while the engine is running.
- Don't use an analog multimeter, as it may not provide accurate readings.
- Don't rely solely on resistance testing for diagnosis. It's just one piece of the puzzle.
- Don't assume a coil pack is good just because it falls within the resistance range. A weak spark can still indicate a problem.
- Don't handle coil packs roughly, as they are sensitive components.
Conclusion
Checking the resistance of a coil pack is a valuable diagnostic step that can help pinpoint ignition problems. By understanding the function of coil packs, following the proper testing procedure, and adhering to safety precautions, you can confidently troubleshoot misfires and maintain your vehicle's performance. Remember, resistance testing is only one part of the diagnostic process. If you suspect a faulty coil pack, consider other factors like visual inspection and spark testing. If you're uncomfortable performing these tests yourself, consult a qualified mechanic. A systematic approach to diagnosis, combined with reliable information, will save you time and money in the long run.