How To Clean A Moldy Car
Mold in your car isn't just unsightly; it's a health hazard and can cause significant damage to your vehicle's interior. This article will guide you through the process of safely and effectively cleaning a moldy car, assuming you're comfortable tackling intermediate DIY car maintenance projects. We'll cover everything from identifying the source of the mold to applying appropriate cleaning solutions and preventative measures.
Purpose of Mold Removal
The primary purpose of removing mold from your car is to protect your health and the health of your passengers. Mold spores can trigger allergic reactions, asthma attacks, and other respiratory issues. Furthermore, mold can degrade your car's interior materials, leading to unpleasant odors, discoloration, and even structural damage. Addressing the problem promptly prevents further spread and minimizes long-term costs associated with repairs or replacement of affected components. Furthermore, identifying and fixing the underlying cause of the moisture intrusion is critical to preventing recurrence.
Key Specs and Main Parts (Target Areas)
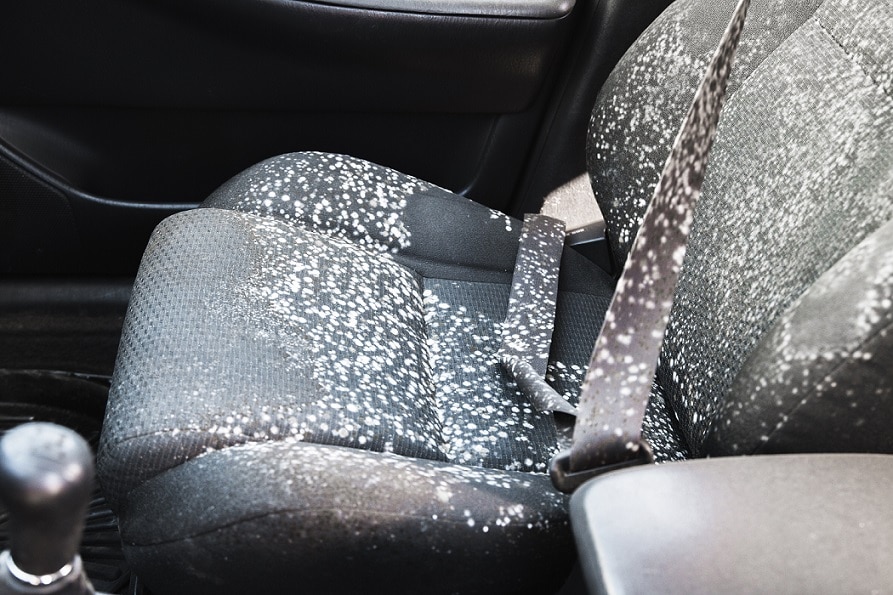
When dealing with mold in a car, consider these key areas:
- Upholstery: Cloth and leather seats, carpets, and headliners are prime breeding grounds for mold due to their porous nature.
- HVAC System: The heating, ventilation, and air conditioning (HVAC) system can harbor mold, especially in the evaporator core and ductwork. This is due to condensation buildup.
- Floorboards: Water leaks can saturate the carpet padding beneath the floorboards, creating a hidden mold haven.
- Trunk: Leaks around the taillights, weather stripping, or sunroof drains can lead to mold growth in the trunk.
- Weather Stripping and Seals: Damaged or improperly installed weather stripping around doors and windows allows moisture to enter the cabin.
Key Specs to Consider:
- Type of Mold: While identifying the specific type of mold is difficult without lab testing, knowing whether it's surface mold versus deeply embedded mold will affect your cleaning strategy.
- Severity of the Infestation: A small, localized patch of mold requires a different approach than widespread contamination.
- Material Compatibility: Ensure your cleaning solutions are safe for the specific materials in your car's interior (e.g., leather, vinyl, fabric). Test in an inconspicuous area first.
- Drying Time: Proper drying after cleaning is crucial to prevent mold from returning. Allow ample time for ventilation and consider using a dehumidifier.
Cleaning Products and Tools
Here's a list of essential cleaning products and tools:
- Mold Killer/Remover: Commercial mold killers, diluted bleach solutions (1 part bleach to 10 parts water), or specialized enzyme cleaners. Always test on an inconspicuous area first.
- Upholstery Cleaner: Specifically designed for automotive upholstery (cloth or leather).
- HEPA Vacuum: A vacuum with a High-Efficiency Particulate Air (HEPA) filter is crucial for capturing mold spores and preventing them from being released back into the air.
- Scrub Brushes: Soft-bristled brushes for delicate surfaces and stiffer brushes for carpets and floor mats.
- Microfiber Cloths: For wiping down surfaces and applying cleaning solutions.
- Spray Bottles: For dispensing cleaning solutions.
- Safety Gear: Gloves, mask (N95 or better), and eye protection are essential to protect yourself from mold spores and cleaning chemicals.
- Dehumidifier: To aid in drying the car after cleaning.
- Ozone Generator (Optional): For advanced odor removal (use with caution and follow instructions carefully).
- Wet/Dry Vacuum (Optional): For extracting excess moisture from carpets and upholstery.
How It Works: The Mold Removal Process
The mold removal process involves several key steps:
- Preparation: Park the car in a well-ventilated area, preferably outdoors. Wear your safety gear (gloves, mask, eye protection). Remove any loose items from the car.
- Vacuuming: Thoroughly vacuum the entire interior of the car, including upholstery, carpets, floor mats, and hard surfaces. Pay special attention to areas with visible mold growth. Use a HEPA vacuum to prevent mold spores from spreading.
- Cleaning Surfaces:
- Hard Surfaces: Wipe down hard surfaces like the dashboard, door panels, and trim with a mold killer or diluted bleach solution. Ensure proper ventilation and avoid prolonged exposure to bleach fumes.
- Upholstery: Apply upholstery cleaner according to the manufacturer's instructions. Use a scrub brush to gently agitate the cleaner into the fabric. Wipe away excess cleaner with a clean microfiber cloth. For leather upholstery, use a leather cleaner and conditioner.
- Carpets and Floor Mats: Apply carpet cleaner or mold killer to affected areas. Use a scrub brush to work the cleaner into the fibers. Extract excess moisture with a wet/dry vacuum or blot with clean towels.
- HVAC System Treatment: Spray an HVAC disinfectant into the air intake vents (usually located near the windshield wipers) while the fan is running on high. This will help to kill mold and bacteria in the system. Consider replacing the cabin air filter.
- Drying: Thoroughly dry the car's interior. Open all doors and windows to promote air circulation. Use a dehumidifier to remove excess moisture. Consider using fans to speed up the drying process. Ensure the carpets and upholstery are completely dry to prevent mold from returning.
- Odor Removal (Optional): If lingering odors persist, use an ozone generator according to the manufacturer's instructions. Important: Ozone is harmful to humans and pets. Ensure the car is unoccupied during ozone treatment and ventilate thoroughly afterward.
- Prevention: Once the car is clean and dry, address the underlying cause of the moisture problem. Repair any leaks, replace damaged weather stripping, and ensure proper drainage. Consider using moisture absorbers or silica gel packs to prevent future moisture buildup.
Real-World Use: Basic Troubleshooting Tips
Here are some common issues you might encounter and how to address them:
- Musty Odor Persists: This indicates that mold may still be present or that the source of the moisture hasn't been addressed. Re-clean the affected areas and thoroughly inspect for leaks. Consider using an ozone generator for advanced odor removal.
- Cleaning Solutions Damage Upholstery: Always test cleaning solutions on an inconspicuous area before applying them to the entire surface. Use cleaners specifically designed for automotive upholstery.
- Mold Returns Quickly: This indicates that the underlying moisture problem hasn't been resolved. Identify and repair any leaks or sources of moisture intrusion. Consider using moisture absorbers or dehumidifiers to prevent future moisture buildup.
- HVAC System Still Smells: Repeat the HVAC system treatment and replace the cabin air filter. If the smell persists, the evaporator core may need professional cleaning.
Safety: Risky Components and Procedures
Safety is paramount when dealing with mold and cleaning chemicals.
- Mold Spores: Always wear a mask (N95 or better) to protect yourself from inhaling mold spores. Mold exposure can trigger allergic reactions, asthma attacks, and other respiratory problems.
- Cleaning Chemicals: Wear gloves and eye protection to protect your skin and eyes from irritants and corrosive chemicals. Read and follow the manufacturer's instructions for all cleaning products. Ensure adequate ventilation when using cleaning chemicals, especially bleach.
- Electrical Components: Avoid spraying cleaning solutions directly onto electrical components. Moisture can cause short circuits and damage. If electrical components are affected by mold, consult a professional for cleaning and repair.
- Ozone Generators: Ozone is harmful to humans and pets. Use ozone generators with extreme caution and follow the manufacturer's instructions carefully. Ensure the car is unoccupied during ozone treatment and ventilate thoroughly afterward.
- Bleach: When using bleach, never mix it with ammonia or other household cleaners, as this can create toxic fumes. Always dilute bleach according to the manufacturer's instructions.
By following these steps and safety precautions, you can effectively clean a moldy car and restore its interior to a healthy and comfortable condition. Remember to address the underlying cause of the moisture problem to prevent future mold growth.
We have a detailed wiring diagram of the car's ventilation system available for download. This diagram can be incredibly helpful in locating potential leaks and understanding the airflow patterns within the vehicle, assisting in identifying mold breeding grounds. Contact us for access to the file.