How To Clean An Exhaust Manifold
The exhaust manifold is a critical component in your engine's exhaust system, responsible for collecting exhaust gases from the cylinders and directing them towards the catalytic converter. Over time, it can become clogged with carbon deposits and other contaminants, leading to reduced engine performance and fuel efficiency. This article will guide you through the process of safely and effectively cleaning your exhaust manifold, ensuring optimal engine function. While this project is within the reach of an experienced DIYer, it requires careful attention to detail and a solid understanding of automotive mechanics.
Background: The Exhaust System and Your Manifold
Before diving into the cleaning process, let's review the basics of your engine's exhaust system. The internal combustion engine creates power by burning a fuel-air mixture. This process generates exhaust gases, which are essentially waste products that must be expelled from the engine. The exhaust system's primary function is to remove these gases, reduce harmful emissions, and minimize noise.
The exhaust system generally consists of the following components, in order:
- Exhaust Manifold: The first component, bolted directly to the cylinder head. It collects the exhaust gases from each cylinder. In some engines, especially high-performance ones, exhaust manifolds are replaced with headers, which are designed for improved flow.
- Catalytic Converter: Reduces harmful pollutants (hydrocarbons, carbon monoxide, and nitrogen oxides) in the exhaust gases.
- Muffler: Reduces the noise generated by the exhaust gases.
- Tailpipe: The final section of the exhaust system, which vents the exhaust gases into the atmosphere.
The exhaust manifold is subjected to extreme temperatures and harsh chemicals. It experiences rapid temperature fluctuations, going from relatively cool during engine start-up to very hot during normal operation. This extreme environment leads to the buildup of carbon deposits, rust, and other contaminants within the manifold's internal passages.
Technical Breakdown: How the Exhaust Manifold Works
The exhaust manifold is essentially a collection chamber that gathers exhaust gases from each cylinder head exhaust port. Its design significantly impacts engine performance. A well-designed manifold minimizes backpressure, allowing exhaust gases to flow freely. Reduced backpressure improves engine efficiency, resulting in increased horsepower and torque.
The design of the manifold can be quite complex, taking into account factors like:
- Primary Tube Length: The length of the individual tubes connecting each cylinder to the collector.
- Primary Tube Diameter: The diameter of the individual tubes.
- Collector Design: The point where the individual tubes merge.
These factors influence the exhaust scavenging effect, which is the process of using the exiting exhaust gases to help pull the remaining gases out of the cylinder. A well-tuned exhaust manifold can significantly improve engine performance through optimized scavenging.
Typically, exhaust manifolds are made of either cast iron or stainless steel. Cast iron is less expensive but more prone to rust and cracking due to thermal stress. Stainless steel is more durable and resistant to corrosion but is also more expensive.
Common Issues and Maintenance Concerns
The exhaust manifold is a durable component, but it's not immune to problems. Here are some common issues:
- Cracking: Repeated heating and cooling cycles can cause cracks in the manifold, particularly in cast iron manifolds. Cracks lead to exhaust leaks, which can reduce engine performance, increase emissions, and create excessive noise. You may notice a hissing sound, especially during cold starts.
- Leaking Gaskets: The gasket between the manifold and the cylinder head can fail over time, leading to exhaust leaks. Symptoms are similar to those of a cracked manifold.
- Clogging: Carbon deposits and other contaminants can build up inside the manifold, restricting exhaust flow. This reduces engine performance and fuel economy.
- Rust: Especially in older vehicles or in regions with harsh winters, the manifold can rust, leading to structural weakness and eventual failure.
Regular inspection of the exhaust manifold is essential. Look for signs of cracks, leaks, or rust. Listen for unusual noises, such as hissing or ticking sounds, particularly during cold starts. If you suspect a problem, address it promptly to prevent further damage to your engine.
Cleaning Your Exhaust Manifold: A Step-by-Step Guide
Cleaning your exhaust manifold can remove carbon deposits and improve exhaust flow. This can lead to increased engine performance and fuel efficiency. Here's how to do it safely and effectively:
Step 1: Safety First!
Always disconnect the negative battery cable before working on any part of your vehicle's electrical system. Wear safety glasses and gloves to protect yourself from debris and chemicals. Work in a well-ventilated area.
Step 2: Removal
- Allow the engine to cool completely. Working on a hot engine can cause burns and warp components.
- Locate the exhaust manifold. It's usually bolted to the cylinder head.
- Disconnect any sensors or wiring harnesses attached to the manifold or nearby components. Label the connectors to ensure proper reassembly.
- Remove the heat shield (if equipped).
- Spray penetrating oil onto the exhaust manifold bolts. Let it soak for at least 15-20 minutes. This will help prevent the bolts from snapping.
- Carefully loosen and remove the exhaust manifold bolts. Use the correct size socket or wrench to avoid rounding off the bolt heads.
- Detach the exhaust manifold from the cylinder head. You may need to gently pry it loose.
- If the manifold is connected to the exhaust system via a flange, unbolt it. Otherwise, you may need to detach it further down the exhaust system, depending on your vehicle's design.
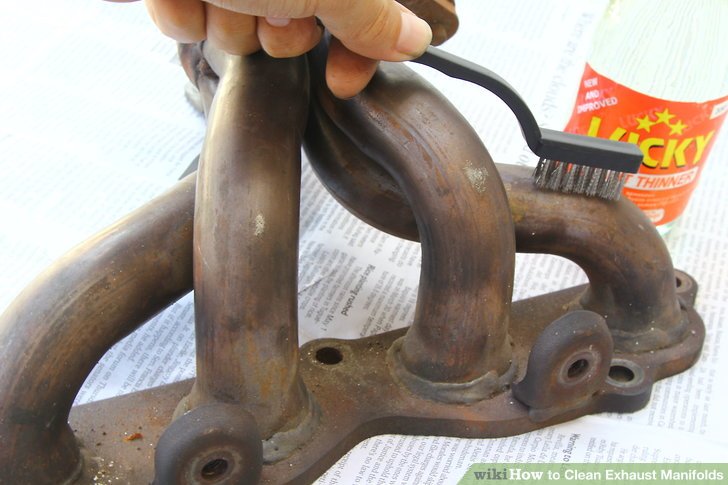
Step 3: Cleaning
There are several methods for cleaning an exhaust manifold. Choose the one that best suits your situation and budget:
- Manual Cleaning: This involves using wire brushes, scrapers, and solvents to remove carbon deposits. It's the most labor-intensive method but also the most affordable. You can use a specialized carbon cleaner or a degreaser like Simple Green. Ensure thorough rinsing after cleaning to remove any residue.
- Chemical Soak: Submerging the manifold in a chemical solution designed to dissolve carbon deposits. This method requires a large container and specialized chemicals (e.g., caustic soda solutions – use with EXTREME caution and follow all safety guidelines). This is generally more effective than manual cleaning but requires careful handling of chemicals.
- Sandblasting/Media Blasting: This involves using compressed air to blast abrasive media (e.g., sand, glass beads) against the manifold, removing carbon deposits and rust. This is the most effective method but requires specialized equipment and precautions. It's crucial to seal all openings to prevent media from entering the manifold.
- Professional Cleaning: Some automotive shops offer exhaust manifold cleaning services. This is the most convenient option but also the most expensive.
Regardless of the method you choose, always wear safety glasses and gloves. If using chemicals, follow the manufacturer's instructions carefully and work in a well-ventilated area.
Step 4: Inspection and Repair
After cleaning the manifold, carefully inspect it for cracks, rust, or other damage. If you find any cracks, the manifold should be replaced. Minor rust can be removed with a wire brush or sandpaper. Check the manifold flange for flatness. If it's warped, it may need to be resurfaced or replaced.
Step 5: Reinstallation
- Clean the cylinder head surface where the manifold will be mounted.
- Install a new exhaust manifold gasket. Always use a new gasket to ensure a proper seal.
- Carefully position the exhaust manifold onto the cylinder head.
- Install the exhaust manifold bolts. Torque them to the manufacturer's specifications. Use a torque wrench to ensure proper tightening.
- Reconnect any sensors or wiring harnesses that you disconnected earlier.
- Reinstall the heat shield (if equipped).
- Reconnect the exhaust system flange.
- Reconnect the negative battery cable.
Step 6: Testing
Start the engine and listen for exhaust leaks. If you hear any hissing sounds, tighten the manifold bolts further. Monitor the engine's performance to ensure that it's running smoothly.
Do's and Don'ts / Best Practices
Here are some important do's and don'ts to keep in mind when cleaning your exhaust manifold:
- Do: Use penetrating oil on the exhaust manifold bolts before attempting to remove them.
- Do: Use the correct size socket or wrench to avoid rounding off the bolt heads.
- Do: Use a new exhaust manifold gasket during reinstallation.
- Do: Torque the exhaust manifold bolts to the manufacturer's specifications.
- Don't: Work on a hot engine.
- Don't: Use excessive force when removing the exhaust manifold bolts.
- Don't: Reuse an old exhaust manifold gasket.
- Don't: Over-tighten the exhaust manifold bolts.
- Do: Consider replacing your exhaust manifold with a performance header for increased horsepower, but only if it’s legal in your jurisdiction and you understand the potential impacts on emissions.
Conclusion
Cleaning your exhaust manifold is a worthwhile project that can improve your engine's performance and fuel efficiency. By following these steps and using the proper tools and techniques, you can safely and effectively remove carbon deposits and restore your manifold to its original condition. However, if you are uncomfortable with any of these steps or if you suspect a more serious problem, it's best to consult a qualified mechanic.