How To Clean Ceiling Of A Car
Maintaining the interior of your car is just as important as keeping the engine running smoothly. A clean interior contributes to a more pleasant driving experience and can even boost your car's resale value. The ceiling, or headliner, of your car is often overlooked but can accumulate dirt, dust, and stains over time. This article provides a detailed guide on how to safely and effectively clean your car's ceiling, targeting intermediate car owners and DIY mechanics.
Purpose of Cleaning Your Car's Ceiling
Why bother cleaning the ceiling of your car? There are several compelling reasons:
- Aesthetics: A clean ceiling significantly improves the overall look and feel of your car's interior.
- Hygiene: The headliner can trap dust, allergens, and odors, impacting air quality inside the vehicle. Cleaning removes these contaminants.
- Prevention of Damage: Accumulated dirt and grime can degrade the headliner material over time. Regular cleaning helps prolong its lifespan.
- Improved Resale Value: A clean interior demonstrates good maintenance, making your car more attractive to potential buyers.
Key Specs and Main Parts of a Car's Headliner
Before you begin, it's helpful to understand the construction of your car's headliner. The basic components typically include:
- Headliner Board (Substrate): This is the rigid or semi-rigid backing material, usually made of cardboard, fiberglass, or a composite material. Its purpose is to provide structural support.
- Foam Padding: A thin layer of foam is often glued to the headliner board to provide a soft, cushioned feel and to help with sound dampening.
- Fabric Covering (Upholstery): This is the visible layer that covers the headliner. Common materials include cloth, velour, or vinyl. The type of fabric significantly impacts the cleaning method you'll need to use.
- Adhesive: This secures the foam and fabric to the headliner board. Over time, especially with heat and humidity, this adhesive can degrade, leading to sagging.
- Trim Pieces: These are plastic or fabric-covered pieces that attach the headliner to the car's frame and conceal edges. They typically clip or screw into place.
Tools and Materials Needed
Gather the following supplies before starting the cleaning process:
- Vacuum Cleaner with Soft Brush Attachment: For removing loose dirt and debris.
- Microfiber Cloths: Essential for gentle cleaning. Use multiple cloths to prevent re-depositing dirt.
- Upholstery Cleaner: Choose a cleaner specifically designed for automotive interiors. Test it on an inconspicuous area first. Avoid harsh chemicals like bleach or ammonia.
- Soft Bristle Brush: For gently agitating stains. A toothbrush or detailing brush works well.
- Spray Bottle: For applying the cleaning solution.
- Clean Water: For rinsing and diluting the cleaning solution.
- Interior Detailing Wipes: For cleaning trim pieces.
- Safety Glasses and Gloves: To protect your eyes and skin.
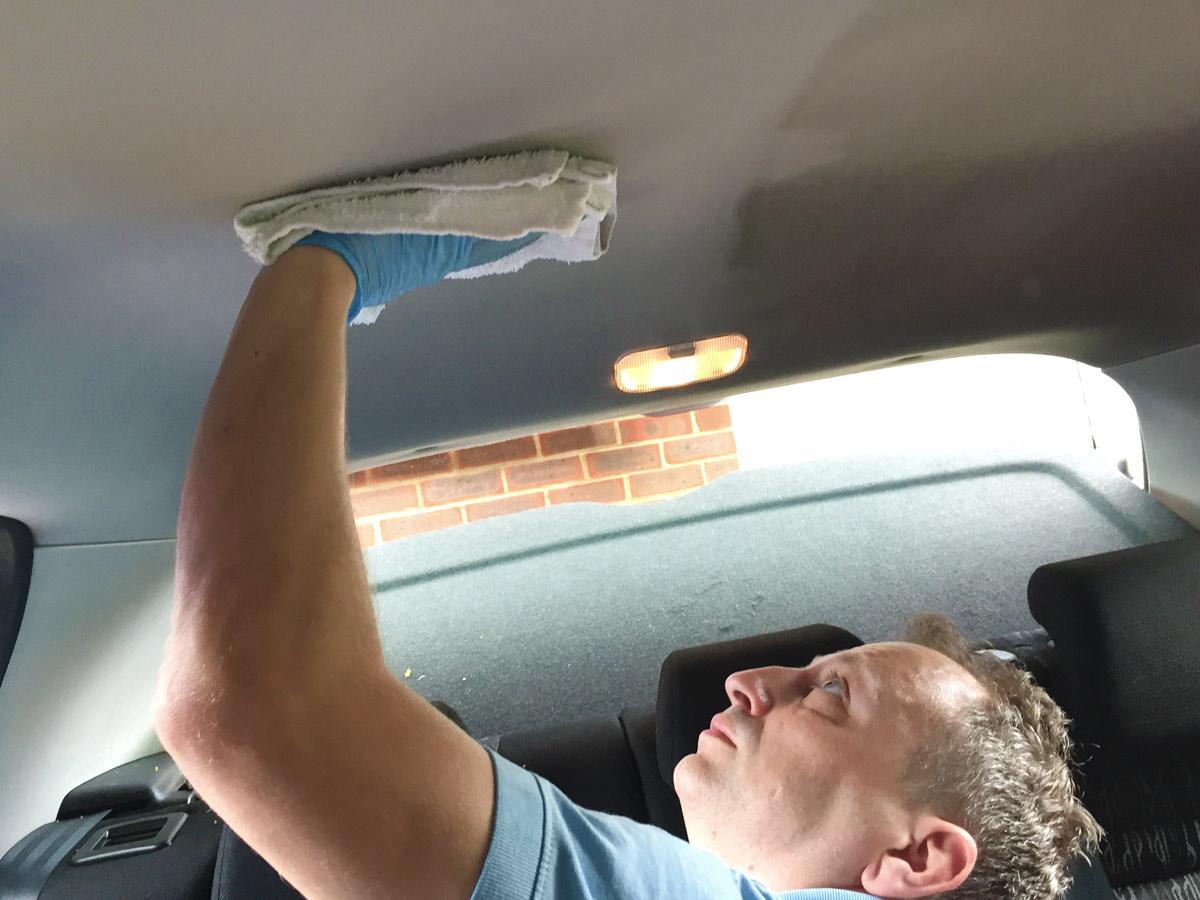
How to Clean Your Car's Ceiling: A Step-by-Step Guide
Follow these steps for a thorough and safe cleaning:
- Preparation: Open all doors and windows to ensure proper ventilation. Remove any loose items from the car's interior.
- Vacuuming: Use the vacuum cleaner with the soft brush attachment to thoroughly vacuum the entire headliner. Pay close attention to seams and edges where dirt tends to accumulate. Work in a methodical pattern to avoid missing any areas.
- Spot Cleaning (If Necessary): If you have specific stains, address them first. Spray a small amount of upholstery cleaner onto a clean microfiber cloth (not directly onto the headliner). Gently blot the stain, working from the outside in to prevent spreading. Avoid rubbing aggressively. If the stain is stubborn, let the cleaner dwell for a few minutes before blotting again.
- General Cleaning: Dilute your chosen upholstery cleaner according to the manufacturer's instructions. Lightly spray the diluted cleaner onto a clean microfiber cloth. Gently wipe the headliner in small sections, overlapping each section slightly. Use a clean section of the cloth as it becomes soiled. Avoid saturating the headliner. Saturation can weaken the adhesive and cause sagging.
- Drying: After cleaning, allow the headliner to air dry completely. You can use a fan to speed up the drying process. Keep the doors and windows open to ensure good ventilation. Avoid using direct sunlight, as this can cause the fabric to fade or shrink.
- Cleaning Trim Pieces: Use interior detailing wipes to clean the trim pieces around the headliner. Be careful not to get any cleaning solution on the headliner itself.
- Final Inspection: Once the headliner is dry, inspect it for any remaining stains or dirt. If necessary, repeat the cleaning process.
Real-World Use: Basic Troubleshooting Tips
Here are some common issues and troubleshooting tips:
- Sagging Headliner: This is a common problem caused by the adhesive degrading over time. Unfortunately, cleaning won't fix this. The headliner needs to be removed and the fabric re-glued, or the entire headliner board replaced. This is a more involved repair best left to professionals if you lack experience.
- Water Stains: Water stains can be tricky to remove. Try using a steam cleaner (very cautiously and from a distance) to lift the stain. Blot with a clean microfiber cloth immediately.
- Stubborn Stains: For stubborn stains like grease or oil, try using a dedicated stain remover specifically formulated for automotive interiors. Always test in an inconspicuous area first.
- Cleaning Solution Residue: If you notice residue after cleaning, wipe the headliner again with a clean, damp microfiber cloth.
- Color Bleeding: On older vehicles, the fabric dye might bleed when cleaned. Test a small, hidden area first. If bleeding occurs, consider having the headliner professionally cleaned.
Safety Considerations
Working on your car's interior involves a few safety precautions:
- Eye Protection: Always wear safety glasses to protect your eyes from cleaning solutions and debris.
- Skin Protection: Wear gloves to protect your skin from harsh chemicals.
- Ventilation: Ensure proper ventilation by opening doors and windows. Avoid breathing in cleaning fumes.
- Electrical Components: Be extremely careful when cleaning around electrical components, such as dome lights and sun visors. Avoid getting any liquids on these components. Short circuits can cause significant damage.
- Airbag Systems: Be mindful of side curtain airbags, often located along the roof rails. Do not apply excessive pressure or force when cleaning near these areas. Consult your vehicle's owner's manual for specific instructions on airbag locations.
Cleaning your car's headliner is a relatively straightforward task that can significantly improve the appearance and hygiene of your vehicle's interior. By following these steps and taking the necessary precautions, you can achieve professional-looking results without breaking the bank. Remember to always test cleaning solutions in an inconspicuous area first and avoid saturating the headliner to prevent damage. Regular cleaning, even just vacuuming, can help prevent the build-up of dirt and grime, making future cleanings easier.
We have a detailed diagram available that illustrates the construction of a typical car headliner, including the layers of materials and attachment points. This diagram can be helpful for understanding the components and planning your cleaning strategy. You can download it here: [hypothetical download link - replace with actual link]. This diagram illustrates component relationships and can be used when replacing the headliner.