How To Clean Fabric Truck Seats
Keeping your truck’s interior clean, especially the fabric seats, is crucial for comfort, hygiene, and maintaining the resale value of your vehicle. This article provides a detailed guide on effectively cleaning fabric truck seats, focusing on techniques and products that deliver professional-level results. We'll delve into the tools, cleaning solutions, and step-by-step procedures required to tackle everything from light stains to deeply embedded dirt.
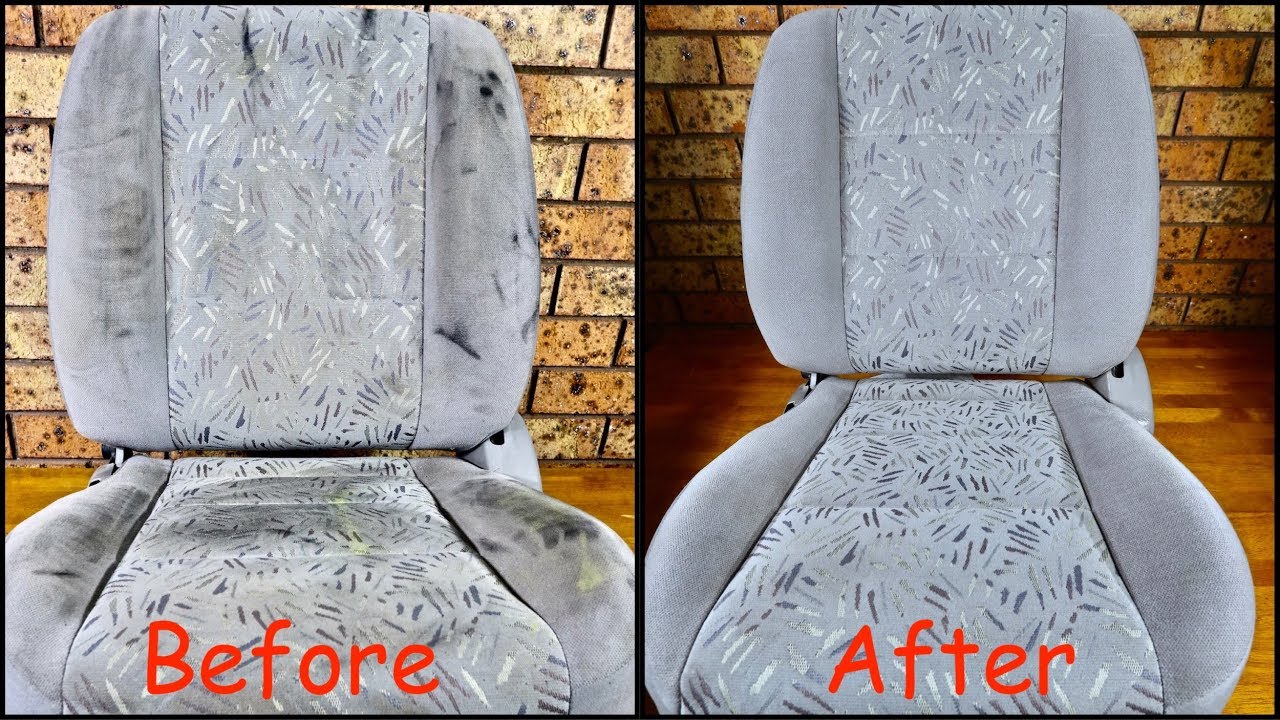
Purpose of Thorough Fabric Seat Cleaning
Regular cleaning of your fabric truck seats goes beyond mere aesthetics. It improves the air quality inside your cabin by removing allergens and dust mites. Furthermore, prompt stain removal prevents permanent damage and discoloration. For those planning to sell their truck, a clean interior significantly increases its appeal and value. Moreover, maintaining clean seats enhances your driving experience, creating a more comfortable and pleasant environment. Finally, think about the wear and tear on your clothing when the fabric is embedded with dirt particles: cleaning the fabric will help extend the life of your clothes.
Key Specs and Main Components: The Cleaning Arsenal
Successful fabric seat cleaning relies on having the right equipment and supplies. Here's a breakdown:
- Vacuum Cleaner with Attachments: A powerful vacuum with a hose and various attachments (crevice tool, upholstery brush) is essential for removing loose dirt and debris. Look for models with strong suction power and HEPA filters to trap allergens.
- Cleaning Solutions: Choosing the right cleaning solution depends on the type of stain and fabric. Options include:
- Upholstery Cleaner: Specifically formulated for fabric seats, available in spray or foam form. Always test in an inconspicuous area first.
- Enzyme Cleaner: Effective for breaking down organic stains like food, blood, and pet stains.
- All-Purpose Cleaner: Diluted appropriately, can be used for general cleaning. Again, test first!
- DIY Solutions: A mixture of warm water and mild dish soap can be effective for light cleaning. White vinegar mixed with water (1:1 ratio) is a good natural stain remover.
- Spray Bottle: For applying cleaning solutions evenly.
- Microfiber Cloths: Soft and absorbent, ideal for wiping and scrubbing. Use different colors to avoid cross-contamination.
- Soft-Bristled Brush: For gently agitating stubborn stains. An old toothbrush can be used for small areas.
- Bucket of Clean Water: For rinsing and diluting solutions.
- Wet/Dry Vacuum (Optional): For extracting excess water and cleaning solution, speeding up the drying process.
- Steamer (Optional): For deep cleaning and sanitizing.
Symbols and Their Meanings: Deciphering Cleaning Product Labels
Understanding the symbols and warnings on cleaning product labels is crucial for safety and effectiveness. Here's a brief overview:
- Exclamation Mark (!): Indicates a potential hazard, such as skin or eye irritation.
- Skull and Crossbones: Signals a highly toxic substance. Avoid contact and inhalation.
- Flammable Symbol (Flame): The product is flammable and should be kept away from heat and open flames.
- Corrosive Symbol (Chemical Spilling): Indicates a corrosive substance that can damage skin and materials.
- Recycling Symbol: Indicates that the packaging is recyclable.
- VOC (Volatile Organic Compounds) Labels: Some products will list VOC content. Lower VOC products are generally better for indoor air quality.
Always read the entire label and follow the manufacturer's instructions carefully. When in doubt, err on the side of caution.
How It Works: The Fabric Seat Cleaning Process, Step-by-Step
Here's a detailed guide to cleaning your fabric truck seats:
- Vacuum Thoroughly: Use the vacuum cleaner with appropriate attachments to remove all loose dirt, dust, and debris from the seats. Pay close attention to crevices and seams.
- Spot Treat Stains: Identify any stains and choose the appropriate cleaning solution. Test the solution on an inconspicuous area of the seat to ensure it doesn't cause discoloration. Apply the solution to the stain, let it sit for a few minutes (follow the product instructions), and then gently blot with a clean microfiber cloth. Avoid rubbing vigorously, which can spread the stain.
- Apply Cleaning Solution: Lightly spray the entire seat with the chosen cleaning solution. Do not saturate the fabric; you want it damp, not soaked.
- Scrub Gently: Use a soft-bristled brush or a clean microfiber cloth to gently scrub the entire seat surface. Work in a circular motion to loosen dirt and grime.
- Extract or Wipe Clean:
- Wet/Dry Vacuum: If you have a wet/dry vacuum, use it to extract the cleaning solution and any remaining dirt. Overlap your passes to ensure thorough extraction.
- Microfiber Cloth: If you don't have a wet/dry vacuum, use clean, damp microfiber cloths to wipe away the cleaning solution. Rinse the cloths frequently in a bucket of clean water.
- Rinse (Optional): If you used a lot of cleaning solution, consider rinsing the seats with clean water. Lightly spray the seats with water and then extract or wipe clean.
- Dry Thoroughly: Allow the seats to air dry completely. This can take several hours or even overnight. Open the truck doors and windows to improve ventilation. You can also use a fan to speed up the drying process. Avoid sitting on the seats until they are completely dry.
- Vacuum Again: Once the seats are dry, vacuum them again to remove any remaining residue or loosened fibers.
Real-World Use: Basic Troubleshooting Tips
Even with careful preparation, challenges can arise. Here are some common issues and their solutions:
- Stubborn Stains: For persistent stains, try using a stronger cleaning solution or repeat the cleaning process. You can also try a specialized stain remover designed for specific types of stains (e.g., ink, grease). Consider a professional detailing service for very difficult stains.
- Water Stains: Water stains can occur if the seats are not dried evenly. To prevent this, ensure thorough extraction and even drying. You can also try dampening the entire seat with a clean, wet cloth and then drying it evenly.
- Unpleasant Odors: If the seats have an unpleasant odor, try using an enzyme cleaner to break down the odor-causing bacteria. You can also sprinkle baking soda on the seats, let it sit for a few hours, and then vacuum it up.
- Discoloration: If the cleaning solution causes discoloration, stop using it immediately. Try a gentler cleaning solution or consult a professional detailer.
Safety: Handling Cleaning Chemicals Responsibly
Cleaning chemicals can pose risks if not handled properly. Always follow these safety precautions:
- Read the Labels: Carefully read and follow the manufacturer's instructions on all cleaning products.
- Wear Gloves: Wear gloves to protect your skin from irritation.
- Ventilation: Work in a well-ventilated area to avoid inhaling fumes.
- Eye Protection: Wear eye protection to prevent accidental splashes.
- Storage: Store cleaning products in a safe place, out of reach of children and pets.
- Mixing Chemicals: Never mix different cleaning chemicals, as this can create dangerous fumes.
Be especially cautious with chemicals labeled as corrosive or flammable. These can cause severe burns or pose a fire hazard.
With the right tools, knowledge, and a bit of elbow grease, you can effectively clean your fabric truck seats and keep your interior looking its best. Remember to always prioritize safety and test cleaning solutions in an inconspicuous area before applying them to the entire seat.
We have a detailed diagram illustrating these steps and highlighting specific problem areas. Contact us, and we'll gladly provide you with a downloadable file of the diagram.