How To Clean Leather Car Interior
Maintaining a pristine interior is crucial for any car enthusiast. While engine tuning and performance modifications are exciting, neglecting the cabin, especially if it features leather upholstery, can significantly detract from the overall driving experience and resale value. This article provides a detailed, step-by-step guide on how to clean leather car interiors, ensuring you achieve professional-quality results without damaging the delicate material.
Understanding Leather Car Interior
Before diving into the cleaning process, it's essential to understand the different types of leather used in car interiors. Most modern vehicles utilize coated leather (also known as protected or finished leather). This type has a protective polymer coating applied to its surface, making it more resistant to stains and wear than aniline leather, which is more porous and susceptible to damage. Identifying the type of leather is crucial for selecting the appropriate cleaning products and techniques. Applying harsh chemicals designed for unfinished leather to a coated leather surface, or vice versa, could lead to irreversible damage.
Key Specs and Preparation
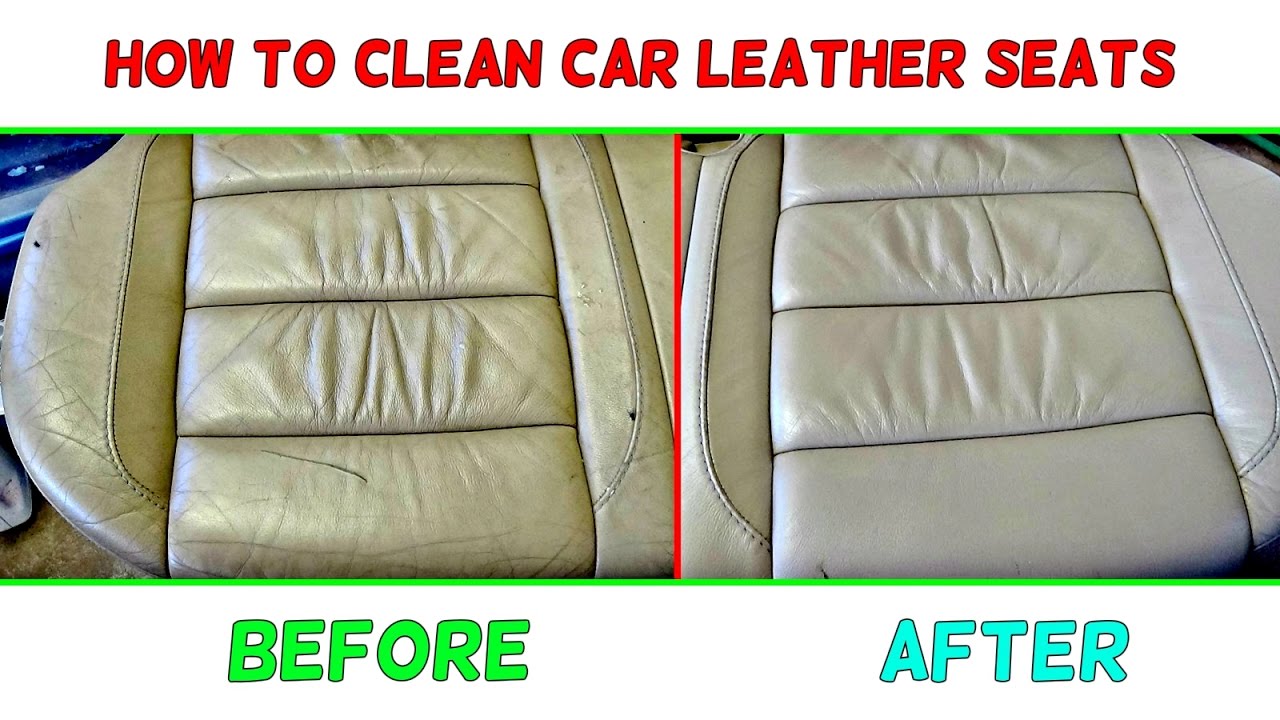
Successful leather cleaning hinges on preparation and the right tools. Here's a list of essential items:
- Vacuum Cleaner: A vacuum cleaner with a soft brush attachment is essential for removing loose dirt and debris.
- Microfiber Cloths: Use high-quality, lint-free microfiber cloths for wiping and buffing. Avoid using abrasive cloths that could scratch the leather.
- Leather Cleaner: Select a pH-balanced leather cleaner specifically designed for automotive use. Test the cleaner on an inconspicuous area first to ensure colorfastness. Avoid using household cleaners, as they often contain harsh chemicals that can dry out or damage the leather.
- Leather Conditioner: After cleaning, a leather conditioner is crucial for replenishing the natural oils and preventing cracking. Choose a conditioner formulated for coated leather.
- Soft-Bristled Brush: A soft-bristled brush (e.g., horsehair brush) can be used to gently agitate the leather cleaner and loosen stubborn dirt.
- Spray Bottle (Optional): A spray bottle can be used to apply the leather cleaner evenly.
- Bucket of Warm Water: For rinsing cloths and diluting cleaning solutions (if necessary).
Safety Note: Always wear gloves and eye protection when working with chemicals. Work in a well-ventilated area to avoid inhaling fumes.
Step-by-Step Cleaning Process
Follow these steps for a thorough and effective leather cleaning:
- Vacuum the Interior: Thoroughly vacuum the entire interior, paying close attention to the seams, crevices, and areas where dirt accumulates. Use the soft brush attachment to avoid scratching the leather.
- Prepare the Leather Cleaner: If using a concentrated leather cleaner, dilute it according to the manufacturer's instructions.
- Apply the Leather Cleaner: Lightly spray the leather cleaner onto a microfiber cloth or directly onto the leather surface. Avoid oversaturating the leather.
- Gently Clean the Leather: Using a circular motion, gently wipe the leather surface with the microfiber cloth. For stubborn dirt or stains, use a soft-bristled brush to gently agitate the cleaner.
- Wipe Away Excess Cleaner: Use a clean, damp microfiber cloth to wipe away any excess cleaner. Avoid leaving any residue on the leather.
- Dry the Leather: Use a clean, dry microfiber cloth to buff the leather and remove any remaining moisture.
- Apply Leather Conditioner: Once the leather is completely dry, apply a leather conditioner according to the manufacturer's instructions. Use a clean microfiber cloth to apply the conditioner evenly.
- Buff the Leather: After the conditioner has had time to absorb (usually a few minutes), buff the leather with a clean, dry microfiber cloth to remove any excess conditioner and restore its natural sheen.
How It Works: The Science Behind Leather Cleaning
Leather cleaners are formulated with surfactants, which are molecules that reduce the surface tension of water, allowing it to penetrate and lift dirt and grime from the leather's surface. The gentle agitation from the microfiber cloth or brush helps to loosen the dirt, while the cleaner's formulation prevents it from redepositing back onto the leather. Leather conditioners, on the other hand, contain oils and moisturizers that replenish the leather's natural oils, preventing it from drying out and cracking. These oils penetrate the leather fibers, keeping them supple and preventing them from becoming brittle.
Real-World Use: Troubleshooting Tips
- Stains: For tough stains, such as ink or dye transfer, consider using a dedicated leather stain remover. Always test the stain remover on an inconspicuous area first.
- Cracking: If your leather is already cracked, a leather conditioner can help to improve its appearance and prevent further damage. However, severe cracking may require professional repair or replacement.
- Fading: Prolonged exposure to sunlight can cause leather to fade. Consider using a leather protectant with UV inhibitors to help prevent fading.
- Smells: Persistent odors can be addressed with specialized leather odor eliminators. Make sure the product is safe for your type of leather.
Safety: Avoiding Damage
- Harsh Chemicals: Avoid using harsh chemicals, such as bleach, ammonia, or solvents, as they can damage the leather.
- Abrasive Cleaners: Do not use abrasive cleaners or scrubbing pads, as they can scratch the leather.
- Oversaturation: Avoid oversaturating the leather with cleaner or conditioner, as this can lead to water damage and discoloration.
- Heat: Do not use heat to dry the leather, as this can cause it to shrink and crack. Allow the leather to air dry naturally.
Advanced Techniques (For Experienced DIYers)
For more advanced cleaning, consider using a leather dye or color restorer to repair minor scratches or fading. These products require careful application and should only be used by experienced DIYers. Always follow the manufacturer's instructions carefully and test the product on an inconspicuous area first.
Conclusion
Cleaning leather car interiors requires a delicate balance of technique, the right products, and patience. By following the steps outlined in this article and taking the necessary precautions, you can maintain a pristine interior that enhances your driving experience and preserves the value of your vehicle. Remember to always test products in an inconspicuous area first and consult with a professional detailer if you are unsure about any aspect of the cleaning process. Regular maintenance, even a quick wipe-down every few weeks, will prevent buildup and make the cleaning process significantly easier in the long run.
We have a detailed leather cleaning product and technique guide that supplements this article. It includes specific product recommendations, maintenance schedules, and advanced troubleshooting tips. Contact us to download the comprehensive guide and take your leather care to the next level.