How To Convert Brake Drum To Disc Brakes
Converting from drum brakes to disc brakes is a popular modification for a few key reasons. Many enthusiasts seek the enhanced stopping power and reduced brake fade that disc brakes offer compared to their drum counterparts. This article provides a detailed guide for experienced DIYers who are considering this upgrade, covering the necessary steps, potential pitfalls, and best practices. Safety is paramount when working on any braking system, so exercise caution and consult a professional if you're unsure about any part of the process.
Understanding Drum and Disc Brakes: A Comparative Overview
Before diving into the conversion process, it's crucial to understand the fundamental differences between drum and disc brakes. This will not only aid in the conversion but also help you diagnose any issues down the line.
Drum Brakes: A Traditional System
Drum brakes are an older design, typically found on the rear axles of older vehicles and some modern economy cars. They operate by using brake shoes that are pressed outward against the inside surface of a rotating brake drum. The hydraulic pressure from the brake master cylinder forces a wheel cylinder to push the shoes against the drum, creating friction and slowing the vehicle.
The advantages of drum brakes include lower manufacturing costs and a self-energizing effect, where the rotation of the drum assists in applying the brakes. However, they suffer from several drawbacks:
- Brake Fade: Drum brakes are more prone to brake fade, a phenomenon where the braking force decreases with repeated use due to overheating. The enclosed design traps heat, reducing the coefficient of friction between the shoes and the drum.
- Reduced Stopping Power: Generally, drum brakes offer less stopping power compared to disc brakes, especially in wet or high-stress conditions.
- Complexity: While simple in concept, drum brakes have more components than disc brakes, which can make them more difficult to service and adjust.
- Water Susceptibility: The enclosed design can trap water and debris, reducing braking effectiveness and increasing the risk of corrosion.
Disc Brakes: The Modern Standard
Disc brakes are the industry standard for modern vehicles, particularly on the front axles where most of the braking force is applied. They consist of a brake rotor (or disc) that rotates with the wheel, a caliper that houses brake pads, and a hydraulic system that applies pressure to the pads. When you press the brake pedal, hydraulic pressure from the master cylinder forces the caliper piston(s) to clamp the brake pads against the rotor, creating friction and slowing the vehicle.
The advantages of disc brakes are numerous:
- Superior Stopping Power: Disc brakes generally provide significantly better stopping power than drum brakes, especially at higher speeds and in emergency situations.
- Reduced Brake Fade: The open design of disc brakes allows for better heat dissipation, reducing the risk of brake fade.
- Consistent Performance: Disc brakes offer more consistent performance across a range of conditions, including wet weather.
- Easier Maintenance: Disc brakes are generally easier to service and maintain than drum brakes.
Technical Breakdown: The Conversion Process
Converting from drum to disc brakes requires careful planning and execution. Here's a step-by-step guide:
1. Research and Parts Selection
This is the most crucial step. You'll need to identify a compatible disc brake conversion kit for your specific vehicle make, model, and year. Look for kits that include:
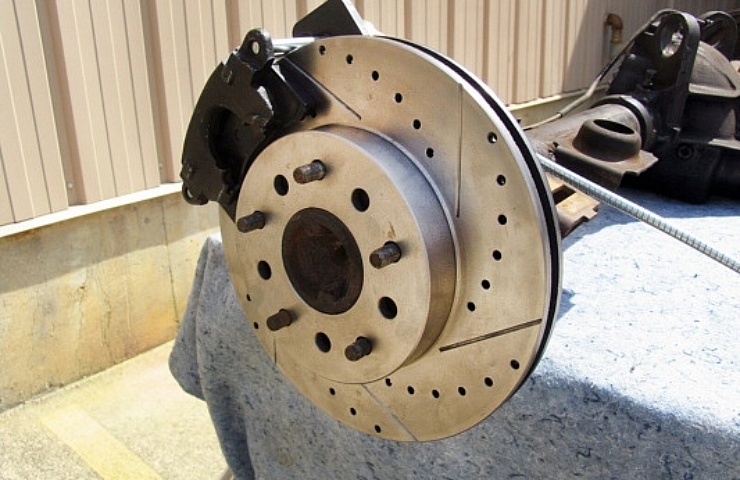
- Brake Rotors: Choose rotors that are the correct size and bolt pattern for your vehicle. Consider slotted or drilled rotors for improved heat dissipation, but be aware that these may also increase brake pad wear.
- Calipers: Ensure the calipers are compatible with your existing brake lines and master cylinder. Options include single-piston, dual-piston, or even multi-piston calipers for enhanced braking performance.
- Brake Pads: Select brake pads appropriate for your driving style and conditions. Options range from organic pads for quiet operation to semi-metallic or ceramic pads for higher performance.
- Mounting Brackets: These brackets are essential for adapting the new calipers to your vehicle's existing suspension.
- Brake Lines: You'll likely need new brake lines to connect the calipers to your vehicle's hydraulic system. Stainless steel braided lines are a popular upgrade for improved durability and brake feel.
- Emergency Brake Cables: Drum brakes typically use a different emergency brake cable system than disc brakes. The kit should include appropriate cables or adapters.
- Dust Shields (Optional): These shields protect the rotors and calipers from debris.
Important Note: Double-check the compatibility of all components before purchasing.
2. Preparation and Disassembly
Before you begin, gather all the necessary tools, including:
- Jack and Jack Stands
- Wheel Chocks
- Socket Set and Wrenches
- Brake Line Wrench (Flare Nut Wrench)
- Pliers
- Screwdrivers
- Brake Fluid
- Brake Cleaner
- Torque Wrench
- Penetrating Oil
Once you have everything ready, follow these steps:
- Safely lift and support the vehicle using jack stands. Never work under a vehicle supported only by a jack.
- Remove the wheels.
- Disconnect the existing brake lines from the drum brake assembly. Use a brake line wrench to avoid damaging the fittings. Be prepared for brake fluid to leak out.
- Disconnect the emergency brake cables.
- Remove the brake drums, shoes, and wheel cylinders.
- Remove the backing plates that held the drum brake assembly in place. This may require removing the axle.
3. Installation of Disc Brake Components
Now it's time to install the new disc brake components:
- Install the mounting brackets according to the kit instructions. Ensure they are properly aligned and securely fastened. Use a torque wrench to tighten the bolts to the specified torque.
- Install the brake rotors. They should fit snugly onto the hub.
- Install the calipers onto the mounting brackets. Ensure the brake pads are properly seated in the calipers.
- Connect the new brake lines to the calipers and the existing brake system. Use new copper crush washers to ensure a leak-free seal. Tighten the fittings securely, but avoid over-tightening.
- Connect the new emergency brake cables according to the kit instructions. Adjust the cables to ensure proper operation of the emergency brake.
- Install the dust shields (if included).
4. Brake Bleeding
After installing the new brake components, it's essential to bleed the brakes to remove any air from the system. Air in the brake lines can significantly reduce braking performance.
There are several methods for bleeding brakes, including:
- Manual Bleeding: This involves having a helper pump the brake pedal while you open and close the bleeder screws on the calipers.
- Pressure Bleeding: This uses a pressure bleeder to force brake fluid through the system, making it a one-person job.
- Vacuum Bleeding: This uses a vacuum pump to draw brake fluid through the system.
Follow the instructions for your chosen method, and continue bleeding until clear, bubble-free fluid comes out of each bleeder screw. Start with the caliper furthest from the master cylinder and work your way closer.
5. Testing and Adjustment
After bleeding the brakes, test the system thoroughly:
- Check for leaks around all fittings and connections.
- Pump the brake pedal several times to ensure it feels firm.
- Perform a low-speed test drive to check the braking performance. Gradually increase the speed and braking force to ensure the brakes are functioning correctly.
- Adjust the emergency brake cables as needed to ensure proper operation.
Common Issues and Maintenance Concerns
- Incorrect Parts: Using incompatible parts can lead to serious safety issues. Double-check compatibility before purchasing.
- Air in the Brake Lines: Air in the brake lines will result in a spongy brake pedal and reduced braking performance. Thorough bleeding is essential.
- Leaking Brake Lines: Leaks can compromise the entire braking system. Inspect all connections carefully and tighten as needed.
- Warped Rotors: Over time, rotors can warp, leading to vibration and reduced braking performance. Replace warped rotors as needed.
- Worn Brake Pads: Regularly inspect your brake pads and replace them when they reach the wear limit.
Do’s and Don’ts / Best Practices
Do’s:
- Use quality parts: Don't compromise on safety. Invest in reputable brands and quality components.
- Follow instructions carefully: Pay close attention to the instructions provided with the conversion kit.
- Torque fasteners correctly: Use a torque wrench to tighten all bolts and nuts to the specified torque.
- Bleed the brakes thoroughly: Ensure all air is removed from the system.
- Test the brakes thoroughly: Perform a series of tests to ensure the brakes are functioning correctly before driving on public roads.
Don’ts:
- Reuse old brake lines: Replace old brake lines with new ones for improved reliability.
- Over-tighten brake line fittings: Over-tightening can damage the fittings and cause leaks.
- Drive with a spongy brake pedal: A spongy brake pedal indicates air in the brake lines. Bleed the brakes before driving.
- Neglect emergency brake adjustment: Properly adjust the emergency brake cables to ensure proper operation.
- Assume anything: When in doubt, consult a professional mechanic.
Conclusion
Converting from drum to disc brakes can significantly improve your vehicle's braking performance and safety. However, it's a complex project that requires careful planning, execution, and attention to detail. If you're an experienced DIYer with a solid understanding of automotive braking systems, this conversion is achievable. However, if you're not comfortable working on brakes, it's best to leave the job to a qualified mechanic. Prioritize safety above all else. A properly executed disc brake conversion will provide peace of mind and enhanced driving confidence.