How To Convert Drum Brakes To Disc Brakes
The quest for enhanced stopping power is a common aspiration among car enthusiasts. Often, this pursuit leads to considering an upgrade from the traditional, yet sometimes lacking, drum brake system to the more modern and efficient disc brake setup. But where do you even begin? Why is it better? And is it really worth the effort and expense? This guide will dissect the process of converting drum brakes to disc brakes, illuminating the 'how' and 'why' behind each step, and ultimately helping you determine if this upgrade is the right move for your vehicle.
The Problem: Brake Fade and Inconsistent Performance
Imagine you're navigating a winding mountain road. Each turn demands a controlled reduction in speed. With drum brakes, you might notice that with each successive braking application, the pedal feels softer, and the car takes longer to slow down. This phenomenon, known as brake fade, is a primary limitation of drum brake systems. The friction material in drum brakes, enclosed within a rotating drum, heats up quickly under repeated or heavy braking. This heat causes the brake shoes to expand, reducing the contact area between the shoes and the drum, leading to decreased braking efficiency. In more extreme cases, the brake fluid itself can overheat and boil, creating compressible vapor bubbles that further reduce braking effectiveness – a frightening scenario, to say the least.
Drum brakes are also more susceptible to performance degradation from moisture and debris. Water or dirt can become trapped inside the drum, reducing friction and causing inconsistent braking behavior. This is because the self-energizing effect of drum brakes can cause them to grab unpredictably when contaminated.
Disc Brakes: A Superior Solution
Now, picture the same mountain road, but this time your vehicle is equipped with disc brakes. You confidently approach each turn, applying the brakes with consistent pedal feel and predictable stopping power. Why the difference? Disc brakes offer several inherent advantages over drum brakes. The most significant is their superior heat dissipation. Because the rotor (the disc brake equivalent of the drum) is exposed to open air, heat is readily dissipated, minimizing brake fade. Furthermore, disc brakes are self-cleaning, meaning that water, dirt, and debris are easily swept away by the rotating rotor and the motion of the brake pads.
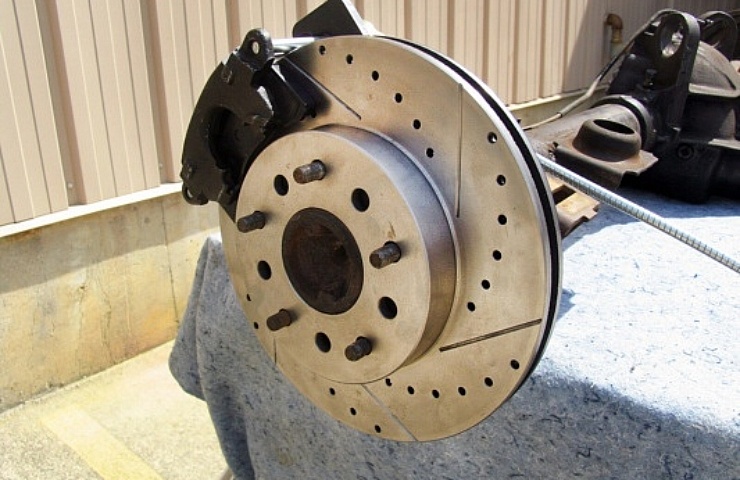
How Disc Brakes Work: A Deep Dive
Let's break down the mechanics. A disc brake system consists of a few key components: the rotor, the caliper, the brake pads, and the hydraulic system. The rotor is a metal disc that rotates along with the wheel. The caliper, mounted near the rotor, houses the brake pads. When you press the brake pedal, the master cylinder sends pressurized brake fluid through the brake lines to the caliper. This hydraulic pressure forces the caliper's piston(s) to press the brake pads against the rotor. The resulting friction slows the rotor, and therefore the wheel, down. Because this friction is applied to an external surface, rather than within a drum, heat is dissipated quickly. Think of it like grabbing a spinning top with your fingers – easier to cool your fingers when they are exposed to the air, right?
Unlike drum brakes, disc brakes typically utilize a non-self-energizing design. This means the braking force is directly proportional to the pressure applied to the pedal, providing more linear and predictable braking performance. This also helps prevent "grabbing," a common complaint with drum brakes, especially in wet conditions.
The Conversion Process: A Step-by-Step Guide
Converting drum brakes to disc brakes is a moderately complex project, typically requiring some mechanical skill and specialized tools. Here's a general overview of the steps involved:
- Research and Planning: This is perhaps the most critical step. You need to determine if a conversion kit exists for your specific vehicle. Many aftermarket companies offer complete kits designed to simplify the process. Ensure the kit is compatible with your vehicle's bolt pattern, wheel offset, and master cylinder capacity. If a kit isn't available, you'll need to source individual components, which requires a much deeper understanding of braking system design.
- Gathering Components: Whether you're using a kit or sourcing parts individually, you'll need the following: rotors, calipers, brake pads, caliper brackets, brake hoses, a proportioning valve (more on this later), and potentially a new master cylinder. Some kits may also include new wheel bearings and hubs.
- Removing the Drum Brakes: This involves removing the wheel, disconnecting the brake lines, detaching the drum, and removing the brake shoes, springs, and other internal components. Be sure to properly dispose of the old brake fluid.
- Installing the Caliper Brackets: The caliper brackets mount to the vehicle's spindle (or axle housing) and provide a mounting point for the caliper. This often requires bolting the bracket in place using existing mounting points or drilling new holes. Accuracy is critical here to ensure proper caliper alignment.
- Mounting the Rotor and Caliper: Once the brackets are installed, the rotor is mounted onto the hub, and the caliper is bolted to the bracket. Be sure to use new hardware and torque the bolts to the manufacturer's specifications.
- Connecting the Brake Hoses: Connect the new brake hoses to the calipers and the existing brake lines. Use new crush washers and ensure the hoses are routed properly to avoid interference with suspension components or other moving parts.
- Installing the Proportioning Valve: This is an often overlooked but essential component. The proportioning valve controls the amount of hydraulic pressure sent to the front and rear brakes. Drum brakes typically require more pressure than disc brakes. Without a proportioning valve, the rear brakes could lock up prematurely, leading to a loss of control. Adjustable proportioning valves are recommended for fine-tuning the braking balance.
- Bleeding the Brakes: After installing all the components, you need to bleed the brakes to remove any air from the hydraulic system. Start with the wheel furthest from the master cylinder and work your way closer. Use a brake bleeder kit or have a helper pump the brake pedal while you open and close the bleeder screw on each caliper.
- Testing and Adjustments: After bleeding the brakes, test the system thoroughly in a safe environment. Pay attention to pedal feel, stopping distance, and any unusual noises or vibrations. Adjust the proportioning valve as needed to achieve optimal braking balance.
Pros and Cons of Disc Brake Conversion
Pros:
- Improved Stopping Power: Disc brakes generally offer shorter stopping distances compared to drum brakes.
- Reduced Brake Fade: Superior heat dissipation minimizes brake fade, especially under heavy or repeated braking.
- Better Performance in Wet Conditions: The self-cleaning design of disc brakes ensures consistent performance, even in wet or muddy conditions.
- Easier Maintenance: Disc brakes are generally easier to inspect and service than drum brakes. Changing brake pads is a relatively simple task.
- More Modern Feel: Disc brakes provide a firmer and more responsive brake pedal feel.
Cons:
- Cost: Converting to disc brakes can be expensive, especially if you're using a high-quality conversion kit.
- Complexity: The conversion process can be complex, requiring mechanical skill and specialized tools.
- Compatibility Issues: Not all vehicles are suitable for disc brake conversions. Compatibility issues can arise with wheel offset, master cylinder capacity, and ABS systems.
- Potential for Imbalance: Improper installation or adjustment of the proportioning valve can lead to braking imbalance and reduced safety.
Use Cases and Manufacturer Examples
Disc brake conversions are particularly popular in several scenarios:
- Classic Cars: Many owners of classic cars convert to disc brakes to improve safety and handling.
- Off-Road Vehicles: Disc brakes offer superior performance in off-road conditions, where drum brakes are prone to contamination and fade.
- Performance Upgrades: Enthusiasts looking to improve their vehicle's braking performance often opt for disc brake conversions.
Several aftermarket companies specialize in disc brake conversion kits, including:
- Wilwood Engineering: Known for high-performance braking systems for a wide range of vehicles.
- Baer Brakes: Offers a variety of brake upgrades, including complete disc brake conversion kits.
- SSBC (Stainless Steel Brakes Corporation): Specializes in brake systems for classic and muscle cars.
Real-World Insights and Recommendations
While disc brake conversions can offer significant benefits, it's essential to approach the project with realistic expectations. Don't assume that simply installing disc brakes will magically transform your vehicle's braking performance. Factors such as tire quality, suspension condition, and driving habits also play a crucial role.
Recommendation 1: Prioritize Quality Components. Don't cut corners on brake components. Invest in high-quality rotors, calipers, and brake pads from reputable manufacturers. Cheap components can compromise braking performance and safety.
Recommendation 2: Pay Attention to the Proportioning Valve. Proper adjustment of the proportioning valve is critical for achieving optimal braking balance. Spend the time to fine-tune the valve to prevent premature rear wheel lockup.
Recommendation 3: Consider a Professional Installation. If you're not comfortable working on braking systems or lack the necessary tools and expertise, consider having the conversion performed by a qualified mechanic. Brakes are a critical safety component, and improper installation can have serious consequences.
Recommendation 4: Upgrade the Master Cylinder (Potentially). Depending on the size of the calipers you choose and the existing master cylinder's capacity, you may need to upgrade to a larger master cylinder to ensure adequate brake pedal feel and hydraulic pressure. An undersized master cylinder can result in a soft pedal and reduced braking performance. Research your master cylinder requirements before beginning.
In conclusion, converting from drum brakes to disc brakes is a substantial upgrade that can significantly improve braking performance and safety. However, it's a complex project that requires careful planning, quality components, and meticulous execution. By understanding the principles behind disc brake systems and following the steps outlined in this guide, you can make an informed decision and potentially transform your vehicle's braking capabilities.