How To Do A Compression Test On Engine
Alright, let's talk compression testing. If you're wrenching on your own vehicle, especially if you're chasing down a performance issue, low power, or just general engine roughness, understanding how to perform a compression test is absolutely critical. This isn't just about blindly throwing parts at a problem; it's about getting a real, quantifiable look inside your engine's cylinders to see what's *actually* happening.
Background: The Internal Combustion Engine and Compression
Before diving into the test itself, let's quickly recap the four-stroke engine cycle. You've got intake, where the piston moves down, drawing a mixture of air and fuel into the cylinder (or just air in a direct-injection engine). Then comes compression: the piston moves *up*, squeezing that mixture. Next, combustion: the spark plug ignites the compressed mixture, forcing the piston down. Finally, exhaust: the piston moves up again, pushing the spent gases out of the cylinder. Compression is *absolutely vital* for efficient combustion. Think of it like this: the higher the compression, the bigger the bang you get when the fuel ignites. If you're losing compression, you're losing power, and you're likely wasting fuel. Compression is measured in pounds per square inch (PSI) or sometimes bar, a metric equivalent.
The compression process relies on a few key components: the piston rings, which seal the gap between the piston and the cylinder wall; the intake and exhaust valves, which must seal tightly against their seats in the cylinder head; and the cylinder head gasket, which provides a gas-tight seal between the cylinder head and the engine block. A leak in any of these areas means lost compression.
The Technical Breakdown: How a Compression Test Works
A compression test is a relatively straightforward procedure that measures the maximum pressure achieved in each cylinder during the compression stroke. We're essentially measuring how well each cylinder is sealing. Here’s the step-by-step process:
Step 1: Preparation is Key
Safety First! Disconnect the negative battery cable. This prevents accidental starting of the engine during the test. You don't want to be cranking an engine with your hands or tools near the rotating assembly. Wear safety glasses and gloves.
Warm-Up (Optional but Recommended): Ideally, you want to perform the test on a slightly warmed-up engine. This allows the engine components to expand to their normal operating tolerances, giving you a more accurate reading. Don't make it scorching hot; just lukewarm. However, a cold test is acceptable, just note it in your records.
Disable the Ignition System: This is critical! You must prevent the engine from starting during the test. The method for disabling the ignition system varies depending on the vehicle. Common methods include:
- Disconnecting the ignition coil(s): Locate the ignition coils (one for each cylinder or a central coil pack) and disconnect the wiring harness from them.
- Removing the fuel pump relay: This prevents fuel from entering the cylinders, which is important, because raw fuel can wash down cylinder walls. The relay's location will be in your owner's manual or a wiring diagram.
- For distributor-based systems: Disconnect the main wire from the distributor to the coil.
Consult your vehicle's repair manual for the specific procedure for your make and model.
Open the Throttle: Fully open the throttle plate. This allows maximum airflow into the cylinders during cranking. You can use a throttle body prop or have a helper hold the accelerator pedal fully depressed.
Step 2: Performing the Test
Remove the Spark Plugs: Carefully remove all of the spark plugs. Keep track of which spark plug came from which cylinder; inspecting the spark plugs can give you additional clues about the engine's condition. (fouled with oil, excessively carbon buildup, etc.)
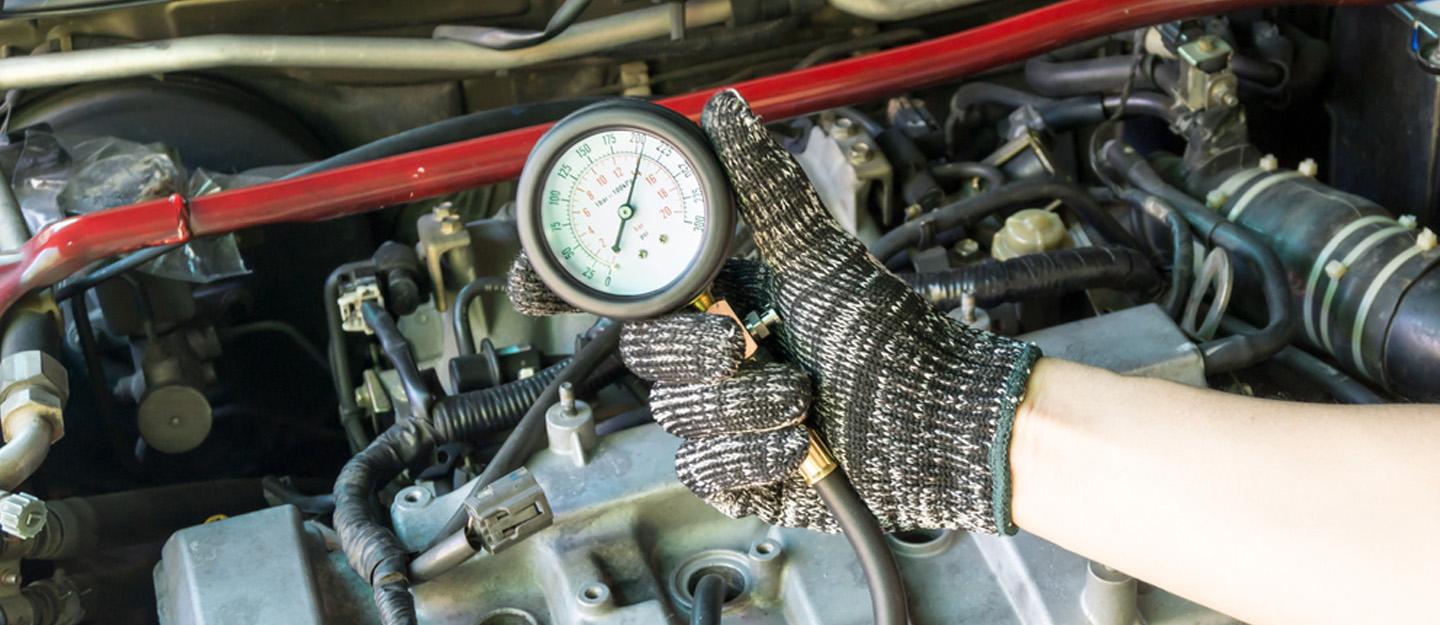
Install the Compression Tester: Thread the compression tester's hose into the spark plug hole of the first cylinder you want to test. Make sure it's snug, but don't overtighten it. There are two main types of compression testers:
- Screw-in type: These provide a more secure seal and are generally more accurate.
- Hold-in type: These require you to physically hold the rubber cone of the tester against the spark plug hole. They can be less accurate and more difficult to use.
Crank the Engine: With the compression tester installed, crank the engine for approximately 5-7 seconds, or until the needle on the gauge stops rising. You want to see the maximum pressure achieved.
Record the Reading: Note the reading on the gauge. Some testers have a "hold" feature that allows you to record the reading after cranking. If yours doesn't, quickly note it before the needle drops.
Repeat for All Cylinders: Repeat steps 2 and 3 for each cylinder, making sure to record the reading for each one.
Step 3: Analyzing the Results
Compare the Readings: This is where the real diagnosis begins. You're looking for two things:
- Absolute Compression: What's the overall compression pressure in each cylinder? Consult your vehicle's repair manual for the specified compression pressure for your engine. A general rule of thumb is that most engines should have compression pressures above 100 PSI, but always refer to the manufacturer's specifications.
- Compression Variation: How much does the compression vary between cylinders? A significant difference in compression between cylinders is a major red flag. A variation of more than 10-15% between the highest and lowest reading cylinder is cause for concern.
Interpreting the Results:
- Low Compression in All Cylinders: This could indicate worn piston rings in all cylinders, a timing belt or chain that has skipped a tooth, or a severely damaged cylinder head gasket (though usually it will only affect adjacent cylinders).
- Low Compression in One Cylinder: This could indicate a burnt or leaking valve, a damaged piston ring in that cylinder, or a problem with the cylinder head gasket affecting only that cylinder.
- Low Compression in Adjacent Cylinders: This strongly suggests a blown cylinder head gasket between those cylinders.
- Zero Compression in One Cylinder: This is a serious problem! It could indicate a completely broken valve, a hole in the piston, or a severely damaged cylinder.
Common Issues and Maintenance Concerns
- False Readings: A weak battery can cause inaccurate compression readings because the engine isn't cranking fast enough. Make sure your battery is fully charged before testing.
- Worn Compression Tester: Over time, the seals in the compression tester can wear out, leading to inaccurate readings. Periodically inspect and replace the tester as needed.
- Flooding the Engine: If you crank the engine excessively with the fuel system disabled, you might still get some fuel entering the cylinders, especially with older systems. This can dilute the oil film on the cylinder walls and give you a false low reading.
Do's and Don'ts / Best Practices
Do's:
- Do Consult your vehicle's repair manual for specific instructions and compression specifications.
- Do Label and inspect the spark plugs as you remove them. They can provide valuable clues.
- Do Make sure the throttle is fully open during the test.
- Do Record all readings carefully.
- Do Repeat the test if you suspect an inaccurate reading.
Don'ts:
- Don't Overtighten the compression tester in the spark plug hole.
- Don't Crank the engine for excessive periods without allowing it to cool down.
- Don't Ignore low compression readings. Investigate the cause thoroughly.
- Don't Attempt a compression test without disabling the ignition system and fuel system.
Conclusion and Recommendations
A compression test is an invaluable diagnostic tool for assessing the health of your engine. By following the steps outlined above and carefully analyzing the results, you can gain a clear understanding of the condition of your cylinders and identify potential problems. If you find significant compression variations or low compression readings, further investigation is warranted. A leak-down test, which involves pressurizing each cylinder with compressed air and listening for leaks, can help pinpoint the source of the compression loss. If you're uncomfortable performing a compression test yourself, or if you're unsure about interpreting the results, it's always best to consult with a qualified mechanic. However, with some patience and attention to detail, you can confidently perform a compression test and gain valuable insight into the health of your engine. Happy wrenching!