How To Drain Gas Tank Car
Draining a car's gas tank might seem daunting, but it's a task many car owners face at some point. Whether you need to remove contaminated fuel, prepare your car for long-term storage, or address a serious misfueling issue (like accidentally putting diesel in a gasoline engine or vice versa), knowing how to safely and effectively drain your gas tank is a valuable skill. This guide will walk you through the process, covering the reasons why you might need to drain your tank, the tools you'll need, and the steps to take to ensure a safe and successful outcome.
Why Draining Your Gas Tank Matters
There are several reasons why draining your car's gas tank might be necessary. Understanding these reasons will help you determine if it's the right solution for your situation:
- Misfueling: Perhaps the most common reason is accidentally putting the wrong type of fuel in your car. Adding diesel to a gasoline engine or gasoline to a diesel engine can cause significant damage if the car is started and run. Draining the tank immediately is crucial to prevent costly repairs.
- Contaminated Fuel: Water, debris, or old, degraded fuel can contaminate your gas tank. This contamination can lead to poor engine performance, stalling, and even damage to fuel system components. Draining the tank and replacing the fuel filter can resolve these issues.
- Long-Term Storage: If you're storing your car for an extended period (months or even years), gasoline can degrade and become gummy, potentially clogging fuel lines and injectors. Draining the tank helps prevent these problems and makes it easier to start the car when you're ready to use it again.
- Fuel System Repairs: Some fuel system repairs require a completely empty gas tank to safely and effectively work on components like the fuel pump, fuel lines, or fuel level sensor.
- Theft Prevention (Rare): In very specific and unusual circumstances, if you are leaving your car unattended in a high-crime area for a long period, draining the gas tank *might* be considered a (somewhat impractical) deterrent to theft. However, this is not a primary reason and is generally less effective than other anti-theft measures.
Choosing the Right Method and Tools
There are a few different methods for draining a gas tank, and the best approach depends on your car's make and model, your comfort level, and the tools you have available. Here's a breakdown of common methods and the tools you'll need:
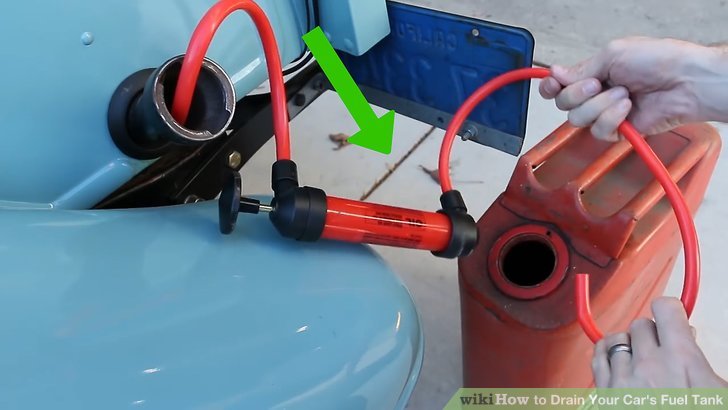
1. Siphoning
Siphoning is a relatively simple method that involves using a hose to create a vacuum and draw fuel out of the tank. This method is best for older cars that don't have anti-siphon devices in the fuel filler neck.
Tools Required:
- Siphon hose: A flexible hose, typically made of plastic or rubber, long enough to reach the bottom of the gas tank. Choose a hose that's resistant to gasoline.
- Fuel-resistant container: Several large, approved fuel containers to store the drained gasoline. Make sure they are clearly labeled "Gasoline" and have tight-fitting lids.
- Hand pump (optional): A hand pump can make siphoning easier and safer, especially if you're having trouble creating a vacuum.
- Gloves: Chemical-resistant gloves to protect your hands from gasoline.
- Safety glasses: To protect your eyes from splashes.
2. Using the Fuel Pump Access Panel
Many modern cars have an access panel in the trunk or under the rear seat that allows you to access the fuel pump. This method involves disconnecting the fuel line at the fuel pump and using the pump itself to drain the tank. This is generally a safer and more efficient method than siphoning, especially for newer vehicles.
Tools Required:
- Fuel-resistant container: Several large, approved fuel containers.
- Wrench or socket set: To disconnect the fuel line.
- Screwdriver: To remove the access panel.
- Gloves: Chemical-resistant gloves.
- Safety glasses: To protect your eyes.
- Rags: To clean up any spills.
- Jumper wires (optional): To power the fuel pump (see instructions below).
3. Using a Drain Plug (Rare)
Some older vehicles have a drain plug at the bottom of the gas tank. This is the easiest method, but it's becoming increasingly rare. If your car has a drain plug, simply unscrew it to drain the tank.
Tools Required:
- Wrench or socket set: To remove the drain plug.
- Fuel-resistant container: To catch the draining fuel.
- Gloves: Chemical-resistant gloves.
- Safety glasses: To protect your eyes.
Step-by-Step Instructions
Important Safety Precautions: Gasoline is highly flammable and can be dangerous. Work in a well-ventilated area, away from any open flames, sparks, or sources of heat. Do not smoke. Have a fire extinguisher nearby. Wear safety glasses and chemical-resistant gloves. Dispose of gasoline properly according to local regulations.
Method 1: Siphoning
- Prepare the area: Park your car on a level surface in a well-ventilated area. Open the fuel filler door.
- Insert the siphon hose: Carefully insert the siphon hose into the fuel filler neck. Gently push it down until you feel it reach the bottom of the tank. Be careful not to force the hose, as you could damage the fuel tank or the anti-siphon device (if present).
- Start the siphon: There are several ways to start a siphon. You can use a hand pump, or you can manually create a vacuum by sucking on the hose (be extremely careful not to swallow any gasoline!).
- Drain the tank: Once the fuel starts flowing, place the other end of the hose into your fuel-resistant container. Monitor the fuel level in the container and switch to a new container as needed.
- Stop the siphon: When the tank is empty, carefully remove the siphon hose.
- Dispose of the fuel properly. Contact your local waste management for information on safe fuel disposal.
Method 2: Using the Fuel Pump Access Panel
- Prepare the area: Park your car on a level surface in a well-ventilated area. Disconnect the negative terminal of the battery. This is crucial for safety.
- Locate the fuel pump access panel: Consult your car's repair manual to find the location of the fuel pump access panel. It's typically located in the trunk or under the rear seat.
- Remove the access panel: Use a screwdriver to remove the screws or clips holding the access panel in place.
- Disconnect the fuel line: Carefully disconnect the fuel line from the fuel pump. Be prepared for some fuel to spill, so have rags handy.
- Connect a hose (optional): If possible, connect a length of fuel-resistant hose to the fuel pump outlet. This will make it easier to direct the fuel into your container.
- Power the fuel pump: This is the trickiest part. You need to briefly power the fuel pump to pump the fuel out of the tank. *Consult your car's repair manual for the correct wiring diagram.* You can often use jumper wires connected to the car's battery to briefly power the fuel pump. Only apply power in short bursts (a few seconds at a time) to avoid overheating the pump.
- Drain the tank: Collect the draining fuel in your fuel-resistant containers.
- Reconnect everything: Once the tank is empty, disconnect the jumper wires, reconnect the fuel line, and reassemble the access panel.
- Reconnect the battery: Reconnect the negative terminal of the battery.
- Dispose of the fuel properly. Contact your local waste management for information on safe fuel disposal.
Method 3: Using a Drain Plug
- Prepare the area: Park your car on a level surface in a well-ventilated area.
- Locate the drain plug: The drain plug is usually located at the bottom of the gas tank.
- Position a container: Place a fuel-resistant container under the drain plug to catch the fuel.
- Remove the drain plug: Carefully unscrew the drain plug using the appropriate wrench or socket.
- Drain the tank: Allow the fuel to drain completely into the container.
- Replace the drain plug: Once the tank is empty, replace the drain plug and tighten it securely.
- Dispose of the fuel properly. Contact your local waste management for information on safe fuel disposal.
Real-World Owner Experiences
Many car owners have shared their experiences draining their gas tanks online. Here are a few common themes and tips:
- Double-check your car's manual: Before you start, consult your car's repair manual for specific instructions and diagrams related to your make and model.
- Take your time: Rushing the process can lead to spills, mistakes, and potential injuries. Be patient and work carefully.
- Consider professional help: If you're not comfortable working with gasoline or you're unsure about any step of the process, consider taking your car to a qualified mechanic.
- Proper disposal is key: Don't pour gasoline down the drain or into the ground. Contact your local waste management facility for information on proper disposal methods.
Frequently Asked Questions (FAQs)
Q: Is it safe to drain my own gas tank?
A: Yes, but only if you take the necessary safety precautions. Gasoline is highly flammable, so it's crucial to work in a well-ventilated area, away from any open flames or sparks. Wear safety glasses and chemical-resistant gloves, and have a fire extinguisher nearby.
Q: How long does it take to drain a gas tank?
A: The time it takes to drain a gas tank depends on the method you use and the size of your tank. Siphoning can take anywhere from 30 minutes to an hour, while using the fuel pump can be faster.
Q: What do I do with the old gasoline?
A: Do not pour gasoline down the drain or into the ground. Contact your local waste management facility for information on proper disposal methods. Many facilities accept gasoline for recycling or disposal.
Q: Can I reuse the old gasoline?
A: It's generally not recommended to reuse old gasoline, especially if it's been contaminated or has been sitting for a long time. Old gasoline can degrade and cause engine problems.
Q: What if my car has an anti-siphon device?
A: Anti-siphon devices prevent you from siphoning fuel out of the tank. If your car has one, you'll need to use a different method, such as using the fuel pump access panel or consulting a mechanic.
Q: How much does it cost to have a mechanic drain my gas tank?
A: The cost to have a mechanic drain your gas tank can vary depending on the shop and your car's make and model. Expect to pay anywhere from $100 to $300 or more, depending on the complexity of the job.