How To Drain The Gas Tank
Draining a fuel tank might seem like a drastic measure, but it's a surprisingly common task for seasoned DIYers, modders, and even everyday car owners. Whether you're dealing with contaminated fuel, preparing a vehicle for long-term storage, swapping out a fuel tank, or performing certain repairs, knowing how to safely and effectively drain the gas tank is an invaluable skill. This article will walk you through the process, offering a technical breakdown with best practices to ensure a safe and successful outcome.
Background: The Automotive Fuel System
Before diving into the how-to, let's briefly discuss the components of a typical automotive fuel system. Understanding how the system works as a whole will make the process of draining the tank more intuitive.
At its heart is the fuel tank itself – a reservoir designed to safely store gasoline or diesel. Submerged inside the tank is the fuel pump. This electrically driven pump draws fuel from the tank and sends it under pressure through a fuel filter, which removes contaminants. The pressurized fuel then travels along the fuel lines to the engine compartment.
In modern fuel-injected vehicles, the fuel reaches the fuel rail, a manifold that distributes fuel to individual fuel injectors. These injectors are electronically controlled valves that spray a precise amount of fuel into the engine's intake manifold (for port fuel injection) or directly into the combustion chamber (for direct fuel injection). A fuel pressure regulator maintains a constant fuel pressure in the fuel rail, and any excess fuel is returned to the fuel tank via a return line (though returnless fuel systems are becoming more common).
Older carbureted vehicles work differently. The fuel pump (often mechanically driven) still draws fuel from the tank, but instead of injectors, the carburetor mixes fuel and air based on engine vacuum. A return line is usually absent in these systems.
Critically, the fuel tank also incorporates a fuel vapor recovery system, also known as the Evaporative Emission Control (EVAP) system. This system captures fuel vapors from the tank and prevents them from being released into the atmosphere. These vapors are routed to a charcoal canister, where they are stored until the engine can burn them. Ignoring the EVAP system can lead to fuel spills and potentially dangerous situations.
Technical Breakdown: Draining the Fuel Tank
There are several methods for draining a fuel tank. We'll cover two of the most common, highlighting the pros and cons of each.
Method 1: Using the Fuel Pump (Recommended for most modern vehicles)
This method involves utilizing the vehicle's existing fuel pump to transfer fuel out of the tank. It's generally cleaner and safer than siphoning, especially on newer vehicles with anti-siphon features.
- Safety First: Disconnect the negative (-) battery terminal. This is *absolutely crucial* to prevent accidental sparking that could ignite fuel vapors. Work in a well-ventilated area, away from any ignition sources (open flames, sparks, etc.). Have a fire extinguisher nearby. Wear safety glasses and gloves.
- Locate and Access the Fuel Pump: The fuel pump is typically located inside the fuel tank. Access is usually gained through an access panel underneath the rear seat or in the trunk. Consult your vehicle's repair manual for the exact location and procedure.
- Identify the Fuel Lines: Once you have access to the fuel pump, you'll see several fuel lines connected to it. The *supply line* (the one that carries fuel *from* the pump *to* the engine) is the one you'll need to disconnect. The *return line* (if present) carries fuel *back* to the tank, and the *EVAP line* is part of the vapor recovery system. Do not disconnect the EVAP line unless you understand the consequences! Often, the supply line will be marked or have a specific fitting.
- Disconnect the Supply Line: Carefully disconnect the supply line from the fuel pump assembly. Be prepared for some fuel to spill, so have rags or a drain pan ready. Quick-disconnect fittings are common; you'll likely need a special tool to release the fitting. Exercise caution to avoid damaging the fitting or the fuel line.
- Extend the Supply Line: Attach a length of fuel-resistant hose to the disconnected supply line. Secure it with a hose clamp to prevent leaks. This hose will be used to direct the fuel into a suitable container.
- Provide Power to the Fuel Pump: This is the trickiest part. You need to temporarily power the fuel pump without starting the engine. One option is to locate the fuel pump relay in the fuse box. Remove the relay and use a jumper wire to connect the appropriate terminals in the relay socket. *Consult your vehicle's wiring diagram to determine which terminals to jump.* Incorrectly jumping terminals can damage the vehicle's electrical system. Alternatively, you can carefully apply 12V DC power directly to the fuel pump connector, again consulting the wiring diagram for proper polarity. Double-check your connections before applying power!
- Pump the Fuel: Direct the extended fuel line into a UL-approved fuel container. Briefly apply power to the fuel pump (either via the jumper wire or direct connection). The pump should start running and pumping fuel into the container. Do not run the pump dry, as this can damage it. Turn off the power when the tank is nearly empty.
- Clean Up: Properly dispose of the drained fuel. Clean up any spills immediately. Reconnect the fuel lines to the fuel pump assembly and reconnect the battery. Reinstall the fuel pump access panel.
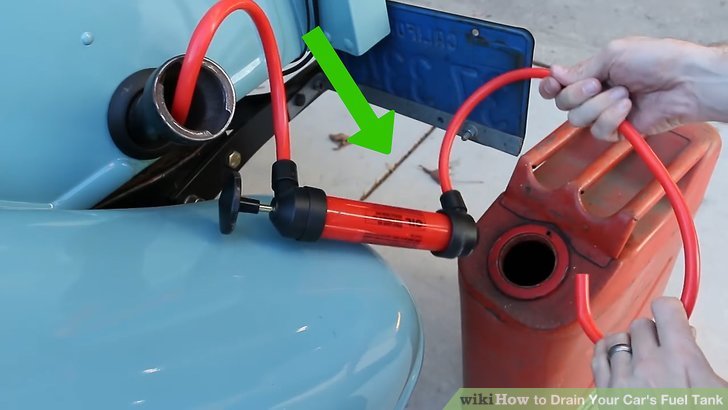
Method 2: Siphoning (Use with Caution)
Siphoning involves using a hose to create suction and draw fuel out of the tank. *This method is generally less desirable* due to the risk of ingesting fuel, the difficulty of overcoming anti-siphon devices, and the potential for fuel spills.
- Safety Precautions: Same as above – disconnect the battery, work in a well-ventilated area, no ignition sources, fire extinguisher, safety glasses, and gloves.
- Insert the Siphon Hose: Carefully insert a length of fuel-resistant hose into the fuel tank. The filler neck may have an anti-siphon screen, which can make this difficult. You may need to use a longer, more rigid hose to bypass the screen. Never force the hose, as you could damage the fuel tank or filler neck.
- Create Suction: There are two ways to create suction. The old-fashioned way is to suck on the end of the hose (extremely dangerous and not recommended). Instead, use a siphon pump or a vacuum pump to initiate the flow. A siphon pump is a small hand pump that you attach to the hose. A vacuum pump creates a vacuum that pulls fuel through the hose.
- Drain the Fuel: Once the fuel starts flowing, direct the hose into a UL-approved fuel container. Monitor the flow and ensure the container doesn't overflow.
- Clean Up: Dispose of the fuel properly. Clean up any spills immediately.
Common Issues and Maintenance Concerns
- Fuel Contamination: Draining the fuel tank is often necessary due to fuel contamination (e.g., water, rust, debris). If you suspect contamination, inspect the inside of the tank for rust or sediment. You may need to clean or replace the tank.
- Stuck Fuel Pump: If the fuel pump is stuck or not working, you may need to use the siphoning method (with extreme caution) or replace the fuel pump entirely.
- Anti-Siphon Devices: Many modern vehicles have anti-siphon devices in the fuel filler neck to prevent fuel theft. These devices can make siphoning very difficult or impossible.
- EVAP System Issues: Disturbing the EVAP system can lead to leaks and trouble codes. Be very careful when disconnecting or reconnecting any EVAP lines.
- Fuel Spillage: Fuel spillage is a common problem. Always have rags and a drain pan ready. Clean up spills immediately to prevent fire hazards.
- Fuel Line Fittings: Fuel line fittings can be brittle and easily damaged. Use the correct tools and exercise caution when disconnecting them.
Do's and Don'ts / Best Practices
Do's:
- DO prioritize safety. Disconnect the battery, work in a well-ventilated area, and have a fire extinguisher nearby.
- DO use fuel-resistant hoses and containers. Regular hoses can degrade and leak when exposed to gasoline.
- DO consult your vehicle's repair manual for specific instructions and wiring diagrams.
- DO properly dispose of the drained fuel. Contact your local waste management facility for disposal guidelines.
- DO wear safety glasses and gloves.
- DO take your time and be patient. Rushing the process can lead to mistakes and accidents.
Don'ts:
- DON'T smoke or use open flames near gasoline.
- DON'T siphon fuel by mouth. This is extremely dangerous.
- DON'T run the fuel pump dry. This can damage the pump.
- DON'T force fuel line fittings. If they're stuck, use penetrating oil and the correct tools.
- DON'T disconnect EVAP lines unless you understand the consequences.
- DON'T use damaged or corroded fuel lines or fittings. Replace them.
Conclusion
Draining a fuel tank can be a straightforward task if approached with caution and proper technique. While siphoning is an option, using the vehicle's fuel pump to evacuate the fuel is generally the safer and more efficient method, especially on modern vehicles. Always prioritize safety, consult your vehicle's repair manual, and take your time. If you're uncomfortable with any part of the process, don't hesitate to seek assistance from a qualified mechanic. A mistake could be costly or dangerous.