How To Find Your Sirius Xm Radio Id
For the modern car enthusiast, upgrading your in-car entertainment is a common and rewarding project. Whether you're activating a new SiriusXM subscription, troubleshooting reception issues, or even swapping head units, you'll inevitably need your SiriusXM Radio ID. It's a unique identifier, like a VIN for your radio, and is essential for communicating with SiriusXM's satellite network. This guide will walk you through several methods to locate this crucial piece of information, equipping you with the knowledge and techniques needed to get the job done right.
Background: SiriusXM and Radio Identification
Before we dive into the "how-to," let's quickly recap what SiriusXM is and why this Radio ID is so important. SiriusXM is a satellite radio service delivering a wide array of music, news, sports, and talk shows directly to your vehicle (or portable device). Unlike traditional terrestrial radio (AM/FM), SiriusXM broadcasts signals from geostationary satellites orbiting the Earth. This vast coverage area allows for consistent, coast-to-coast reception (where available). To ensure that only authorized users receive the service, SiriusXM uses a subscription-based model tied to specific radio receivers. That's where the Radio ID comes in.
Think of the Radio ID as the digital fingerprint of your SiriusXM receiver. It's a unique serial number programmed into the radio's memory during manufacturing. When you subscribe to SiriusXM, you provide them with this ID, linking your account to that specific receiver. Without it, SiriusXM has no way of knowing which radio to enable the broadcast for. This identification system is fundamental to their business model and the delivery of their service.
Technical Breakdown: Finding Your SiriusXM Radio ID
There are several ways to locate your SiriusXM Radio ID, each with its own set of advantages and disadvantages. We'll cover the most common and reliable methods, allowing you to choose the one that best suits your situation.
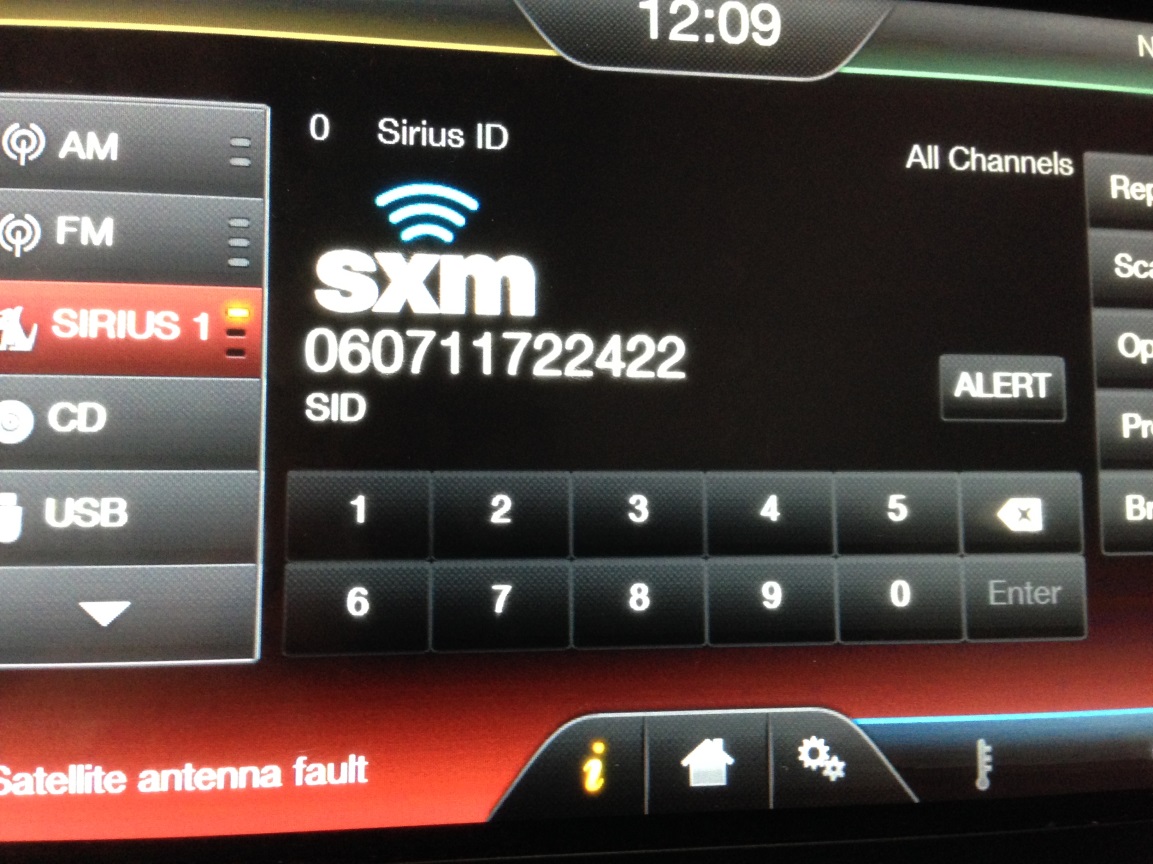
1. Tuning to Channel 0 (or Channel 184)
This is often the simplest and most direct method, provided your SiriusXM radio is properly connected and functioning. The process is straightforward:
- Turn on your vehicle's ignition and ensure the radio is powered on.
- Select the SiriusXM input source. This may be labeled "Sirius," "XM," "Satellite Radio," or something similar, depending on your head unit. Consult your vehicle's owner's manual if needed.
- Tune to Channel 0 (or Channel 184). You can usually do this using the radio's tuning knob, buttons, or touchscreen interface. Some older radios may use Channel 184 instead of Channel 0.
- Wait for the Radio ID to display. After a few seconds, the radio should display a 12-character alphanumeric code. This is your SiriusXM Radio ID. It will not contain the letters "I," "O," "S," or "F" to avoid confusion with numbers.
Technical Note: The radio is programmed to display the Radio ID when tuned to Channel 0 or 184 because these channels are specifically designated for that purpose. The data is embedded within the SiriusXM signal and decoded by the radio's internal processor. If your radio displays "Check Antenna," "No Signal," or some other error message, it indicates a problem with the antenna connection or signal reception, preventing the Radio ID from being displayed.
2. Using the Radio's Menu or Settings
Many modern head units offer a menu or settings screen that displays the Radio ID along with other system information. The exact location of this information varies depending on the make and model of your vehicle and head unit, but the following general steps apply:
- Turn on your vehicle's ignition and ensure the radio is powered on.
- Access the radio's menu or settings. This typically involves pressing a "Menu," "Settings," or "Setup" button on the head unit. Refer to your vehicle's owner's manual for specific instructions.
- Navigate to the "SiriusXM" or "Satellite Radio" settings. Look for options related to SiriusXM subscriptions, activation, or system information.
- Locate the "Radio ID" or "ESN". The Radio ID may be listed under one of these headings. It's often displayed as a 12-character alphanumeric code.
Technical Note: Manufacturers embed the Radio ID in the radio's non-volatile memory (often EEPROM – Electrically Erasable Programmable Read-Only Memory). The head unit's firmware is programmed to access this memory location and display the Radio ID on the screen through the menu system. This method provides a more persistent and user-friendly way to retrieve the ID without relying on a live SiriusXM signal.
3. Checking the Vehicle's Original Documentation
In some cases, the SiriusXM Radio ID may be printed on a sticker or card included with the vehicle's original documentation, such as the owner's manual or warranty paperwork. This is less common, but worth checking, especially if you're dealing with an older vehicle or one where the radio has been replaced.
Technical Note: Automakers sometimes include the Radio ID in the vehicle's build sheet or a separate document for internal tracking purposes. This practice is not universally adopted, and the likelihood of finding the Radio ID in this manner depends on the vehicle's manufacturer and model year.
4. Contacting the Dealership
If you're unable to locate the Radio ID using the methods above, contacting the dealership where the vehicle was purchased is another option. They may have access to the vehicle's records and be able to retrieve the Radio ID from their system.
Technical Note: Dealerships often maintain a database of vehicle information, including the original equipment installed. This database may include the SiriusXM Radio ID, especially if the vehicle was originally equipped with satellite radio. However, this information may not always be readily available, and the dealership may require proof of ownership before providing it.
5. Using an OBD-II Scanner (Advanced)
For the more technically inclined, an OBD-II (On-Board Diagnostics II) scanner can sometimes be used to retrieve the SiriusXM Radio ID. This method requires a compatible scanner and some familiarity with OBD-II protocols.
- Connect the OBD-II scanner to the vehicle's diagnostic port (usually located under the dashboard).
- Power on the scanner and navigate to the diagnostic menu.
- Look for options related to "Module Information" or "ECU Information". The exact wording varies depending on the scanner model.
- Select the radio or infotainment system module. This may be labeled "Radio," "Infotainment," "Head Unit," or something similar.
- Look for the "ESN" or "Radio ID". The scanner should display the Radio ID if it's accessible through the OBD-II interface.
Technical Note: The ability to retrieve the SiriusXM Radio ID via OBD-II depends on the vehicle's specific implementation of the OBD-II protocol and the capabilities of the scanner. Not all vehicles or scanners support this functionality. Furthermore, accessing this information may require specialized diagnostic software or knowledge of specific PID (Parameter ID) values.
Common Issues and Maintenance Concerns
While finding your Radio ID is generally straightforward, some common issues can arise:
- "Check Antenna" or "No Signal" error: This indicates a problem with the antenna connection. Check the antenna cable connection at both the head unit and the antenna itself. Also inspect the antenna for any damage. A faulty antenna will prevent the Radio ID from displaying.
- Radio ID not displaying on Channel 0/184: Ensure the radio is properly tuned to Channel 0 or Channel 184. If the problem persists, try resetting the radio by disconnecting the power for a few minutes.
- Radio ID not found in menu: Consult your vehicle's owner's manual for specific instructions on accessing the Radio ID through the menu system. The location may vary depending on the make and model of your vehicle.
- Incorrect Radio ID: Always double-check the Radio ID to ensure accuracy. A single incorrect character can prevent activation.
Troubleshooting Tip: If you're experiencing persistent issues, try disconnecting the vehicle's battery for a few minutes to reset the radio's electronics. This can sometimes resolve minor software glitches.
Do's and Don'ts / Best Practices
To ensure a smooth and successful Radio ID retrieval process, follow these best practices:
- Do: Consult your vehicle's owner's manual for specific instructions and diagrams.
- Do: Double-check the Radio ID for accuracy before submitting it to SiriusXM.
- Do: Take a picture of the Radio ID displayed on the screen for future reference.
- Don't: Attempt to disassemble the radio to locate the Radio ID. This can void your warranty and potentially damage the unit.
- Don't: Provide your Radio ID to untrusted sources. This information can be used for fraudulent purposes.
- Don't: Assume that the Radio ID is the same as the VIN (Vehicle Identification Number). They are distinct identifiers.
Conclusion
Locating your SiriusXM Radio ID is a crucial step in activating or troubleshooting your satellite radio service. By following the methods outlined in this guide, you should be able to successfully retrieve your Radio ID. Remember to start with the simplest methods, like tuning to Channel 0 or checking the radio's menu, and only resort to more advanced techniques if necessary. When in doubt, consulting your vehicle's owner's manual is always a good idea. With a little patience and attention to detail, you'll have your SiriusXM radio up and running in no time. For most users, tuning to Channel 0 or Channel 184 is the easiest and most reliable method. However, if you encounter difficulties, exploring the radio's menu system or contacting your dealership are viable alternatives.