How To Fit A Brake Light Switch
Let's talk about brake light switches. A seemingly simple component, but absolutely crucial for safety. A faulty brake light switch can lead to accidents and failed inspections. If your brake lights are acting erratically, not lighting up at all, or staying on constantly, chances are the switch is the culprit. This guide will walk you through the process of diagnosing and replacing it, arming you with the knowledge to tackle this repair yourself.
Understanding the Brake Light System
Before we dive into the replacement, let's cover some fundamental background. The brake light system is a relatively straightforward circuit. When you depress the brake pedal, it activates the brake light switch, which in turn closes the electrical circuit, sending power to your brake lights. This illuminates the rear brake lights, signaling your intention to slow down or stop to drivers behind you.
The system typically consists of the following key components:
- Brake Pedal: The mechanical input that initiates the braking process and actuates the brake light switch.
- Brake Light Switch: A normally open switch, meaning the circuit is broken (open) under normal conditions. It closes the circuit when the brake pedal is depressed.
- Wiring Harness: The network of wires that carries the electrical current from the battery, through the switch, to the brake lights.
- Brake Lights: The bulbs or LEDs located at the rear of your vehicle that illuminate when the brake pedal is pressed.
- Fuse: A safety device that protects the circuit from overcurrent. A blown fuse is a common symptom associated with brake light issues, though not necessarily the switch itself.
Technical Breakdown: How a Brake Light Switch Works
The brake light switch is usually located near the brake pedal assembly. It's a small, cylindrical device with a plunger or button that is mechanically linked to the movement of the brake pedal. When the brake pedal is at rest, the plunger is either depressed or extended, depending on the specific design. This keeps the electrical contacts inside the switch separated, maintaining an open circuit.
When you press the brake pedal, the mechanical linkage causes the plunger to either extend or retract (again, depending on the design). This movement allows the internal contacts to meet, completing the electrical circuit and sending power to the brake lights. Upon releasing the brake pedal, the plunger returns to its original position, breaking the circuit and turning off the lights.
There are different types of brake light switches, but the most common are:
- Mechanical Switches: These are the most basic type and rely on a physical plunger to make and break the electrical connection.
- Hydraulic Switches: These switches are less common in modern vehicles. They are activated by the hydraulic pressure in the brake lines. When pressure increases due to brake application, the switch closes the circuit.
Replacing the Brake Light Switch: A Step-by-Step Guide
Now, let's get to the meat of the matter: replacing the brake light switch. Here's a step-by-step guide:
- Safety First: Disconnect the negative terminal of your battery. This is crucial to prevent any electrical shorts during the process.
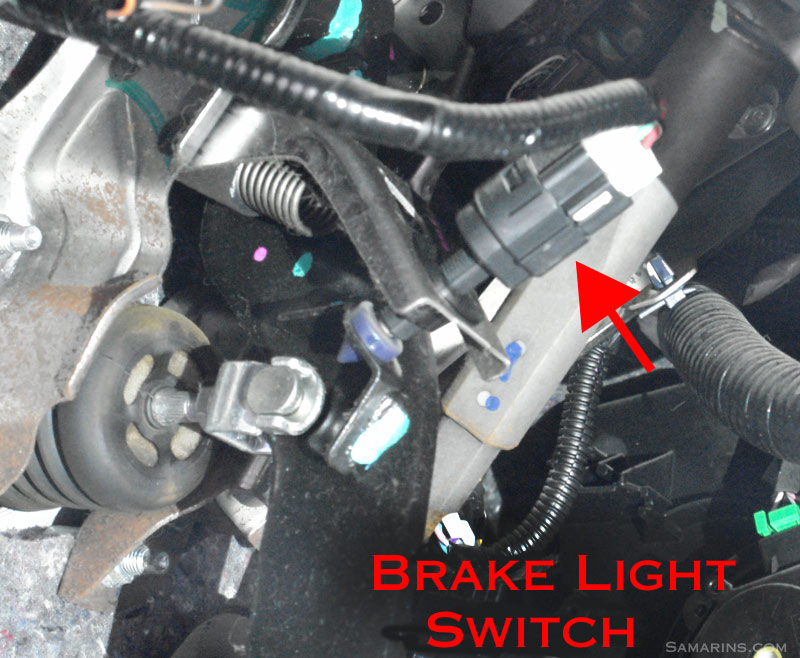
- Locate the Brake Light Switch: It's usually mounted near the top of the brake pedal arm, often attached to a bracket. You might need a flashlight to get a good view.
- Disconnect the Electrical Connector: The switch will have an electrical connector attached to it. Gently squeeze the release tab (if there is one) and pull the connector straight off. Avoid yanking on the wires.
- Remove the Old Switch: The method for removing the switch varies depending on the design. Some switches simply twist and lock into place, while others are held in by a nut or clip. Examine the switch carefully to determine the correct removal method. If it's a twist-lock type, rotate the switch (usually a quarter turn) and pull it straight out. If it's secured by a nut, use a wrench to loosen and remove the nut.
- Install the New Switch: Before installing the new switch, compare it to the old one to ensure it's the correct type and has the same number of terminals. Install the new switch by reversing the removal process. If it's a twist-lock type, align the switch with the mounting hole, push it in, and rotate it until it locks. If it's secured by a nut, install the nut and tighten it securely.
- Adjust the Switch (If Necessary): Some switches are adjustable to ensure proper operation. Consult your vehicle's repair manual for specific adjustment procedures. Typically, this involves adjusting the switch so that the brake lights illuminate when the brake pedal is depressed a small amount (about 1/4 to 1/2 inch). Incorrect adjustment can cause the brake lights to stay on constantly or not illuminate at all.
- Reconnect the Electrical Connector: Plug the electrical connector back into the new switch until it clicks into place.
- Reconnect the Battery: Reconnect the negative terminal of your battery.
- Test the Brake Lights: Have someone stand behind your vehicle while you depress the brake pedal. Verify that the brake lights illuminate properly. Also, check that the brake lights turn off completely when you release the pedal.
Common Issues and Maintenance Concerns
Brake light switches are generally reliable, but they can fail due to wear and tear, corrosion, or electrical issues. Here are some common problems:
- Failed Switch: The most common issue is a simply failed switch. Internal contacts can wear out, preventing the switch from closing the circuit.
- Corrosion: Corrosion on the electrical contacts can impede the flow of electricity, causing intermittent or non-functional brake lights.
- Misalignment: If the switch is not properly aligned, it may not be activated correctly by the brake pedal.
- Wiring Issues: Problems with the wiring harness, such as broken wires or loose connections, can also affect the brake lights.
- Fuse Problems: A short circuit in the brake light system can blow the fuse, preventing the brake lights from working. While this isn't the switch itself, a faulty switch could cause a short.
Regularly inspect your brake lights to ensure they are working correctly. If you notice any issues, such as intermittent brake lights or brake lights that stay on constantly, address them promptly to prevent accidents.
Do's and Don'ts / Best Practices
- DO disconnect the battery before working on the electrical system.
- DO use the correct replacement switch for your vehicle. Check your vehicle's make, model, and year to ensure compatibility.
- DO compare the old switch to the new switch before installing it.
- DO adjust the switch properly if necessary. Refer to your vehicle's repair manual for specific instructions.
- DO test the brake lights after installation to ensure they are working correctly.
- DON'T overtighten the switch or any mounting hardware.
- DON'T force the electrical connector onto the switch.
- DON'T ignore warning signs, such as intermittent brake lights or brake lights that stay on constantly.
Conclusion
Replacing a brake light switch is a relatively simple repair that most intermediate DIYers can tackle. By understanding the system, following the steps outlined in this guide, and adhering to best practices, you can save money and ensure your vehicle's safety. If you're uncomfortable performing this repair yourself, don't hesitate to consult a qualified mechanic. However, armed with this knowledge, you're well-equipped to diagnose and resolve most brake light switch-related issues, keeping you and other drivers safe on the road. Always prioritize safety and double-check your work!