How To Fix A Broken Side Mirror
Let's talk about fixing a broken side mirror. It's one of those repairs that seems daunting but is often quite manageable for the experienced DIYer. We're going to break down the process, focusing on understanding the mirror assembly itself and how to approach common problems. Consider this a comprehensive guide, assuming you're already comfortable with basic automotive tools and safety procedures.
Purpose of Understanding the Side Mirror Diagram
Having a detailed understanding of your side mirror's components and wiring (if applicable) is crucial for a few key reasons:
- Accurate Diagnosis: You can pinpoint the exact part that's broken, saving you time and money. No more guessing!
- Efficient Repairs: Knowing how things fit together makes disassembly and reassembly much smoother.
- Safe Repairs: Understanding wiring diagrams is essential when dealing with heated mirrors or integrated turn signals, preventing shorts or damage to your car's electrical system.
- Learning & Customization: You can customize or upgrade your side mirrors with aftermarket parts with confidence.
Ultimately, understanding the inner workings of your side mirror empowers you to tackle repairs with confidence and potentially save a significant amount of money compared to a professional repair.
Key Specs and Main Parts
Before diving into troubleshooting, let’s clarify the main components of a typical side mirror assembly:
Main Mirror Components:
- Mirror Glass: The reflective surface. Often heated in modern vehicles. Can be plain glass or coated for anti-glare.
- Mirror Housing (Casing): The outer shell that protects the internal components. Typically made of plastic, sometimes painted or finished.
- Adjustment Mechanism: This allows you to adjust the mirror's angle. Could be manual (cables and knobs) or electric (motors and gears).
- Mounting Bracket: Attaches the mirror assembly to the car door.
- Turn Signal Indicator (Optional): Many modern side mirrors include integrated turn signals.
- Heated Mirror Element (Optional): A heating element behind the mirror glass to defrost or defog it.
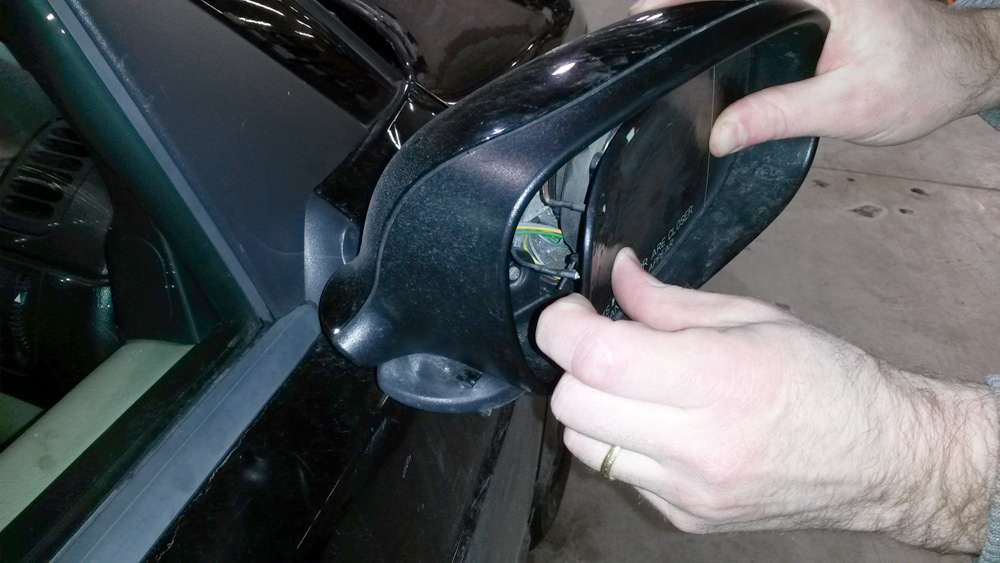
- Wiring Harness (Optional): Connects the electric adjustment motors, heated mirror element, and turn signal to the car's electrical system.
Key Specs to Consider:
- Mirror Type: Convex, planar (flat), aspherical. Determines field of view.
- Adjustment Type: Manual or electric.
- Housing Material: Plastic type, paint code.
- Wiring Connector Type: (Number of pins, connector shape). Crucial for replacing entire assemblies.
- Heated Mirror Resistance (Ohms): Important when diagnosing heater element issues.
Symbols and Diagram Interpretation
Wiring diagrams can seem intimidating, but they follow standardized symbols:
- Solid Lines: Represent wires. Thicker lines often indicate power wires.
- Dashed Lines: Indicate connections within a component, not direct wiring.
- Circles: Represent components like resistors, diodes, or sensors.
- Squares/Rectangles: Represent switches, relays, or control modules.
- Ground Symbol (Looks like an inverted triangle or a series of decreasing horizontal lines): Indicates a connection to the car's chassis ground.
- Color Codes: Wires are often color-coded (e.g., BLU for Blue, RED for Red, GRN for Green). Wiring diagrams will include a key explaining the color codes.
A typical side mirror wiring diagram might show the following:
- Power wire (e.g., fused 12V supply) to the mirror adjustment switch.
- Wiring from the switch to the adjustment motors (one motor for horizontal adjustment, one for vertical).
- Wiring to the heated mirror element (if present).
- Wiring to the turn signal indicator (if present).
Learning to trace these lines and identify the components is key to understanding the electrical circuit of your side mirror.
How It Works
The basic function of a side mirror is simple: to provide the driver with a view of the area beside and behind the vehicle. The complexity arises from the features added to modern mirrors.
Manual Adjustment:
Cables connected to knobs inside the car are mechanically linked to the mirror glass. Turning the knobs pulls or pushes the cables, tilting the mirror.
Electric Adjustment:
A switch in the car controls small electric motors within the mirror housing. These motors drive gears or levers that tilt the mirror. When you move the adjustment switch, you're sending power to specific motors to move the mirror in the desired direction.
Heated Mirror:
A heating element (essentially a resistor) is glued to the back of the mirror glass. When power is applied, the element heats up, warming the glass and melting ice or evaporating condensation.
Turn Signal:
An LED or incandescent bulb is integrated into the mirror housing. When the turn signal is activated, the light illuminates, providing additional visibility to other drivers.
Real-World Use – Basic Troubleshooting Tips
Here are some common side mirror problems and troubleshooting tips:
- Mirror Glass Broken: Replace the glass. You can often buy replacement glass that simply clips into the existing housing. Carefully remove the broken glass, noting how it's attached.
- Mirror Not Adjusting (Manual): Check the cables for breaks or kinks. Lubricate the cables and the adjustment mechanism.
- Mirror Not Adjusting (Electric): Check the fuse. Test the adjustment switch with a multimeter. If the switch is good, test the motors with a multimeter to see if they're receiving power. If they aren't, check the wiring harness for breaks or loose connections. If motors are getting power but not working, replace the motors.
- Heated Mirror Not Working: Check the fuse. Test the heating element with a multimeter for resistance. An open circuit indicates a faulty heating element. Check the wiring harness for breaks or loose connections.
- Turn Signal Not Working: Check the bulb or LEDs. Check the wiring harness for breaks or loose connections. Test the turn signal circuit with a multimeter.
Important: When diagnosing electrical problems, always start with the simplest things first – fuses, loose connections, etc.
Safety Considerations
Working on side mirrors can involve some risks:
- Sharp Glass: Broken mirror glass can be extremely sharp. Wear gloves and eye protection when handling it.
- Electrical Components: When working with heated mirrors or turn signals, disconnect the car battery to prevent electrical shocks or shorts.
- Airbag Interference: Some side mirrors are located near side-impact airbags. Be extremely careful not to damage or interfere with the airbag system. If you're unsure, consult a professional.
- Wiring Damage: Be gentle when disconnecting wiring harnesses. Avoid pulling on the wires, as this can damage the connectors.
Always prioritize safety. If you're uncomfortable with any aspect of the repair, seek professional assistance.
We have a detailed side mirror diagram available for download. This diagram provides a visual representation of the components discussed and can be a valuable tool for troubleshooting and repair. This will show you the specific wiring diagram for a common vehicle. Understanding these diagrams is key to successfully repairing your side mirror and will give you a deeper understanding of automotive electrical systems.