How To Fix A Hail Damaged Car
Hailstorms can wreak havoc on a vehicle's appearance, leaving behind a multitude of unsightly dents. While professional auto body repair is often the best solution, a skilled DIYer with some experience and the right tools can tackle many hail damage repairs themselves. This article will walk you through the process, outlining the techniques, tools, and safety precautions necessary to restore your car's finish.
Understanding Hail Damage Repair
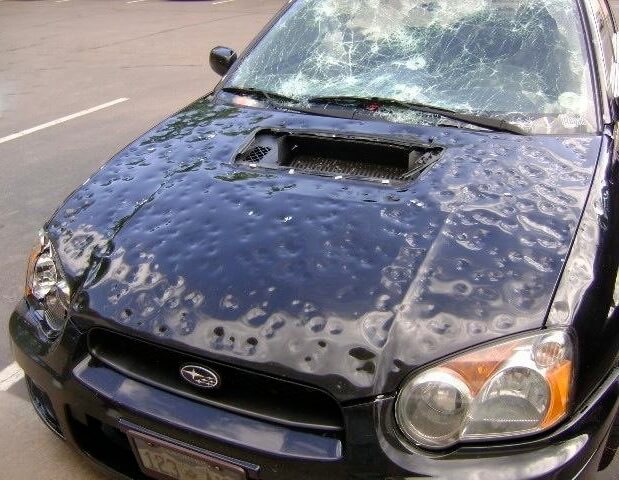
Before diving in, it's crucial to understand the extent of the damage and the principles behind the repair methods. Hail damage usually manifests as small, rounded dents scattered across the car's body panels. The severity of the damage dictates the repair approach, ranging from paintless dent repair (PDR) to more involved techniques involving body fillers and repainting.
Paintless Dent Repair (PDR)
PDR is the preferred method for repairing hail damage when the paint hasn't been compromised. It involves gently manipulating the metal from the underside of the panel to restore its original shape. This technique preserves the factory finish, avoids the need for painting, and is generally less expensive than traditional repair methods.
Traditional Dent Repair
If the hail damage is severe, causing stretched metal or cracked paint, traditional dent repair is necessary. This involves using tools to pull or hammer out the dent, applying body filler (also known as bondo) to smooth out imperfections, and then sanding, priming, and repainting the affected area.
Tools and Materials Needed
The specific tools required depend on the chosen repair method. Here's a breakdown of the essential items:
For Paintless Dent Repair (PDR):
- PDR Rods: A set of specialized steel rods with various tips for accessing and pushing out dents from behind the panel. Different shapes and lengths are needed for different locations and dent sizes.
- PDR Light Board: A specialized light that reflects off the panel's surface, highlighting dents and imperfections. This is *critical* for seeing what you're doing.
- Tap Down Tool and Hammer: Used to gently tap down high spots that may result from pushing out the dent.
- Door Jams and Window Wedges: Used to create access points to get the PDR rods into the body panels, without scratching the paint.
- Heat Gun (Optional): Gentle heat can make the metal more pliable, especially in colder climates.
For Traditional Dent Repair:
- Body Hammer and Dolly Set: Used for shaping and smoothing metal. A *dolly* is a shaped anvil held behind the panel, while the *hammer* shapes the metal from the front.
- Dent Puller: Various types exist, including slide hammers and stud welders, used to pull out large dents.
- Body Filler (Bondo): A two-part epoxy used to fill in imperfections and create a smooth surface.
- Sandpaper: Various grits (80, 180, 320, 400) for shaping the body filler and preparing the surface for primer.
- Sanding Block: Provides a flat, even surface for sanding.
- Primer: A base coat that prepares the surface for paint and improves adhesion.
- Paint: Matching automotive paint for the vehicle's color code. Consult your car's VIN plate for the exact color code.
- Clear Coat: A protective layer that adds gloss and durability to the paint.
- Spray Gun or Aerosol Cans: For applying primer, paint, and clear coat.
- Masking Tape and Paper: For protecting surrounding areas from overspray.
- Tack Cloth: For removing dust and debris before painting.
Safety Equipment:
- Safety Glasses: Essential for protecting your eyes from flying debris and chemicals.
- Gloves: Protect your hands from sharp edges, chemicals, and solvents.
- Respirator: When sanding body filler and painting, a respirator is *crucial* to protect your lungs from harmful dust and fumes. Use a respirator rated for organic vapors.
Repair Process: Paintless Dent Repair (PDR)
- Preparation: Clean the affected area thoroughly. Use a wax and grease remover to ensure a clean surface.
- Access: Identify the best access point to reach the back of the dent. This might involve removing interior panels, trim pieces, or accessing through existing holes in the body structure.
- Lighting: Position the PDR light board to clearly illuminate the dent and surrounding area.
- Pushing: Using the appropriate PDR rod, gently push the metal from the back side of the dent. Work slowly and methodically, focusing on small areas at a time. Avoid over-pushing, which can create high spots.
- Tapping Down: If high spots develop, use the tap down tool and hammer to gently tap them down.
- Inspection: Regularly inspect your work using the PDR light board. The goal is to restore the original shape of the panel without stretching or damaging the paint.
- Repeat: Continue pushing and tapping until the dent is completely removed.
Repair Process: Traditional Dent Repair
- Preparation: Clean the affected area and remove any loose paint or rust.
- Hammering and Pulling: Use the body hammer and dolly to rough out the dent. For larger dents, use a dent puller to pull the metal back into shape.
- Body Filler Application: Mix the body filler according to the manufacturer's instructions. Apply a thin layer to the dent, overlapping the edges.
- Sanding: Once the body filler is dry, sand it down using progressively finer grits of sandpaper (80, 180, 320, 400) to create a smooth, even surface. Use a sanding block to ensure a flat surface.
- Priming: Apply several thin coats of primer to the sanded area, allowing each coat to dry completely. Sand the primer with 400-grit sandpaper to create a smooth surface for paint.
- Painting: Apply several thin coats of automotive paint, allowing each coat to dry completely. Follow the paint manufacturer's instructions for mixing and application.
- Clear Coat: Apply several thin coats of clear coat to protect the paint and add gloss.
- Wet Sanding and Buffing (Optional): For a flawless finish, wet sand the clear coat with very fine sandpaper (2000-grit or higher) and then buff the surface with a polishing compound.
Real-World Troubleshooting Tips
- Patience is Key: Hail damage repair takes time and patience. Don't rush the process, or you risk damaging the panel further.
- Start Small: Begin with the least damaged panels to gain experience and confidence.
- Lighting is Crucial: Proper lighting is essential for seeing dents clearly and accurately. Experiment with different angles and intensities.
- Don't Overheat: When using a heat gun, be careful not to overheat the paint, as this can cause it to blister or peel.
- Color Matching: Getting an exact paint match can be tricky. Consider having the paint professionally mixed based on your car's VIN code, or blending the new paint into the surrounding panels.
Safety Considerations
Working with automotive tools and chemicals can be hazardous. Take the following precautions:
- Wear Safety Glasses: Protect your eyes from flying debris and chemicals.
- Wear Gloves: Protect your hands from sharp edges, chemicals, and solvents.
- Use a Respirator: When sanding body filler and painting, a respirator is *crucial* to protect your lungs from harmful dust and fumes.
- Work in a Well-Ventilated Area: This is especially important when working with paints and solvents.
- Disconnect the Battery: Before removing any interior panels or working near electrical components, disconnect the car's battery to prevent accidental short circuits.
- Be Careful with Heat Guns: Heat guns can get extremely hot and can easily cause burns. Use caution and wear heat-resistant gloves.
Diagrams and Further Resources
Visual aids, such as exploded diagrams of body panels and component locations, can be extremely helpful during the repair process. These diagrams show the relationships between different parts, access points, and potential obstacles. We have a comprehensive diagram available for download, showing common access points for PDR on various vehicle models. This diagram will help you visualize where to insert your PDR rods and how to avoid damaging other components.
Additionally, numerous online resources, including videos and forums, can provide further guidance and support. Search for tutorials specific to your vehicle make and model.
Disclaimer: This article provides general guidance on hail damage repair. The specific techniques and tools required may vary depending on the severity of the damage and the vehicle make and model. If you are not comfortable performing these repairs yourself, it is best to consult a professional auto body repair shop.