How To Fix Car Rear Window Heater
The biting wind howls, snowflakes dance across your windshield, and the world outside is a blurry, frosted landscape. You flick the switch for your rear window defroster, expecting instant clarity. But nothing happens. Or worse, you notice only a few lines clearing, leaving vast swaths of icy obstruction. A malfunctioning rear window heater can be more than just an inconvenience; it's a safety hazard, impairing visibility during crucial winter driving conditions. So, how do you diagnose and potentially fix this frustrating problem?
The Scenario: A Frozen Frustration
Imagine this: you're late for work, the kids are waiting for the school bus, and the rear window is completely iced over. You've scraped the front, but the back is stubbornly opaque. You hit the defroster button, and after a few minutes, thin lines appear, offering tantalizing glimpses of the road behind. However, large sections remain frosted, forcing you to crane your neck and rely heavily on your side mirrors. This is a classic case of a partially functioning, or completely non-functional, rear window heater. Before heading to the mechanic, let's explore how this system works and what you can do to troubleshoot it.
Deconstructing the Defroster: How it Works
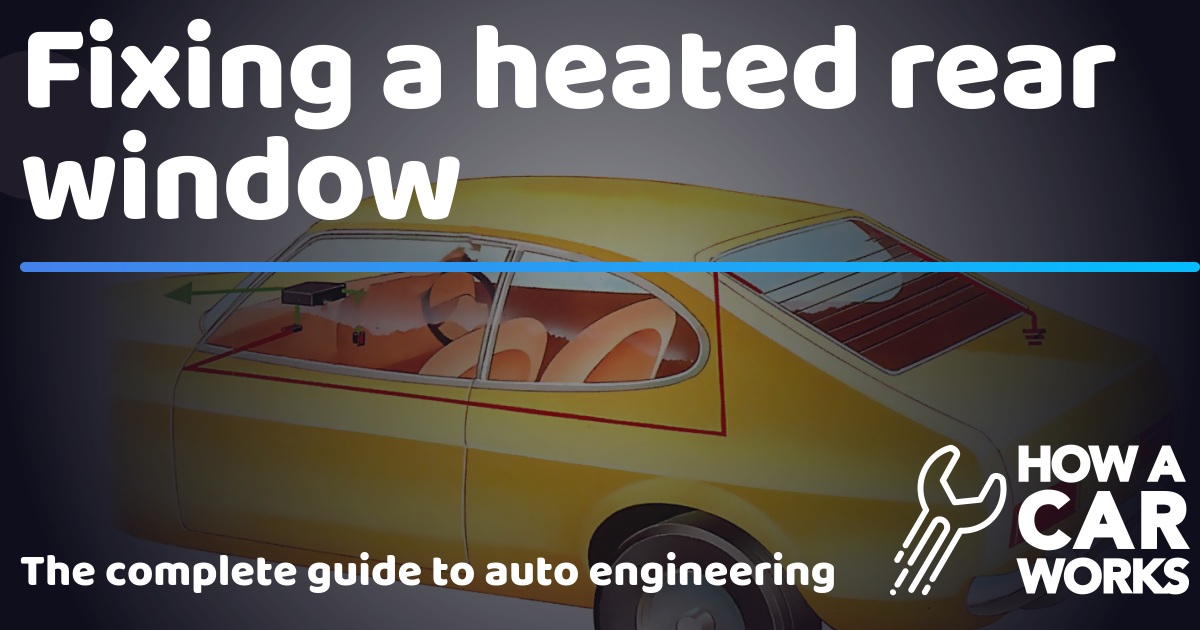
The rear window defroster, more accurately called a rear window heater, isn't some magical device. It's a relatively simple electrical circuit built directly into the rear windshield. Think of it like a miniature electric blanket for your back window. Here's a breakdown of its components and functionality:
Key Components:
- Heating Grid: The most visible part of the system, this consists of a series of thin, horizontal lines printed onto the inside surface of the rear window. These lines are made of a special conductive material, typically a silver-ceramic compound.
- Electrical Terminals: Located on either side of the heating grid, these terminals connect the grid to the vehicle's electrical system. One terminal is usually positive (+), and the other is negative (-), completing the circuit.
- Relay: A relay acts as an electrical switch, controlled by the defroster button on your dashboard. When you press the button, a small current activates the relay, allowing a larger current to flow to the heating grid.
- Fuse: A crucial safety component. The fuse protects the entire circuit from overloads. If too much current flows through the system (due to a short circuit, for example), the fuse blows, interrupting the circuit and preventing damage.
- Timer/Control Module: Many modern vehicles incorporate a timer or control module that automatically shuts off the defroster after a set period (typically 10-15 minutes) to prevent overheating and battery drain.
The Electrical Circuit Explained:
The rear window heater works on the principle of electrical resistance. When you activate the defroster, the relay closes, allowing current to flow from the car's battery, through the fuse, to one of the electrical terminals on the rear window. The current then travels through the heating grid, encountering resistance as it does so. This resistance generates heat, which warms the glass and melts the ice and frost. The current then exits through the other terminal and returns to the car's electrical system, completing the circuit.
Imagine a garden hose with a slight kink in it. The kink represents the resistance in the heating grid. When water (electricity) flows through the hose, the kink causes friction, generating heat. The more kinks (resistance), the more heat generated.
Troubleshooting the Defroster: A Step-by-Step Guide
Now that you understand how the system works, let's get to the troubleshooting. Here's a systematic approach to diagnosing the problem:
- Check the Fuse: This is the simplest and often overlooked step. Consult your owner's manual to locate the fuse for the rear window defroster. Use a fuse tester or visually inspect the fuse to see if it's blown. If it is, replace it with a fuse of the exact same amperage. If the new fuse blows immediately, it indicates a short circuit in the system.
- Inspect the Relay: Relays can fail over time. You can try swapping the defroster relay with a relay of the same type from another system (e.g., the horn relay) to see if that solves the problem. If it does, replace the faulty relay.
- Check the Electrical Terminals: Examine the terminals on the rear window for corrosion or damage. Clean any corrosion with a wire brush or electrical contact cleaner. Ensure the terminals are securely connected to the wiring harness. A loose connection can prevent current from flowing properly.
- Test for Voltage: Use a multimeter to check for voltage at the electrical terminals when the defroster is activated. You should see approximately 12 volts. If there's no voltage, the problem lies upstream (fuse, relay, wiring).
- Inspect the Heating Grid: This is where things get more delicate. Carefully examine the heating grid for breaks or damage. Use a magnifying glass for a closer look. Breaks in the grid are a common cause of partial defroster failure.
- Test the Heating Grid Continuity: A multimeter can be used to check the continuity of each grid line. Set the multimeter to the continuity setting (often indicated by a beep symbol). Place one probe on one end of the grid line and the other probe on the other end. A beep indicates continuity (the grid line is intact). If there's no beep, the grid line is broken.
Repairing a Broken Heating Grid: DIY vs. Professional
If you've identified a break in the heating grid, you have two options: DIY repair or professional repair.
DIY Repair:
DIY repair kits are available at most auto parts stores. These kits typically include a conductive paint or adhesive that you apply to the break in the grid. The process involves carefully cleaning the area around the break, applying the conductive material, and allowing it to dry. While DIY kits can be effective for small breaks, they're not a permanent solution and may require reapplication over time. Success depends heavily on careful application and following the kit's instructions precisely.
Professional Repair:
Professional repair involves either repairing the grid using specialized equipment or replacing the entire rear window. This is a more expensive option, but it offers a more reliable and longer-lasting solution. If the damage is extensive or you're not comfortable working with delicate electrical components, professional repair is the recommended approach. Replacing the entire window is generally the most expensive option, but it ensures a perfect and permanent fix.
Pros and Cons of Rear Window Heaters
Like any automotive feature, rear window heaters have their advantages and disadvantages.
Pros:
- Improved Visibility: Clears ice and frost quickly, enhancing visibility in winter conditions.
- Enhanced Safety: Improved visibility reduces the risk of accidents.
- Convenience: Eliminates the need for manual scraping.
Cons:
- Energy Consumption: Draws significant power from the car's battery.
- Potential for Damage: Heating grid is delicate and can be easily damaged.
- Repair Costs: Repairs can be expensive, especially if the entire window needs replacing.
Manufacturer Examples and Implementations
Rear window heaters are a standard feature on most modern vehicles, but manufacturers may implement them slightly differently. Some vehicles may have a more robust heating grid design, while others may incorporate advanced control systems that optimize energy consumption. For example:
- BMW: Often uses a timer that automatically adjusts the heating intensity based on the ambient temperature.
- Tesla: Integrates the rear window heater into its climate control system, allowing for remote activation via the mobile app.
- Ford: Some Ford models feature a "Quickclear" heated windshield, which uses a similar principle to the rear window heater but covers the entire windshield.
Real-World Insights and Recommendations
Based on real-world experience, here are some key recommendations:
- Regular Inspection: Periodically inspect the heating grid for any signs of damage or wear.
- Gentle Cleaning: When cleaning the rear window, use a soft cloth and avoid abrasive cleaners that could damage the heating grid.
- Prompt Repair: Address any issues with the defroster promptly to prevent further damage.
- Battery Health: Ensure your car's battery is in good condition, as the defroster draws a significant amount of power.
- Consider a Ceramic Coating: Applying a ceramic coating to the rear window can help to prevent ice and frost from sticking, reducing the load on the defroster.
A functioning rear window heater is essential for safe winter driving. By understanding how the system works and following the troubleshooting steps outlined in this guide, you can diagnose and potentially fix many common problems, saving you time and money. Remember to prioritize safety and consult a qualified mechanic if you're not comfortable performing the repairs yourself. Don't let a frozen rear window keep you from hitting the road with confidence!