How To Fix Hail Damage On Car
Hail damage can be a real pain, leaving your vehicle looking like it's been through a war zone. While severe damage might require professional body shop attention, many smaller dings can be repaired at home with the right tools and techniques. This article provides a detailed guide to understanding and fixing hail damage, focusing on Paintless Dent Repair (PDR), a common and effective method.
Understanding Hail Damage and PDR
PDR, or Paintless Dent Repair, is a technique that manipulates the metal back to its original shape without damaging the factory paint finish. It's ideal for shallow dents and dings where the paint hasn't been cracked or chipped.
Purpose of Understanding the Damage
Before attempting any repair, it's crucial to thoroughly assess the damage. This diagram matters because it guides you in identifying the type, size, and location of dents, allowing you to determine if PDR is a viable option and what tools you'll need. A clear understanding prevents further damage and ensures a successful repair.
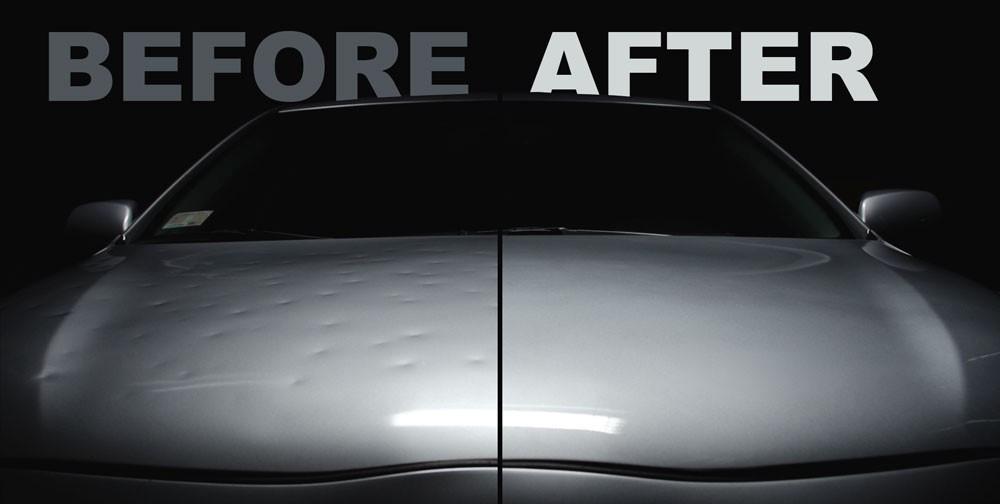
Key Specs and Main Parts (of a Damaged Panel)
Let's consider a typical car panel damaged by hail. Key aspects to examine include:
- Dent Diameter: The width of the dent. Smaller dents (under 1 inch) are generally easier to repair with PDR.
- Dent Depth: How deep the dent is. Shallow dents are perfect for PDR. Deep, sharp dents might require more specialized tools or techniques, possibly even traditional body filler and repainting.
- Paint Condition: Check for cracks, chips, or scratches in the paint. If the paint is damaged, PDR may not be sufficient, and you might need to consider repainting.
- Metal Type: Different metals (aluminum vs. steel) respond differently to PDR. Aluminum is softer and more prone to stretching, requiring more careful manipulation.
- Location of the Dent: Dents in easily accessible areas are simpler to repair than those in tight corners or on body lines.
Main 'parts' we're concerned with, in this context, are the specific areas on the panel affected by each individual dent.
Symbols and Lines (in a dent assessment diagram - imagined)
Although we don't have a physical diagram here, let's illustrate how one might work. Imagine an overhead view of a car hood:
- Circles/Ovals: These would represent the outline of each dent. The size of the shape corresponds to the dent diameter.
- Shading: Different shades within the circles indicate dent depth. Lighter shading might represent shallow dents, while darker shading indicates deeper dents.
- Arrows: Arrows pointing towards the center of the dent could illustrate the direction of the impact.
- Solid Lines: Solid lines crossing a dent indicate that the paint is cracked or chipped.
- Dotted Lines: Dotted lines might indicate areas where the metal is stretched or creased.
- Color Coding: Different colors could be used to categorize the severity of the damage. Green for minor dents suitable for PDR, yellow for moderate dents that might require more skill, and red for severe dents that likely need professional repair.
A key would be provided to explain these symbols and color codings. Knowing how to read such a diagram allows for a more accurate assessment of the repair needed.
How PDR Works
PDR utilizes specialized tools to gently push or pull the metal back into its original shape from the inside of the panel. The process involves:
- Accessing the Dent: This might involve removing interior panels, lights, or other components to gain access to the back side of the dent.
- Lighting: Specialized PDR lights are used to highlight the contours of the dent and reveal imperfections. These lights often have striped patterns that reflect off the metal, making even subtle variations in shape visible.
- Tool Selection: Various PDR tools are available, including rods, picks, and levers, each designed for specific types of dents and access points.
- Manipulation: The technician carefully uses the tools to apply pressure to the back of the dent, gradually massaging the metal back into its original shape. This requires patience and skill to avoid over-pushing or stretching the metal.
- Tapping Down: A knock-down tool, often with replaceable tips of varying hardness, is used to gently tap down any high spots or crowns that may form during the pushing process.
The goal is to restore the panel to its original contour without damaging the paint. Achieving this requires a delicate balance of pushing and tapping, constantly monitoring the progress with the PDR light.
Real-World Use: Basic Troubleshooting Tips
Here are some common issues you might encounter and how to address them:
- Dent is too deep: If the dent is too deep, PDR might not be sufficient. You might need to consider traditional bodywork techniques involving filler and repainting.
- Paint is cracking: If the paint starts to crack during the PDR process, stop immediately. Further manipulation could cause the paint to chip or peel.
- Metal is stretching: If the metal starts to stretch, it can create a high spot or "crown" around the dent. Use a knock-down tool to gently tap down the crown and prevent further stretching.
- Limited Access: Sometimes, accessing the back of the dent is difficult or impossible. In these cases, you might need to consider alternative PDR techniques, such as glue pulling (using specialized glue and pullers to gently pull the dent from the outside).
Remember, patience is key. Don't try to rush the process, as this can lead to mistakes and further damage. If you're unsure about any step, it's always best to consult a professional PDR technician.
Safety Considerations
Working on car bodies can involve some risks. Here are a few points to keep in mind:
- Sharp Edges: Be careful of sharp edges on the metal panels. Wear gloves to protect your hands.
- Electrical Components: When removing interior panels, be aware of electrical wiring and components. Disconnect the battery to prevent accidental shocks. Always consult your vehicle's service manual before disconnecting any electrical components.
- Airbag Systems: Avoid working near airbag sensors or components. Accidental deployment can cause serious injury.
- Proper Ventilation: If using any chemicals or solvents, ensure adequate ventilation.
- Eye Protection: Always wear safety glasses to protect your eyes from debris.
It is also important to remember that some areas of the car, like the hood and trunk, use spring-loaded hinges. These can be dangerous if not handled properly. Ensure they are properly secured before working in these areas.
Advanced Techniques and Considerations
Beyond the basics, PDR can involve more complex techniques:
- Glue Pulling: As mentioned earlier, this involves using specialized glue and pullers to gently pull the dent from the outside. This is often used when access to the back of the panel is limited. Different glue formulas and puller designs cater to varying dent sizes and metal types.
- Heat Application: Applying heat to the metal can sometimes make it more pliable and easier to manipulate. However, this should be done with caution, as excessive heat can damage the paint. Heat guns designed for automotive use are recommended.
- Blending Techniques: After the main dent is removed, blending techniques are used to smooth out any remaining imperfections and ensure a seamless repair. This often involves using specialized tools and techniques to gently massage the metal.
Mastering these advanced techniques requires practice and experience. Consider taking a PDR training course to learn from experienced professionals.
Hail damage repair, especially using PDR, is a skill that improves with practice. Start with less visible areas and work your way up. With patience and the right tools, you can restore your car's appearance and save money on costly body shop repairs.
We have access to detailed diagrams that can further assist you in your repair process. If you'd like to receive a copy, please [provide instructions on how to request the diagram]. Good luck with your repair!