How To Fix Leaking Brake Caliper
Few things are as unsettling as the feeling of your brake pedal sinking lower than usual, accompanied by a soft, hissing sound. This often points to a leaking brake caliper, a problem that demands immediate attention. Driving with compromised brakes is not only dangerous but also risks further damage to other components of your braking system. While professional repair is always recommended, understanding the problem and the process of fixing it can empower you to make informed decisions and potentially tackle the job yourself if you're mechanically inclined.
The Dreaded Leak: A Scenario
Imagine this: You're driving down a familiar road, approaching a red light. As you press the brake pedal, it feels spongy and travels further than it should. You hear a faint hissing noise coming from the vicinity of one of your wheels. Panic starts to set in. This is a classic scenario of a leaking brake caliper. The brake fluid, the lifeblood of your braking system, is escaping, reducing the pressure available to clamp the brake pads against the rotors and slow your vehicle.
Think of your braking system like a hydraulic press. You apply force to a small piston (the master cylinder), which transmits that force through incompressible fluid to a larger piston (the brake caliper). This amplifies the force, allowing you to easily stop a multi-ton vehicle. A leak in the system is like a hole in the hydraulic line of the press – the pressure drops, and the system loses its effectiveness.
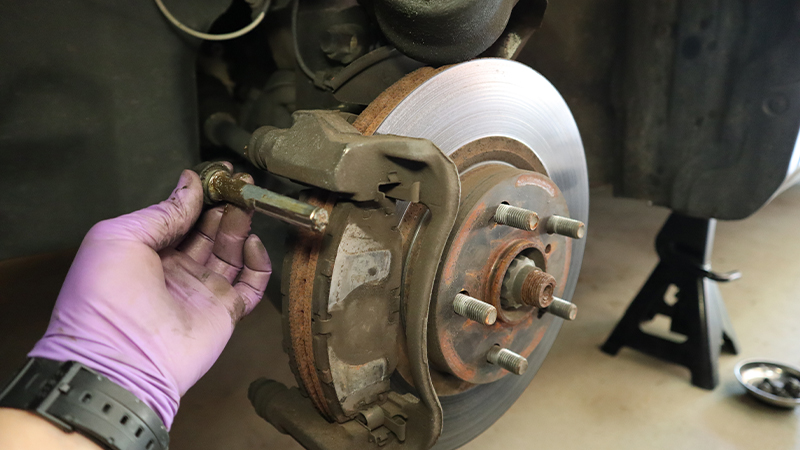
Understanding the Mechanics: How Brake Calipers Work
To understand how to fix a leaking caliper, we need to understand how it works. Brake calipers are essential components in disc brake systems. They house the brake pads and use hydraulic pressure from the master cylinder to squeeze the pads against the brake rotors, creating friction and slowing the vehicle. They're essentially hydraulic clamps.
Key Components:
- Caliper Body: The main housing that supports the other components. Usually made of cast iron or aluminum.
- Piston(s): Cylindrical component(s) that push the brake pads against the rotor. Sealed with a rubber boot.
- Seals: Rubber rings that prevent brake fluid from leaking past the piston. These are the most common source of leaks.
- Brake Pads: Friction material that contacts the rotor.
- Bleeder Screw: Used to bleed air from the brake lines.
- Guide Pins/Slides: Allow the caliper to move and maintain even pressure on the brake pads.
When you press the brake pedal, the master cylinder sends pressurized brake fluid through the brake lines to the caliper. This pressure forces the piston(s) out of the caliper bore, pushing the brake pads against the rotor. The friction between the pads and rotor slows the rotation of the wheel. When you release the brake pedal, the piston retracts (slightly), and the pads move away from the rotor.
The seals are the weak point. Over time, the seals can degrade due to age, heat, and contaminants in the brake fluid. This degradation can cause the seals to shrink, crack, or become brittle, allowing brake fluid to leak past the piston.
Fixing the Leak: Options and Considerations
There are two primary ways to address a leaking brake caliper:
- Caliper Rebuild: This involves disassembling the caliper, cleaning all components, replacing the seals and boots, and reassembling the caliper.
- Caliper Replacement: Replacing the entire caliper with a new or remanufactured unit.
Caliper Rebuild: The DIY Approach
Pros:
- Cost-Effective: Seal kits are significantly cheaper than replacing the entire caliper.
- Educational: Provides a deeper understanding of the braking system.
- Environmentally Friendly: Reduces waste by reusing the caliper body.
Cons:
- Time-Consuming: Requires meticulous cleaning and careful reassembly.
- Skill Required: Requires mechanical aptitude and knowledge of braking systems.
- Potential for Error: Incorrect reassembly can lead to brake failure.
- Caliper Condition: Not suitable if the caliper body is damaged or corroded.
Use Cases: Caliper rebuilding is a viable option for older vehicles where replacement calipers might be difficult to find or for individuals who enjoy DIY projects and possess the necessary skills and tools.
Process:
- Safety First: Disconnect the negative battery terminal. Use jack stands to safely support the vehicle.
- Remove the Wheel: Loosen the lug nuts and remove the wheel.
- Disconnect the Brake Line: Carefully disconnect the brake line from the caliper. Use a flare nut wrench to avoid rounding the fitting. Plug the brake line to prevent excessive fluid loss.
- Remove the Caliper: Unbolt the caliper from the brake caliper bracket.
- Disassemble the Caliper: Carefully remove the piston from the caliper body. Compressed air can be used to assist with this, but use caution to avoid injury. Remove the old seals and boots.
- Clean the Components: Thoroughly clean all caliper components with brake cleaner. Inspect the caliper bore for damage or corrosion.
- Install New Seals and Boots: Lubricate the new seals with brake fluid and carefully install them in the caliper bore. Install the new boot.
- Reassemble the Caliper: Carefully reinsert the piston into the caliper bore.
- Reinstall the Caliper: Bolt the caliper back onto the bracket.
- Reconnect the Brake Line: Reconnect the brake line to the caliper.
- Bleed the Brakes: Bleed the brake system to remove any air that may have entered the lines.
- Reinstall the Wheel: Reinstall the wheel and tighten the lug nuts to the proper torque.
- Test the Brakes: Pump the brake pedal several times to ensure proper brake function. Take the vehicle for a test drive in a safe area to confirm the repair.
Caliper Replacement: The Faster Route
Pros:
- Faster: Significantly faster than rebuilding a caliper.
- Reliable: New or remanufactured calipers offer a higher level of confidence.
- Less Risk: Reduces the risk of errors during reassembly.
Cons:
- More Expensive: Replacement calipers are more expensive than seal kits.
- Potentially Unnecessary: If the caliper body is in good condition, replacing it might be wasteful.
Use Cases: Caliper replacement is the preferred option for individuals who lack the time or skills to rebuild a caliper, or if the caliper body is damaged beyond repair. It's also a good choice for critical applications where reliability is paramount.
Process: The process is similar to removing the caliper for rebuilding, but instead of disassembling and reassembling the old caliper, you simply install the new or remanufactured unit. Remember to bleed the brakes after installation.
Manufacturer Examples:
Many manufacturers offer both new and remanufactured calipers. For example:
- Cardone: A popular brand offering a wide range of remanufactured brake calipers.
- Brembo: Known for high-performance braking systems and calipers.
- ATE: A major supplier of OE brake components.
The choice between a new and remanufactured caliper often comes down to budget and availability. Remanufactured calipers are typically cheaper but undergo rigorous testing to ensure they meet or exceed OE specifications.
Brake Fluid: The Unsung Hero
Regardless of whether you rebuild or replace your brake caliper, using the correct type of brake fluid is critical. Using the wrong type can damage seals and lead to premature failure. Consult your vehicle's owner's manual for the recommended brake fluid type (DOT 3, DOT 4, or DOT 5.1). DOT 5 fluid is silicone-based and incompatible with most vehicles. Always use fresh, unopened brake fluid to avoid contamination.
Real-World Insights and Recommendations
Based on real-world experience, here are a few recommendations:
- Inspect Regularly: Regularly inspect your brake system for signs of leaks, wear, or damage. Early detection can prevent more serious problems.
- Use Quality Parts: When rebuilding or replacing calipers, use high-quality seals, boots, and brake pads. Cheap parts can compromise braking performance and longevity.
- Bleed Thoroughly: Properly bleeding the brakes is essential after any brake work. Air in the brake lines can significantly reduce braking performance. Consider using a pressure bleeder for a more efficient and effective bleeding process.
- Don't Neglect Guide Pins: Clean and lubricate the caliper guide pins/slides regularly to ensure smooth caliper movement. Seized guide pins can cause uneven brake pad wear and reduced braking performance. Use a high-temperature brake caliper grease.
- Consider Replacing in Pairs: If one caliper is leaking, consider replacing or rebuilding the calipers on both sides of the axle. This ensures even braking performance and prevents uneven wear.
- Professional Help: If you are not comfortable working on your brakes, seek professional assistance. Brakes are a critical safety system, and any mistakes can have serious consequences.
Fixing a leaking brake caliper is a task that requires careful attention to detail and a good understanding of the braking system. By understanding the mechanics, considering the options, and following best practices, you can effectively address this problem and ensure the safety of your vehicle. Whether you choose to rebuild or replace, remember that proper brake maintenance is crucial for safe driving.