How To Fix Rusted Gas Tank
A rusty gas tank is a common problem for older vehicles, especially those that sit for extended periods. Rust not only contaminates the fuel system, leading to poor performance and potential engine damage, but also weakens the tank itself, potentially causing leaks. Repairing or restoring a rusted gas tank is a challenging but achievable project for the experienced DIYer. This article provides a detailed guide to assessing the damage, cleaning the tank, and preventing future rust, allowing you to extend the life of your vehicle and avoid costly replacements.
Background: Fuel Systems and Rust Formation
Understanding the basics of the fuel system and how rust forms is crucial before tackling a gas tank restoration. In a typical gasoline-powered vehicle, the fuel system begins with the gas tank, which stores the fuel. A fuel pump, typically located inside the tank, draws fuel through a fuel filter and sends it to the engine. From there, the fuel is either injected directly into the cylinders (direct injection) or into the intake manifold (port injection). A fuel pressure regulator maintains consistent fuel pressure to ensure proper combustion.
Rust, or iron oxide, forms when iron or steel (the primary materials used in gas tank construction) is exposed to oxygen and moisture. The process, known as oxidation, weakens the metal over time. Inside a gas tank, condensation can form, especially in vehicles stored in humid environments or those that experience frequent temperature changes. This condensation, combined with any water that may enter the tank through a loose gas cap or contaminated fuel, accelerates the rusting process. Furthermore, the presence of ethanol in modern gasoline can exacerbate the problem, as ethanol attracts water.
Technical Breakdown: How Rust Affects the Fuel System
Rust impacts the fuel system in several ways:
- Fuel Contamination: Rust particles break off from the tank walls and settle at the bottom. These particles are then drawn into the fuel pump and sent towards the engine. This contamination can clog fuel filters, fuel injectors, and even damage the fuel pump itself.
- Reduced Fuel Flow: A heavily rusted tank can have significant buildup of rust and debris, restricting the flow of fuel to the engine. This can lead to poor acceleration, stalling, and overall reduced performance.
- Tank Weakening: The oxidation process weakens the metal of the tank itself. This can lead to leaks, which are a serious fire hazard. In extreme cases, the tank can even rupture.
- Fuel Pump Failure: The fuel pump is designed to pump clean fuel. Pumping rust-contaminated fuel puts extra strain on the pump, causing it to overheat and fail prematurely.
Repairing a Rusted Gas Tank: A Step-by-Step Guide
The following steps outline the process of repairing a rusted gas tank. Safety is paramount, so always work in a well-ventilated area, wear appropriate safety gear (eye protection, gloves, and a respirator), and disconnect the vehicle's battery before starting.
1. Assessment and Preparation
Before attempting any repairs, it's crucial to assess the extent of the rust damage. If the tank is severely rusted through or has large holes, replacement is usually the safest and most practical option. Minor surface rust and some internal scaling can often be addressed with cleaning and sealing.
- Empty the Tank: Siphon any remaining fuel from the tank. Dispose of the fuel properly, following local regulations.
- Remove the Tank: Disconnect the fuel lines, fuel pump electrical connector, and any other hoses or wires attached to the tank. Loosen the straps or mounting hardware that hold the tank in place and carefully lower it to the ground. It's helpful to have a second person assist with this, as a full gas tank can be heavy.
- Inspect the Tank: Visually inspect the tank for external rust, leaks, and damage. Look inside the tank with a flashlight to assess the level of internal rust and debris.
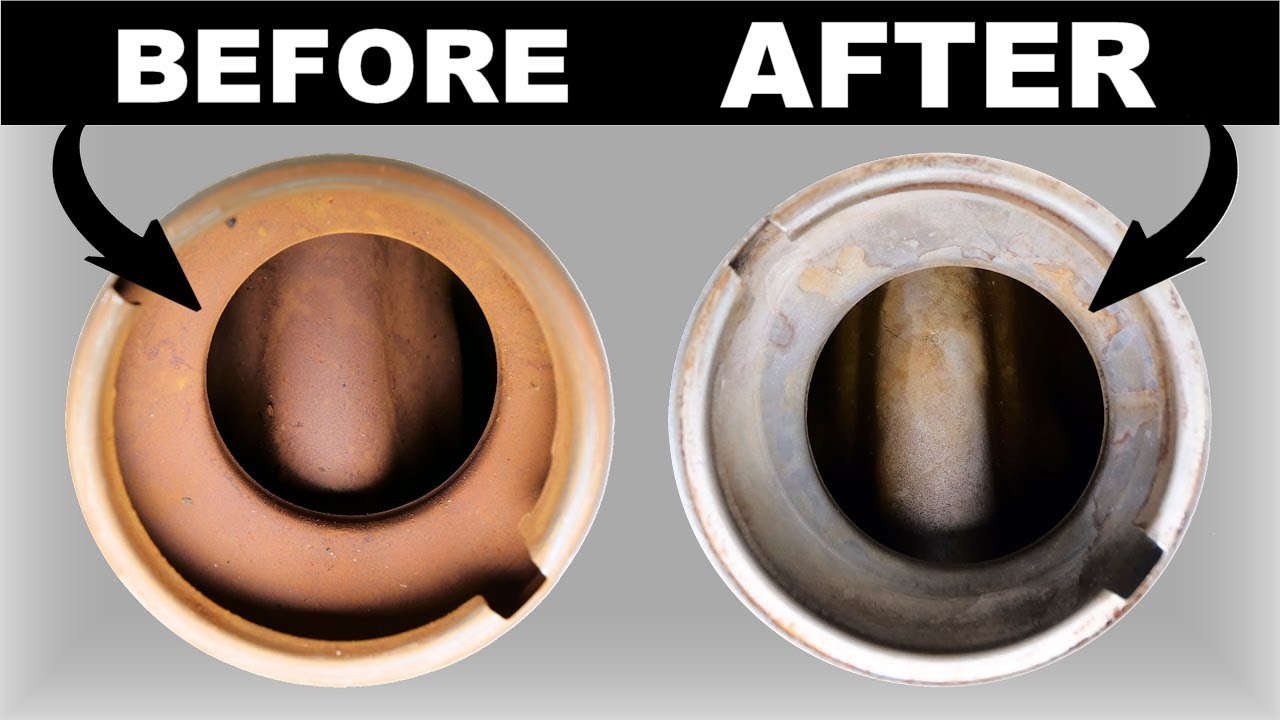
2. Cleaning the Tank
Cleaning the tank is crucial to remove loose rust and prepare the surface for sealing.
- Initial Rinse: Rinse the tank with water and a mild detergent to remove any loose debris and fuel residue.
- Mechanical Cleaning: This step involves using abrasive methods to remove rust. Several options are available:
- Gravel/Nut Method: Pour a generous amount of gravel (aquarium gravel works well) or nuts (hardware store grade) into the tank. Secure the gas cap and any other openings with tape. Shake the tank vigorously for an extended period (30-60 minutes) to dislodge rust. This method is effective for removing loose rust but may not address heavily rusted areas.
- Chain Method: Similar to the gravel method, use a length of chain inside the tank. This can be more aggressive at removing rust but requires caution to avoid damaging the tank.
- Pressure Washer: A pressure washer with a long nozzle can be used to blast rust and debris from the inside of the tank. Be sure to wear appropriate safety gear, as water and rust particles will be ejected from the tank.
- Chemical Cleaning (Rust Removal): After mechanical cleaning, a chemical rust remover can be used to dissolve remaining rust. Follow the manufacturer's instructions carefully. Common options include:
- Phosphoric Acid: Converts rust into a stable iron phosphate coating.
- Muriatic Acid (Hydrochloric Acid): A powerful rust remover, but requires extreme caution. It can damage the tank if not used properly.
Always wear appropriate PPE (Personal Protective Equipment) and work in a well-ventilated area when using chemical rust removers.
- Neutralization: After using a chemical rust remover, it's essential to neutralize the acid. Use a solution of baking soda and water to neutralize the acid. Rinse the tank thoroughly with water.
- Drying: Thoroughly dry the tank to prevent flash rusting. Use a heat gun on a low setting or compressed air to speed up the drying process.
3. Sealing the Tank
Sealing the tank prevents future rust and seals any small pinholes that may have formed.
- Choose a Sealer: Several fuel tank sealers are available, typically epoxy-based or polymer-based. Choose a sealer specifically designed for gas tanks and compatible with modern fuels (including ethanol).
- Prepare the Tank: Ensure the tank is completely dry and free of any loose debris. Follow the sealer manufacturer's instructions for surface preparation.
- Apply the Sealer: Pour the sealer into the tank and rotate it to coat all interior surfaces evenly. Follow the manufacturer's instructions for application thickness and curing time. Some sealers require multiple coats.
- Drain Excess Sealer: After coating the tank, drain any excess sealer.
- Curing: Allow the sealer to cure completely, following the manufacturer's instructions. This may take several days.
4. Reinstallation
Once the sealer is fully cured, the tank can be reinstalled.
- Inspect Fuel Lines: Before reinstalling the tank, inspect the fuel lines for cracks or damage. Replace any worn or damaged lines.
- Install Fuel Pump and Filter: Install a new fuel pump and fuel filter to ensure a clean fuel supply.
- Reinstall the Tank: Carefully lift the tank back into position and secure it with the straps or mounting hardware.
- Reconnect Fuel Lines and Electrical Connections: Reconnect the fuel lines, fuel pump electrical connector, and any other hoses or wires attached to the tank.
- Test for Leaks: Add a small amount of fuel to the tank and check for leaks. Start the vehicle and monitor for any fuel leaks or unusual engine behavior.
Common Issues and Maintenance Concerns
- Pinholes: Small pinholes can be difficult to detect. A tank sealer can usually seal these holes.
- Heavy Rust: Severely rusted tanks may be beyond repair and require replacement.
- Sealer Failure: Improper surface preparation or using an incompatible sealer can lead to sealer failure.
- Fuel Line Deterioration: Old fuel lines can deteriorate over time, leading to leaks. Replace fuel lines as needed.
Do's and Don'ts / Best Practices
- DO: Wear appropriate safety gear (eye protection, gloves, respirator).
- DO: Work in a well-ventilated area.
- DO: Disconnect the vehicle's battery before starting.
- DO: Follow the manufacturer's instructions for all products used.
- DO: Use a fuel tank sealer specifically designed for gas tanks and compatible with modern fuels.
- DON'T: Smoke or use open flames near gasoline or fuel vapors.
- DON'T: Use harsh chemicals that can damage the tank.
- DON'T: Rush the process. Allow ample time for cleaning, sealing, and curing.
- Best Practice: Use fuel stabilizer in stored vehicles to prevent fuel degradation and condensation.
- Best Practice: Keep the fuel tank full in stored vehicles to minimize condensation formation.
Conclusion
Repairing a rusted gas tank is a labor-intensive but rewarding project. By following the steps outlined in this guide, you can restore your gas tank to good working condition and prevent future rust problems. However, if you are unsure about any step of the process or if the tank is severely damaged, it is always best to consult a qualified mechanic. Replacing a severely rusted tank is often the safest and most cost-effective long-term solution, especially if you value peace of mind and avoiding potential safety hazards. Prioritize safety at all times, and you'll be well on your way to a cleaner, more reliable fuel system.