How To Get Hail Dents Out Of Hood
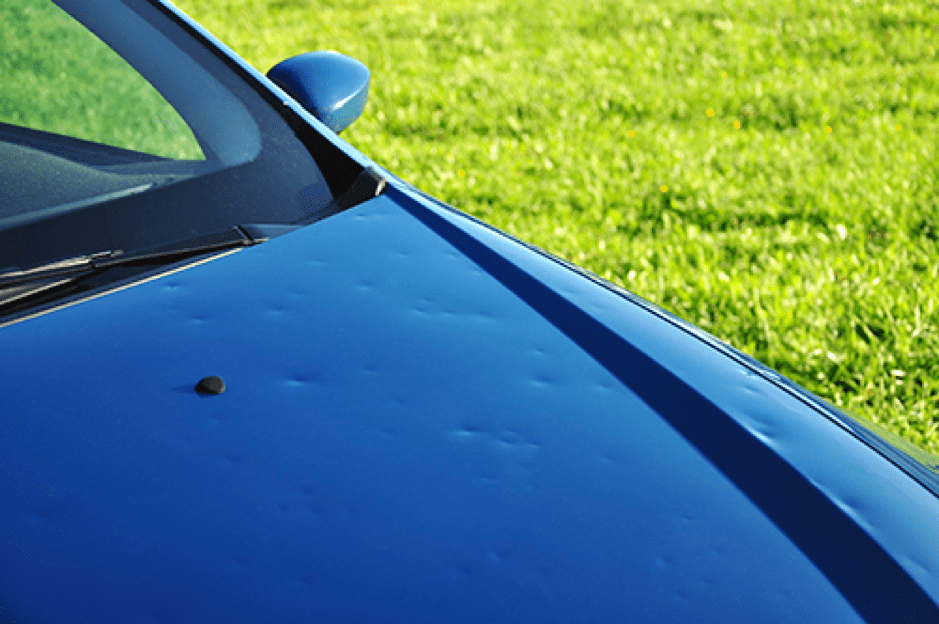
So, you've got a hood that looks like it's been used for target practice thanks to a recent hailstorm? Frustrating, I know. But don't rush to the body shop just yet. If you're a reasonably experienced DIYer with a bit of patience, you might be able to tackle those hail dents yourself. We're going to walk through a few common methods and, importantly, cover the safety aspects. We'll also discuss the advantages and disadvantages of each technique.
Understanding Hail Dent Removal: An Overview
The goal of hail dent removal is to return the distorted metal of your hood back to its original shape. The key is understanding that metal has a 'memory'. When dented, the metal stretches and compresses, but it wants to return to its original form. The techniques we'll discuss attempt to coax the metal back to that state, either by applying pressure from the inside (Paintless Dent Repair, or PDR) or by carefully manipulating the surface with heat and cold.
Key Specs and Main Parts (Depending on Method)
Here's a breakdown of the main tools and components involved, depending on the hail dent removal method you choose:
- Paintless Dent Repair (PDR): PDR tools include specialized metal rods of varying shapes and sizes, designed to access the dent from behind the panel. A light board is also essential to illuminate the dent and help you visualize the pressure points. You might also need door edge guards to protect the paint when inserting tools.
- Heat Gun/Hair Dryer and Compressed Air/Dry Ice: A heat gun (with adjustable temperature settings) or a high-powered hair dryer is used to warm the metal. Compressed air (held upside down to dispense liquid) or dry ice is then used to rapidly cool the metal.
- Suction Dent Puller: These tools use suction to pull the dent outwards. They typically consist of a suction cup attached to a slide hammer or a ratchet mechanism.
- Hammer and Dolly: This is a more traditional method that requires careful use of a hammer (body hammer or rubber mallet) and a dolly (a shaped metal anvil) to reshape the metal. This method is generally not recommended for beginners on painted surfaces as it's easy to damage the paint.
Understanding the ‘Invisible’ Diagram: Mental Visualization
While we don’t have a single, downloadable diagram here, understanding the mental diagram of metal deformation is crucial. Think of your hood panel as a complex network of stresses. A hail dent represents a concentrated point of stress. Our goal is to redistribute that stress evenly across the surrounding area, allowing the metal to relax back into its original shape. The shape of the dent, its depth, and its location all play a role in choosing the appropriate technique and pressure application.
How It Works: The Science of Dent Removal
Let's break down how each method works:
- Paintless Dent Repair (PDR): This is the preferred method for most hail dents, as it doesn't damage the paint. You insert the PDR tool through existing access holes (e.g., in the hood bracing) or carefully drill new access points (plugged later). Using the light board, you locate the high and low spots around the dent. The PDR tool is then used to gently massage the metal from behind, slowly pushing the dent outwards. It’s a process of incremental adjustments, requiring a delicate touch and patience.
- Heat and Cold Method: Heating the metal expands it. Rapidly cooling it contracts it. The theory is that this rapid expansion and contraction can "pop" the dent out. The heat should be applied evenly around the dent, and the cooling should be concentrated in the center. This method is more effective on shallower, less creased dents.
- Suction Dent Puller: The suction cup creates a vacuum, adhering to the dented area. By pulling on the slide hammer or ratchet, you apply outward force. This can be effective for larger, smoother dents, but it's less precise than PDR and can sometimes stretch the metal.
- Hammer and Dolly: The dolly is held behind the dent, providing a solid surface. The hammer is then used to gently tap the dented area. The dolly helps to shape the metal and prevent it from stretching too much. Again, this method is best left to professionals or very experienced DIYers, especially on painted surfaces.
Real-World Use: Basic Troubleshooting
Here are some troubleshooting tips for each method:
- PDR:
- Problem: Metal feels stiff and won't move. Solution: You might be applying pressure in the wrong area. Re-examine the dent under the light board and try different angles. Make sure the tip of your tool isn't slipping.
- Problem: Paint is cracking. Solution: Stop immediately! You're applying too much pressure or working on a compromised area. This indicates the paint is already weakened or damaged.
- Heat and Cold:
- Problem: Nothing is happening. Solution: Ensure the heat is sufficient (but not excessive - see safety notes below). Try varying the cooling method – compressed air might be more effective than dry ice in some cases.
- Problem: Paint is blistering. Solution: You're applying too much heat! Stop immediately and let the area cool down.
- Suction Dent Puller:
- Problem: Suction cup won't stick. Solution: Clean the surface thoroughly with isopropyl alcohol. Make sure the suction cup is clean and free of debris.
- Problem: Dent is pulled out too far. Solution: You've over-corrected. Gently tap the area back down with a rubber mallet.
Safety First: Identifying Risky Components and Practices
Safety is paramount! Here are some key safety considerations:
- Heat Gun: Heat guns can reach extremely high temperatures. Always wear heat-resistant gloves and eye protection. Never point the heat gun at yourself, others, or flammable materials. Do not overheat the painted surface, as this can cause blistering or peeling. Start with a low setting and gradually increase the heat as needed.
- Compressed Air: When using compressed air, wear eye protection to prevent debris from entering your eyes. Be careful when dispensing liquid compressed air, as it can cause frostbite.
- Dry Ice: Dry ice is extremely cold and can cause severe frostbite. Always wear insulated gloves and handle it with caution. Never put dry ice in a sealed container, as the pressure buildup can cause an explosion.
- Sharp Tools: PDR tools can be sharp. Handle them with care to avoid cuts. Be mindful of the tool's position when working inside the hood to avoid damaging wiring or other components.
- Vehicle Battery: When working under the hood, disconnect the negative terminal of the battery to prevent accidental shorts.
Final Thoughts
Removing hail dents can be a rewarding DIY project, but it requires patience, skill, and the right tools. If you're unsure about your abilities, it's always best to consult a professional. Starting with a small, inconspicuous dent is a good way to practice and gain experience. Remember that some dents may be too severe to repair using these methods. If the paint is cracked or the metal is severely stretched, professional bodywork may be required.
We have the diagram to help you understand the vehicle hood design and access points, which will aid in the removal of the dent. You can download the hood diagram here: [Hypothetical Link - Insert Link Here]. It shows the general layout of the hood's support structure, giving you a better idea of where you can safely insert PDR tools without damaging internal components. Good luck!