How To Get Rid Of Car Mold
Conquering Car Mold: A DIY Guide for the Dedicated Car Owner
Car mold isn't just unsightly; it can be a health hazard, causing respiratory issues and allergic reactions. As an experienced DIYer, you know the satisfaction of tackling automotive challenges yourself. This guide provides a comprehensive, technically-informed approach to eradicating mold from your vehicle, empowering you to reclaim your car's interior and ensure a healthier driving environment. We'll go beyond simple cleaning and delve into the root causes, preventative measures, and essential safety protocols.
Purpose: Why Mastering Mold Removal Matters
Understanding and implementing effective mold removal techniques is critical for several reasons:
- Health and Safety: Mold spores are allergenic and can trigger respiratory problems, especially in sensitive individuals. Removing mold ensures a healthier cabin environment.
- Preserving Vehicle Value: Mold growth can damage interior surfaces, leading to discoloration, material degradation, and a decrease in resale value.
- Preventing Recurrence: Simply wiping down visible mold is insufficient. Addressing the underlying moisture sources and implementing preventative measures prevents future outbreaks.
- DIY Satisfaction: Knowing you've thoroughly cleaned and protected your vehicle offers a sense of accomplishment and saves you money compared to professional detailing services.
Key Specs and Main Parts: Identifying the Battleground
Before launching your anti-mold offensive, understanding the common areas where mold thrives is crucial. Key areas include:
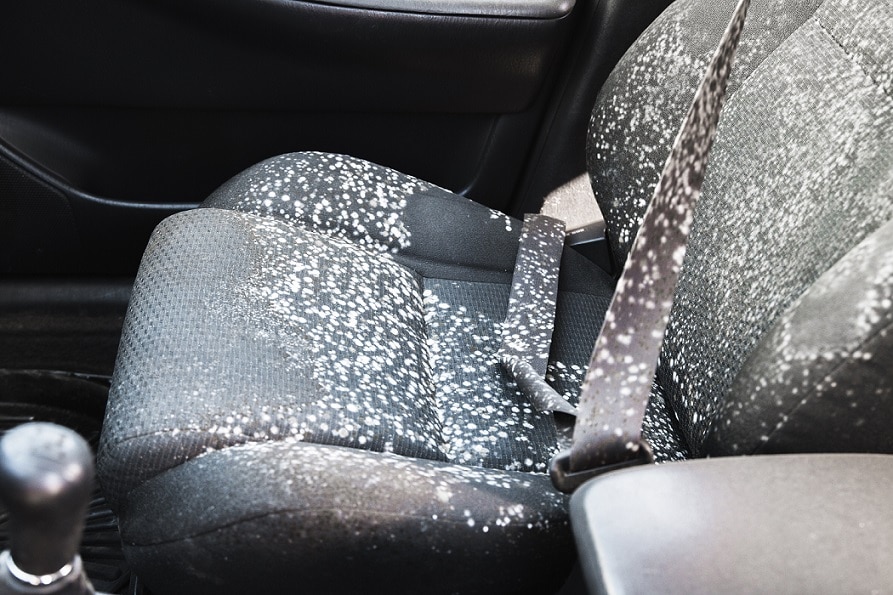
- Carpets and Floor Mats: These are notorious for trapping moisture, especially after spills or exposure to rain and snow. The carpet fibers and the underlying padding provide a perfect breeding ground.
- Upholstery (Seats): Fabric and leather upholstery can absorb moisture, leading to mold growth. Seams and folds are particularly vulnerable. Porous materials are your enemy here.
- Air Conditioning System: The evaporator core, located behind the dashboard, can accumulate condensation and become a breeding ground for mold and bacteria. The evaporator drain can become clogged, exacerbating the problem.
- Headliner: Leaks from the sunroof or roof seams can saturate the headliner, creating a hidden mold colony. The adhesive holding the headliner in place can also degrade and trap moisture.
- Trunk: Similar to carpets, the trunk is prone to moisture buildup, especially if there are leaks in the weather stripping.
- Door Seals and Weather Stripping: Damaged or degraded door seals allow moisture to enter the cabin, promoting mold growth.
Tools of the Trade: Essential Equipment and Materials
To effectively combat car mold, you'll need the following tools and materials:
- Personal Protective Equipment (PPE): Respirator (N95 or better), gloves (nitrile or rubber), and eye protection. Mold spores are hazardous.
- Wet/Dry Vacuum: Crucial for removing loose mold and debris and extracting moisture. Choose a model with a HEPA filter to trap mold spores.
- Mold-Specific Cleaner: Commercial mold removers are available, or you can create a DIY solution using diluted bleach (1 part bleach to 10 parts water) or vinegar. Borax solution (1 cup borax to 1 gallon water) is also effective. Always test any cleaner on an inconspicuous area first!
- Stiff-Bristled Brush: For scrubbing mold from surfaces.
- Microfiber Cloths: For wiping down surfaces.
- Spray Bottle: For applying cleaning solutions.
- Dehumidifier or Fan: To thoroughly dry the interior after cleaning.
- Ozone Generator (Optional, with caution): Ozone generators can kill mold and eliminate odors, but they are potent and should be used with extreme caution and proper ventilation. Never occupy the vehicle while the ozone generator is running.
How It Works: The Mold Removal Process
The mold removal process involves several key steps:
- Preparation: Park the car in a well-ventilated area. Open all doors and windows. Wear your PPE.
- Vacuuming: Thoroughly vacuum all affected areas, including carpets, upholstery, headliner, and trunk. Use a crevice tool to reach tight spaces.
- Cleaning: Apply your chosen cleaning solution to the affected areas. Saturate the area and let it sit for the recommended time (usually 10-15 minutes). Do not let bleach solutions dry on surfaces, as this can cause discoloration.
- Scrubbing: Use a stiff-bristled brush to scrub away the mold.
- Wiping: Wipe down all surfaces with a clean, damp microfiber cloth to remove any remaining cleaner and mold residue.
- Extraction: Use the wet/dry vacuum to extract as much moisture as possible from carpets and upholstery.
- Drying: Use a dehumidifier or fan to thoroughly dry the interior. Leave the doors and windows open to promote air circulation. This is the most critical step in preventing recurrence.
- Air Conditioning Treatment: Use an A/C cleaner specifically designed to kill mold and bacteria in the evaporator core. Follow the manufacturer's instructions.
- Ozone Treatment (Optional): If odors persist, consider using an ozone generator. Carefully follow the manufacturer's instructions and ensure the vehicle is thoroughly ventilated after treatment.
- Prevention: Address any underlying moisture sources, such as leaks in the roof, sunroof, or weather stripping. Consider using moisture absorbers or silica gel packets to prevent future moisture buildup. Regularly clean and vacuum your car's interior.
Real-World Use: Troubleshooting Tips and Advanced Techniques
- Persistent Odors: If odors persist after cleaning, try sprinkling baking soda on carpets and upholstery, letting it sit overnight, and then vacuuming it up.
- Stubborn Stains: For stubborn stains, consider using a commercial carpet and upholstery cleaner specifically designed for stain removal.
- Headliner Mold: Removing mold from the headliner can be challenging. Start with a gentle cleaner and avoid saturating the headliner, as this can cause it to sag. Use a soft-bristled brush and blot the area dry.
- Hidden Mold: If you suspect mold is growing behind panels or under carpets, you may need to remove these components for a more thorough cleaning. Consult a repair manual for instructions on safely removing interior panels.
- Evaporator Core Cleaning: Some vehicles have an access port to the evaporator core. If not, you may need to remove the blower motor to gain access. Consult a repair manual for specific instructions.
Safety: Handling Hazardous Materials and Equipment
Working with mold and cleaning chemicals requires caution. Here are some essential safety precautions:
- Respiratory Protection: Always wear a respirator (N95 or better) to avoid inhaling mold spores.
- Skin and Eye Protection: Wear gloves and eye protection to prevent skin and eye irritation from cleaning chemicals.
- Ventilation: Work in a well-ventilated area to avoid inhaling fumes from cleaning chemicals.
- Chemical Handling: Follow the manufacturer's instructions for all cleaning chemicals. Never mix bleach with ammonia, as this can create toxic fumes.
- Electrical Safety: When using a wet/dry vacuum or other electrical equipment, ensure the area is dry and the equipment is properly grounded.
- Ozone Generator Safety: Never occupy the vehicle while the ozone generator is running. Ozone is a lung irritant and can be harmful if inhaled. Follow the manufacturer's instructions carefully and ensure the vehicle is thoroughly ventilated after treatment.
By following these guidelines and taking the necessary precautions, you can effectively eliminate mold from your vehicle and enjoy a healthier and more pleasant driving experience. Remember, prevention is key, so address any moisture sources and maintain a clean and dry interior.
We have a detailed diagram illustrating the common mold locations and ventilation systems in your vehicle available for download. This resource will provide a visual guide to aid you in your mold removal efforts.