How To Hook An Amp Up In A Car
So, you're ready to crank up the volume in your car. The factory stereo just isn't cutting it, and the siren song of deeper bass and clearer highs is too tempting to resist. Installing an amplifier is the key, but the process can seem daunting. Fear not, aspiring audiophile! This guide breaks down the intricacies of hooking up an amp in your car, transforming your mobile listening experience from mediocre to magnificent.
The Problem: Sound Without Power
Imagine a scenario: You're at a concert, and the band is playing their hearts out. But the PA system is powered by a couple of AA batteries. You hear something, but it lacks punch, clarity, and overall impact. That's essentially what's happening with your factory car stereo. The head unit (the radio) has limited power output. It can drive the speakers, but not with the authority needed for a truly immersive listening experience. Amplifiers are like the professional PA system for your car; they provide the oomph that unlocks the full potential of your speakers.
How the System Works: A Mechanical Breakdown
Let's delve into the mechanics. At its core, an amplifier increases the strength of an audio signal. The head unit sends a low-level audio signal to the amplifier. This signal is then boosted by the amplifier's internal circuitry, which draws power from the car's electrical system (specifically, the battery). The amplified signal is then sent to the speakers, driving them with significantly more power, resulting in louder, cleaner, and more dynamic sound.
Here's a step-by-step breakdown of the components and their roles:
- Head Unit: The source of the audio signal (radio, CD player, Bluetooth, etc.). Provides a low-level signal to the amplifier via RCA outputs or high-level speaker wire outputs.
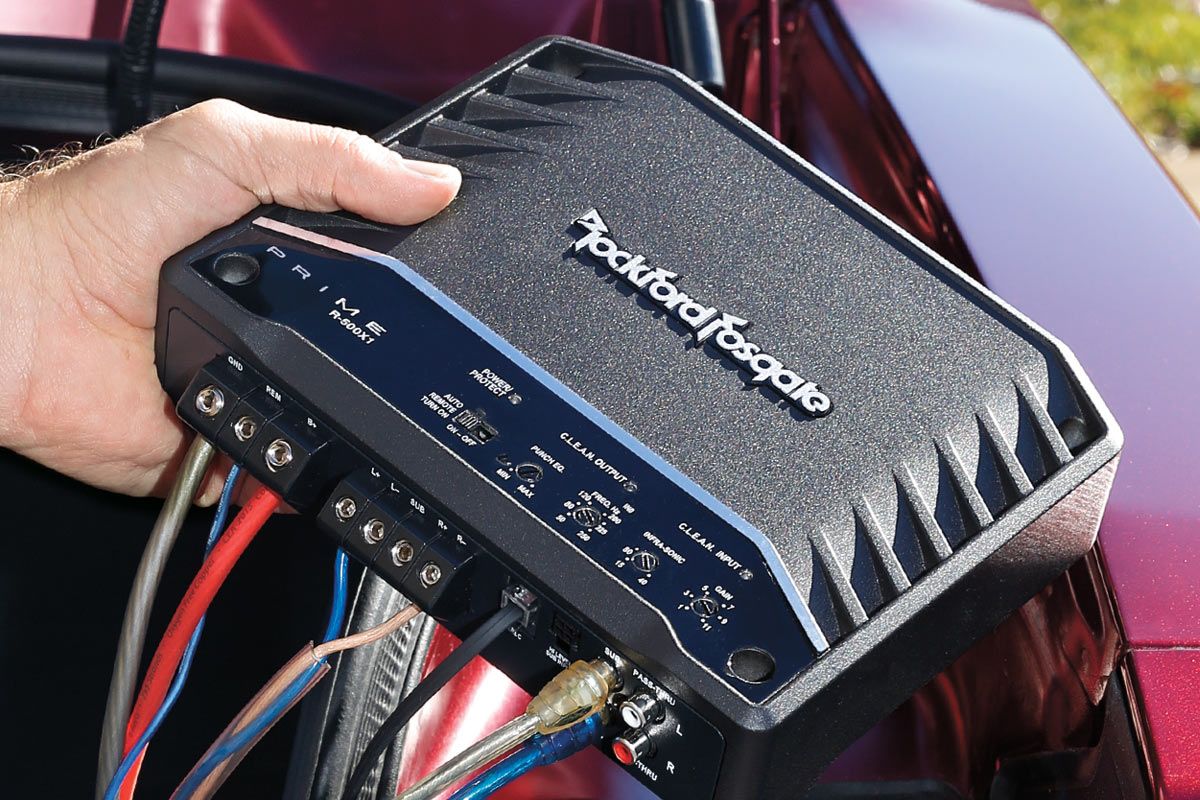
- Amplifier: The heart of the upgrade. It boosts the audio signal and sends it to the speakers. Amplifiers come in various configurations (mono, 2-channel, 4-channel, 5-channel, etc.) depending on the number of speakers you want to power.
- Speakers: Convert the amplified electrical signal back into sound waves. Higher quality speakers benefit most from the increased power provided by an amplifier.
- Power Wire: A thick gauge wire that connects the amplifier directly to the car's battery. This wire provides the amplifier with the necessary power to operate. Safety is paramount here; always disconnect the negative terminal of the battery before working on the electrical system.
- Ground Wire: Connects the amplifier to the car's chassis, providing a ground path for the electrical current. A good ground connection is crucial for optimal performance and minimizing noise.
- Remote Turn-On Wire: A thin wire that connects the amplifier to the head unit. When the head unit is turned on, it sends a signal through this wire, telling the amplifier to power on.
- RCA Cables (or Speaker Wire): Carries the audio signal from the head unit to the amplifier (RCA cables typically used with aftermarket head units). Some amplifiers can accept high-level inputs from the factory speaker wires.
- Fuse: A safety device placed in the power wire, close to the battery. It protects the amplifier and the car's electrical system from damage in case of a short circuit.
Pros and Cons of Adding an Amplifier
Pros:
- Increased Volume: The most obvious benefit. You can crank up the music without distortion.
- Improved Sound Quality: Amplifiers provide cleaner power, resulting in clearer highs, deeper bass, and a more dynamic soundstage.
- More Headroom: Headroom refers to the amplifier's ability to handle sudden peaks in the audio signal without clipping (distorting). More headroom translates to a more natural and less fatiguing listening experience.
- Ability to Power Subwoofers: Subwoofers require significant power to reproduce low frequencies effectively. An amplifier is essential for powering a subwoofer.
Cons:
- Cost: Amplifiers can be expensive, especially high-quality models.
- Installation Complexity: Installing an amplifier requires some technical knowledge and can be time-consuming. Professional installation is often recommended.
- Power Consumption: Amplifiers draw power from the car's electrical system, which can put a strain on the battery and alternator, especially with high-powered amplifiers.
- Potential for Noise: A poorly installed amplifier can introduce noise into the audio system. Proper grounding and shielding are essential.
Use Cases and Manufacturer Examples
Use Cases:
- Boosting Factory Stereo: Improving the sound quality of a factory stereo system without replacing the head unit. Using a line output converter (LOC) to convert the speaker-level outputs from the factory stereo into RCA signals for the amplifier.
- Powering Subwoofers: Dedicated mono amplifiers are designed specifically for powering subwoofers.
- Upgrading Full System: Replacing both the head unit and speakers and using a multi-channel amplifier to power the entire system.
Manufacturer Examples:
- JL Audio: Known for their high-end amplifiers and subwoofers, renowned for sound quality and reliability.
- Rockford Fosgate: Offers a wide range of amplifiers, from entry-level to high-performance, known for their power and value.
- Alpine: A popular brand with a diverse lineup of amplifiers, head units, and speakers.
- Kenwood: Offers reliable amplifiers at competitive prices, suitable for upgrading a factory system or building a budget-friendly custom system.
Step-by-Step Installation Guide (Simplified)
- Disconnect the Negative Battery Terminal: Safety first!
- Choose an Amplifier Location: Consider ventilation and accessibility for adjustments. Under a seat or in the trunk are common locations.
- Run the Power Wire: Connect the power wire to the positive terminal of the battery, ensuring a fuse is installed close to the battery. Route the wire through the firewall to the amplifier location, being careful to avoid sharp edges or moving parts.
- Run the Ground Wire: Connect the ground wire to a clean, bare metal surface on the car's chassis, as close to the amplifier as possible. Scrape away any paint or rust to ensure a good connection.
- Run the Remote Turn-On Wire: Connect the remote turn-on wire from the head unit to the amplifier.
- Connect the RCA Cables (or Speaker Wires): Connect the RCA cables from the head unit to the amplifier's input jacks. If using a factory head unit, use a line output converter (LOC) to convert the speaker-level outputs to RCA signals. Or connect the high-level speaker wire outputs from the factory head unit directly to the amp if it supports it.
- Connect the Speaker Wires: Connect the speaker wires from the amplifier's output terminals to the speakers.
- Adjust the Amplifier Gains: Adjust the amplifier's gains to match the output of the head unit and the sensitivity of the speakers. This is crucial for achieving optimal sound quality and preventing distortion.
- Reconnect the Negative Battery Terminal:
- Test the System: Turn on the head unit and test the system. Listen for any distortion or noise. Make adjustments as needed.
Real-World Insights and Recommendations
Having installed countless amplifiers over the years, a few key points stand out. First, don't skimp on wiring. Use high-quality, appropriately sized power and ground wires to ensure the amplifier receives adequate power and has a solid ground connection. Undersized wires can lead to voltage drop, which can degrade performance and even damage the amplifier.
Second, pay close attention to grounding. A poor ground connection is a common cause of noise and distortion. Clean the grounding surface thoroughly and use a star washer to ensure a tight, secure connection.
Third, take your time with gain adjustments. Setting the gains properly is essential for achieving optimal sound quality and preventing clipping. Start with the gains turned all the way down and gradually increase them until the sound is loud and clear without distortion. Use an oscilloscope for the most accurate gain setting, but if one isn't available, there are many guides to proper gain-setting available online that can teach you how to set your gain by ear using a multimeter.
Finally, consider the long-term impact on your car's electrical system. If you plan on installing a high-powered amplifier, it may be necessary to upgrade the battery and alternator to ensure they can handle the increased load. A failing alternator can damage your new amplifier, and a dead battery can leave you stranded.
Upgrading your car's audio system with an amplifier can be a rewarding experience, transforming your daily commute into a mobile concert hall. By understanding the underlying principles and following these guidelines, you can confidently tackle the installation process and enjoy the fruits of your labor: a powerful and pristine listening experience.