How To Hook Up Ac Gauges
So, you're looking to hook up some AC gauges? Excellent! Whether you're troubleshooting a cooling problem, topping off your refrigerant, or just deepening your understanding of your car's air conditioning system, understanding how to connect and interpret AC gauges is a valuable skill. This guide will walk you through the process, covering everything from the purpose of these gauges to basic troubleshooting and safety precautions.
Purpose of AC Gauges
Why bother with all this? AC gauges are your direct window into the health and performance of your vehicle's air conditioning system. They provide real-time pressure readings on both the high and low sides of the system, allowing you to diagnose problems like leaks, compressor issues, blockages, or incorrect refrigerant levels. Without them, you're essentially flying blind when it comes to AC repair. Understanding these pressures enables you to accurately pinpoint the source of the problem and implement the correct repair, saving you time, money, and potential damage to other components.
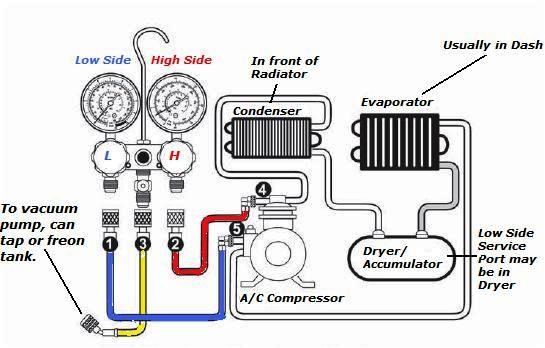
Key Specs and Main Parts
Let's break down the essential components of an AC gauge set:
- Manifold: This is the central body of the gauge set, typically made of metal or durable plastic. It houses the valves that control the flow of refrigerant, and the connection points for the gauges and hoses.
- High-Pressure Gauge (Red): This gauge displays the pressure on the high side of the AC system, typically after the compressor. It has a higher pressure range (e.g., 0-500 psi or more) and is usually red.
- Low-Pressure Gauge (Blue): This gauge displays the pressure on the low side of the AC system, typically before the compressor (suction side). It has a lower pressure range (e.g., 0-150 psi) and is usually blue.
- Hoses (Red, Blue, Yellow): These hoses connect the manifold to the service ports on the vehicle's AC system and to a refrigerant source (if needed). Each hose is typically color-coded to match the corresponding gauge and service port. The yellow hose is usually used for vacuuming and charging the system.
- Service Couplers: These quick-connect fittings attach the hoses to the vehicle's AC service ports. They are designed to prevent refrigerant leakage and ensure a secure connection. Different vehicles might use different types of couplers, so ensure you have the right ones for your car.
- Can Tap (Optional): Used for connecting to refrigerant cans for charging the system. Not always needed for basic diagnostics.
Symbols and Color Conventions
Understanding the symbols and colors used in AC diagrams and on the gauges themselves is crucial for correct operation.
- Lines: Solid lines typically represent refrigerant lines. Dotted lines might represent vacuum lines or control lines.
- Colors:
- Red: Always associated with the high-pressure side of the system.
- Blue: Always associated with the low-pressure side of the system.
- Yellow: Usually represents the utility hose, used for vacuuming, charging, or connecting to a recovery machine.
- Icons: Different diagrams might use various icons to represent components like the compressor, condenser, evaporator, and expansion valve. Consult the specific diagram for your vehicle's AC system for clarification.
How It Works
The AC gauge set connects to the high and low-pressure service ports on your vehicle's AC system. These ports are usually located near the compressor and the evaporator core, respectively. The gauges measure the pressure of the refrigerant at these points, providing a snapshot of the system's overall health. The manifold allows you to isolate the high and low sides, evacuate the system, and add refrigerant. Here's a simplified breakdown:
- Connecting the Hoses: Attach the red hose to the high-pressure service port, the blue hose to the low-pressure service port, and the yellow hose to your vacuum pump or refrigerant source (if needed). Ensure the service couplers are securely locked onto the ports.
- Reading the Gauges: Once connected, the gauges will display the current pressures in the system. These readings can be compared to the manufacturer's specifications to diagnose potential problems.
- Using the Manifold Valves: The manifold valves control the flow of refrigerant through the system. By opening or closing these valves, you can isolate the high and low sides, evacuate the system to remove moisture and non-condensables, or add refrigerant.
Real-World Use and Basic Troubleshooting
Here's how you might use AC gauges in a real-world scenario:
- Low Refrigerant: Both the high and low-pressure readings are lower than normal. This usually indicates a refrigerant leak.
- Overcharged System: Both high and low-pressure readings are higher than normal. This can damage the compressor.
- Compressor Issues: If the high-side pressure is low and the low-side pressure is high, the compressor may be failing.
- Blockage: A very high reading on the high side and a very low reading on the low side could indicate a blockage in the system, such as a clogged expansion valve or dryer.
Important Note: Always consult your vehicle's service manual for the correct pressure specifications and troubleshooting procedures. These specifications vary depending on the vehicle make, model, and refrigerant type.
Safety Precautions
Working with AC systems involves handling refrigerant, which can be dangerous if not handled properly. Here are some crucial safety precautions:
- Wear Safety Glasses: Always wear safety glasses to protect your eyes from refrigerant splashes.
- Wear Gloves: Wear gloves to protect your skin from refrigerant burns. Refrigerant can cause frostbite if it comes into contact with your skin.
- Work in a Well-Ventilated Area: Refrigerant fumes can be harmful if inhaled. Ensure you're working in a well-ventilated area.
- Avoid Overfilling: Overfilling the system with refrigerant can damage the compressor and other components.
- Handle Refrigerant with Care: Refrigerant is under pressure and can be dangerous if mishandled. Follow all safety instructions and procedures carefully.
- Proper Disposal: Never release refrigerant into the atmosphere. It's illegal and harmful to the environment. Always recover refrigerant using a recovery machine and dispose of it properly.
- The compressor is a particularly risky component. Always ensure the engine is off before connecting or disconnecting gauges or hoses. The rotating parts can cause serious injury. High pressure refrigerant can also cause injury.
Disclaimer: Working with AC systems requires knowledge and experience. If you're not comfortable performing these procedures yourself, it's best to consult a qualified technician.
By understanding the purpose, components, and operation of AC gauges, you can effectively diagnose and troubleshoot problems with your vehicle's air conditioning system. Remember to always prioritize safety and consult your vehicle's service manual for specific instructions and specifications.
We have a detailed AC gauge hookup diagram available for download, which provides a visual representation of the connections and components discussed in this article. This diagram can be a valuable tool for understanding and applying the information provided here. Contact us to retrieve the diagram. Happy wrenching!