How To Install A Bike Rack On Suv
So, you're ready to haul some bikes! Installing a bike rack on your SUV opens up a world of cycling adventures, allowing you to explore trails and destinations far beyond your immediate neighborhood. This guide will walk you through the process, assuming you're comfortable with basic hand tools and have a good understanding of your vehicle. We'll cover everything from choosing the right rack to bolting it securely in place.
Understanding Your Bike Rack Options
Before we dive into the installation, let's clarify the different types of bike racks commonly used on SUVs. Choosing the correct type is crucial for safety and convenience.
Hitch-Mounted Racks
These are the most common and arguably the most versatile. Hitch racks insert into a receiver hitch (we'll cover this shortly) already mounted on your SUV. They come in two primary styles:
- Platform Racks: Bikes sit on a platform and are secured with straps and sometimes wheel clamps. These are generally easier to load and unload, especially for heavier bikes.
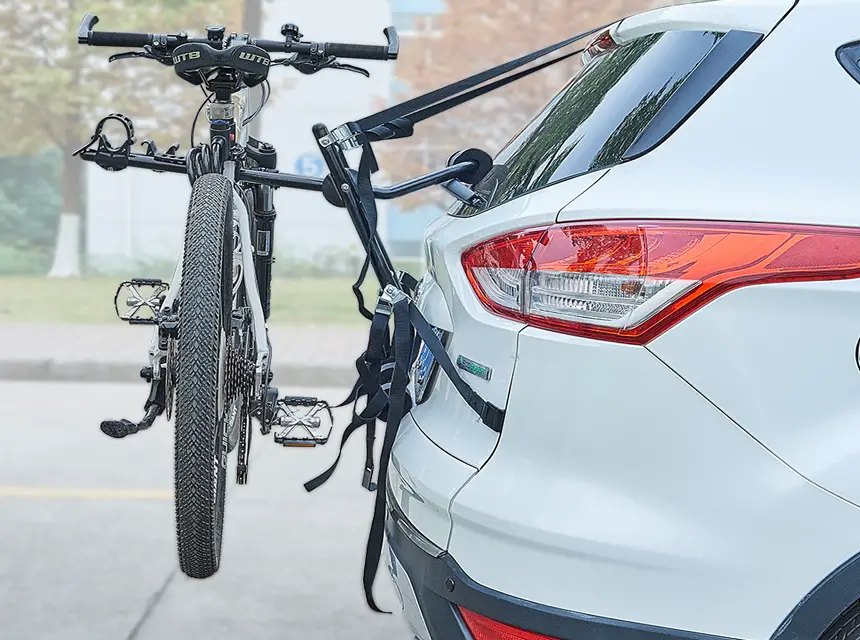
- Hanging Racks (or Mast Racks): Bikes hang from the rack's arms, typically by their top tube. These are usually more compact and less expensive than platform racks, but require careful loading to prevent bike-to-bike contact. Consider your bike's frame geometry – some frames need an adapter bar to hang level on a hanging rack.
Trunk-Mounted Racks
These racks attach to the rear of your vehicle using straps and hooks. They're a budget-friendly option and don't require a hitch, but they can be less stable and more prone to scratching the vehicle's paint. Weight capacity is generally lower, and installation requires careful adjustment of the straps to ensure a secure fit.
Roof-Mounted Racks
These racks mount to the roof of your SUV, usually onto existing roof rails or crossbars. They are a good option if you frequently carry bikes and want to keep your hitch free for other uses (like towing). However, they require lifting the bikes onto the roof, which can be challenging, especially for heavier bikes or taller vehicles. Also, remember you have bikes on the roof before entering low clearance areas!
Key Specs and Main Parts: The Hitch Receiver
For hitch-mounted racks, the most critical component is the hitch receiver. This is a square tube welded to the vehicle's frame that accepts the bike rack. Hitch receivers come in different classes, which dictate their tongue weight (downward force) and gross trailer weight (towing capacity). Make sure your receiver class is adequate for the rack's weight *plus* the weight of your bikes. Overloading a receiver can lead to catastrophic failure.
Key Specs to consider:
- Hitch Class: Typically Class I (light duty), Class II, Class III (most common for SUVs), or Class IV (heavy duty).
- Receiver Size: Usually 1.25" or 2". Make sure your bike rack matches the receiver size. Adapters are available, but it's best to use the correct size for maximum stability.
- Tongue Weight Capacity (TW): The maximum vertical load the hitch can support. Exceeding this can damage the hitch or vehicle.
Main Parts of a Hitch Receiver:
- Receiver Tube: The square opening that accepts the bike rack's stinger (the part that slides into the receiver).
- Mounting Brackets: Welded to the vehicle's frame. These are what provide the structural support.
- Safety Chain Loops: Used for attaching safety chains when towing a trailer (not relevant for bike racks, but always present).
- Hitch Pin Hole: The hole through which the hitch pin is inserted to secure the bike rack.
Installation: Hitch Receiver (If Necessary)
If your SUV doesn't already have a hitch receiver, you'll need to install one. This is a fairly straightforward process for many vehicles, but it can require some heavy lifting. Here's a general overview:
- Identify Mounting Points: Most hitches bolt directly to existing holes in the vehicle's frame. Consult the hitch manufacturer's instructions to locate these points.
- Prepare the Vehicle: You may need to remove the spare tire, exhaust components, or other underbody panels to access the mounting points.
- Position the Hitch: Carefully lift the hitch into position, aligning the mounting holes with the frame holes. A floor jack can be very helpful here.
- Install Hardware: Use the bolts and washers provided with the hitch. Torque them to the manufacturer's specifications using a torque wrench. This is critical to ensure a secure connection. Under-torquing can lead to loosening, while over-torquing can damage the threads.
- Reinstall Components: Reattach any components you removed in step 2.
Safety Note: Working under a vehicle can be dangerous. Always use jack stands to support the vehicle before working underneath it. Never rely solely on a jack.
Installing the Bike Rack
Once the hitch receiver is installed (or if you already have one), installing the bike rack is relatively simple:
- Insert the Stinger: Slide the bike rack's stinger into the receiver tube.
- Align the Holes: Align the holes in the stinger with the hole in the receiver tube.
- Insert the Hitch Pin: Insert the hitch pin through the aligned holes and secure it with a clip or lock. Some racks come with locking hitch pins for added security.
- Tighten the Anti-Rattle Device (If Applicable): Many hitch racks have an anti-rattle device (e.g., a set screw or a cam lever) that tightens against the receiver tube to eliminate wobble. Tighten this according to the manufacturer's instructions.
- Test the Rack: Give the rack a good shake to ensure it's securely attached.
Real-World Use: Basic Troubleshooting
- Rack Wobbles: If the rack wobbles excessively, double-check that the hitch pin is securely fastened and that the anti-rattle device is properly tightened. If the wobble persists, the receiver tube or stinger may be worn.
- Bikes Sway: Ensure the bikes are properly secured to the rack according to the manufacturer's instructions. Use additional straps if necessary.
- Difficult to Insert Stinger: Clean the receiver tube and stinger with a wire brush to remove rust or debris. Apply a small amount of grease to the stinger for easier insertion.
Safety: Critical Considerations
- Weight Capacity: Never exceed the rack's or the hitch receiver's weight capacity. Overloading can lead to rack failure and potential accidents.
- Secure Straps: Always double-check that all straps and fasteners are securely tightened before driving. Loose straps can allow bikes to shift or fall off the rack.
- Rearview Visibility: Be aware that a bike rack can obstruct your rearview mirror. Adjust your side mirrors accordingly.
- Ground Clearance: Some bike racks can reduce ground clearance, especially when loaded with bikes. Be careful when driving over speed bumps or uneven terrain.
- Turning Radius: A bike rack can increase the overall length of your vehicle, affecting your turning radius. Be mindful of this when maneuvering in tight spaces.
- Regular Inspection: Periodically inspect the rack for signs of wear or damage, such as cracks, rust, or loose fasteners. Replace any damaged parts immediately.
Installing a bike rack is a rewarding project that allows you to transport your bikes safely and conveniently. By following these instructions and paying attention to safety, you can enjoy countless cycling adventures with your SUV. Always consult the manufacturer's instructions for your specific bike rack and hitch receiver for detailed guidance.
Remember, this guide provides general information. The exact installation procedure may vary depending on your vehicle and the specific bike rack you choose. Always prioritize safety and consult a professional mechanic if you're unsure about any aspect of the installation.
Disclaimer: The information provided in this article is for informational purposes only and should not be considered professional advice. Always consult with a qualified mechanic or technician for any automotive repairs or modifications.
Note: We have detailed diagrams and installation manuals available. If you would like a downloadable file, please contact us with your specific vehicle and bike rack model.