How To Install A Brake Light Switch
The sudden realization that your brake lights aren't working can be more than just a minor annoyance; it's a significant safety hazard. Tailgating drivers, sudden stops, and reduced visibility conditions all amplify the risk of an accident if your intentions aren't clearly communicated. While a burned-out bulb is a common culprit, a faulty brake light switch is another frequent offender. But don't fret – replacing it is often a task achievable in your own garage with a little know-how. This guide provides a technical walkthrough of installing a brake light switch, exploring the underlying mechanics, weighing the pros and cons, and offering practical insights.
The Case of the Missing Brake Lights
Imagine this: You're approaching a red light, smoothly decelerating, and glance in your rearview mirror to see the car behind you rapidly closing the gap. A quick jab at the brake pedal confirms your worst fear – your brake lights aren't illuminating! This scenario, while potentially fictional, highlights the critical importance of functional brake lights. They're a crucial communication tool on the road, informing other drivers of your intentions and helping to prevent rear-end collisions. Before assuming the worst, check the simplest things first: brake light bulbs and fuses. If those are fine, the next logical step is investigating the brake light switch.
Brake Lights: A Simple System with Crucial Impact
Let's use a simple analogy: think of the brake light system as a light switch in your house, but one activated by your foot. When you press the brake pedal, it closes a circuit, allowing electricity to flow to the brake lights, causing them to illuminate. The brake light switch is the component that makes this connection happen. When your foot is not on the brake pedal, the switch is in the "open" position, breaking the electrical circuit. Pressing the pedal physically moves the switch to the "closed" position, completing the circuit and activating the lights. This entire operation occurs within milliseconds, making it a seemingly instantaneous response.
Under the Hood: How the Brake Light Switch Works
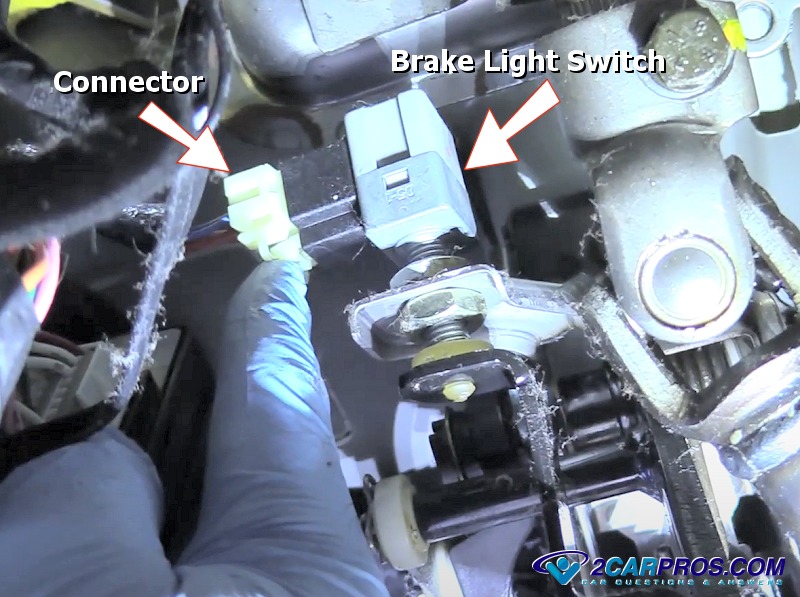
The brake light switch is typically located near the top of the brake pedal arm, often mounted on a bracket near the pivot point. It's a small, usually cylindrical, device with electrical connectors and a plunger or button. The plunger interacts directly with the brake pedal arm. When the brake pedal is released, the plunger is extended, keeping the electrical circuit open. Pressing the pedal pushes the plunger in, allowing an internal contact to bridge the electrical circuit.
From a mechanical standpoint, most switches utilize a simple spring-loaded mechanism. A spring pushes the plunger outward. When the brake pedal is pressed, it overcomes the spring pressure, forcing the plunger inward. Electrically, the switch can be either normally open (NO) or normally closed (NC). A normally open switch, which is more common in brake light applications, means the circuit is open until the brake pedal is pressed. A normally closed switch would have the circuit closed until the brake pedal is pressed, at which point the circuit is opened. The specific type depends on the vehicle's electrical system design.
Some more advanced systems incorporate redundancy for safety. For instance, they might use two separate switches or a dual-circuit switch. If one circuit fails, the other can still activate the brake lights, albeit potentially with a warning light on the dashboard. This redundancy is crucial for maintaining safety in the event of a component failure.
The Installation Process: A Step-by-Step Guide
Before beginning any electrical work on your vehicle, disconnect the negative terminal of the battery. This crucial step prevents accidental shorts and potential damage to the electrical system. Locate the brake light switch, typically near the top of the brake pedal arm. Disconnect the electrical connector(s) from the switch. Some connectors may have a locking mechanism that needs to be disengaged. Carefully remove the switch from its mounting bracket. This often involves twisting, unscrewing, or pressing a retaining clip.
Install the new brake light switch in the reverse order. Ensure it's properly seated and secured in the mounting bracket. Reconnect the electrical connector(s), making sure they are firmly in place. Reconnect the negative terminal of the battery.
Finally, test the brake lights to confirm proper operation. Have a helper stand behind the vehicle while you press the brake pedal. The brake lights should illuminate immediately and extinguish when the pedal is released. If the lights still don't work, recheck the connections and the switch installation. If problems persist, consult a qualified mechanic.
Pros and Cons of DIY Brake Light Switch Replacement
Pros:
- Cost Savings: Replacing the switch yourself can save on labor costs compared to taking it to a mechanic.
- Convenience: You can perform the repair at your own pace and on your own schedule.
- Learning Experience: It's an opportunity to gain a better understanding of your vehicle's electrical system.
Cons:
- Potential for Error: Incorrect installation can lead to further problems or even damage the electrical system.
- Safety Concerns: Working with electrical components requires caution and adherence to safety procedures.
- Time Commitment: The repair may take longer than anticipated, especially if you're unfamiliar with the process.
Use Cases and Manufacturer Examples
The design and placement of brake light switches can vary across different vehicle manufacturers and models. For example, some vehicles from Toyota might use a switch with a specific adjustment procedure to ensure proper activation, while Ford vehicles might use a different type of connector or mounting system. European manufacturers like BMW and Mercedes-Benz often integrate the brake light switch with other sensor systems, such as the stability control system, adding complexity to the repair. It is always best to check the manufacturer's repair manual before starting any repair.
Another scenario: a brake light switch might need replacement if the vehicle is equipped with aftermarket cruise control. Cruise control systems often tap into the brake light circuit to disengage when the brake pedal is pressed. Over time, this can put additional strain on the switch, leading to premature failure. In such cases, it's essential to use a high-quality replacement switch that can withstand the increased load.
Real-World Insights and Recommendations
While replacing a brake light switch is often a straightforward task, there are a few crucial factors to consider. First, use a high-quality replacement switch from a reputable manufacturer. Cheap, generic switches may have unreliable contacts or poor construction, leading to premature failure. Second, pay close attention to the switch's adjustment. Some switches require precise adjustment to ensure they activate at the correct point in the brake pedal travel. Incorrect adjustment can result in the brake lights staying on continuously or not activating at all.
Finally, consider the vehicle's age and overall condition. If the vehicle is older and has accumulated significant mileage, other components in the brake light system may also be nearing the end of their service life. It might be wise to inspect the wiring harness, connectors, and brake light sockets for signs of corrosion or damage. Addressing these issues proactively can prevent future problems and ensure the brake lights remain functional and reliable.
In conclusion, installing a brake light switch is a manageable task for the motivated amateur mechanic. By understanding the system's mechanics, following the proper installation procedures, and using high-quality components, you can restore your brake lights to full functionality and ensure your safety on the road.