How To Install A Fuel Pump
Replacing a fuel pump might seem daunting, but with the right tools and knowledge, it's a project that many experienced DIYers can tackle. Whether you're dealing with a failing pump, upgrading for increased performance, or simply performing preventative maintenance, this guide will walk you through the process. We’ll cover the technical aspects, common pitfalls, and best practices to ensure a successful installation.
Understanding the Fuel System
Before diving into the installation, it’s crucial to understand the basics of your vehicle's fuel system. The fuel system's primary job is to deliver a consistent and adequate supply of fuel from the tank to the engine, under varying operating conditions. Let's break down the core components:
- Fuel Tank: Stores the fuel. Modern tanks often incorporate baffling to minimize fuel slosh and prevent fuel starvation during cornering or acceleration.
- Fuel Pump: The heart of the system, responsible for drawing fuel from the tank and delivering it under pressure to the fuel rail. Most modern vehicles use electric fuel pumps, typically located inside the fuel tank for cooling and noise reduction.
- Fuel Filter: Removes contaminants from the fuel, protecting the fuel injectors from clogging. Some vehicles have the filter integrated into the fuel pump assembly, while others have an inline filter.
- Fuel Lines: Carry fuel between the tank, pump, filter, and fuel rail.
- Fuel Rail: Distributes fuel evenly to the fuel injectors.
- Fuel Injectors: Atomize the fuel and spray it into the intake manifold or directly into the combustion chamber (in direct injection systems).
- Fuel Pressure Regulator: Maintains a constant fuel pressure in the fuel rail. Excess fuel is returned to the tank via a return line (in older systems). Modern systems often use returnless fuel systems that regulate fuel pressure via the fuel pump control module.
How the Fuel System Works (Simplified)
The fuel pump, typically an electric motor-driven impeller or gerotor pump, draws fuel from the tank and pushes it through the fuel filter. The pressurized fuel then travels through the fuel lines to the fuel rail. The fuel pressure regulator (if equipped) maintains a constant pressure in the rail, ensuring the injectors receive a consistent supply. When the engine control unit (ECU) signals the injectors to open, they spray a precisely metered amount of fuel into the engine. Any excess fuel (in systems with a return line) is returned to the fuel tank.
Technical Breakdown: Installing the Fuel Pump
Now, let's get into the practical steps of replacing a fuel pump. Safety is paramount. Always disconnect the negative battery terminal before starting any work on the fuel system.
Tools and Materials Needed:
- New fuel pump (correct model for your vehicle)
- Fuel pump strainer/sock (usually included with the new pump)
- Fuel filter (if not integrated with the pump assembly)
- Fuel line disconnect tools (specific to your vehicle’s fuel line fittings - often quick-disconnect tools)
- Wrench set
- Screwdriver set
- Hammer
- Punch
- Multimeter
- Jack and jack stands
- Wheel chocks
- Safety glasses
- Gloves (fuel-resistant)
- Fire extinguisher (always have one nearby when working with fuel)
- Container for catching fuel
- Rags or absorbent pads
- Penetrating oil (for stubborn fasteners)
- New fuel tank o-ring or gasket (if needed)
- Torque wrench
Step-by-Step Installation:
- Safety First: Disconnect the negative battery terminal. Chock the rear wheels and engage the parking brake.
- Access the Fuel Tank: The method for accessing the fuel tank varies depending on the vehicle.
- Through the Trunk/Cabin: Some vehicles have an access panel in the trunk or under the rear seat. Remove the panel to expose the fuel pump assembly.
- Under the Vehicle: Other vehicles require you to lower the fuel tank. Use jack stands to safely support the vehicle. Disconnect any electrical connectors, fuel lines, and straps holding the tank in place. Have a helper assist you in lowering the tank, as it can be heavy even when nearly empty.
- Prepare the Fuel Tank: Clean the area around the fuel pump assembly to prevent dirt from falling into the tank.
- Disconnect Fuel Lines and Electrical Connectors: Carefully disconnect the fuel lines using the appropriate disconnect tools. Be prepared for fuel spillage. Have a container and rags ready. Disconnect the electrical connector to the fuel pump assembly.
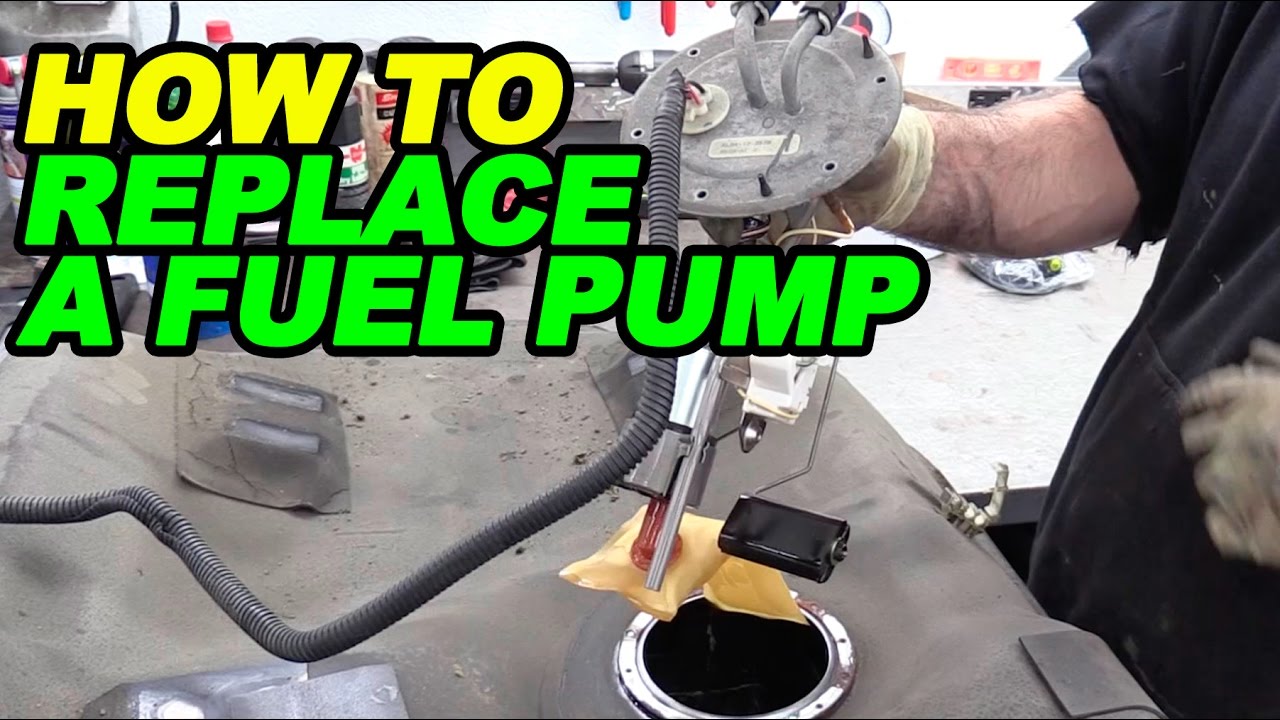
- Remove the Fuel Pump Assembly: The fuel pump assembly is typically held in place by a retaining ring. Use a hammer and punch (or a specialized fuel pump removal tool) to carefully loosen and remove the retaining ring. Rotate the ring counter-clockwise to release it.
- Extract the Fuel Pump Assembly: Carefully lift the fuel pump assembly out of the tank. Tilt it to drain any remaining fuel back into the tank.
- Disassemble the Fuel Pump Assembly: Place the assembly on a clean work surface. Disconnect the old fuel pump from the assembly. This often involves disconnecting electrical connectors and fuel hoses. Note the orientation of the pump and any components for reassembly. Replace the fuel strainer/sock with the new one.
- Install the New Fuel Pump: Install the new fuel pump into the assembly, ensuring all connections are secure and properly oriented. Double-check all electrical connections and fuel hose connections.
- Reassemble the Fuel Pump Assembly: Carefully lower the fuel pump assembly back into the fuel tank, aligning it correctly.
- Secure the Retaining Ring: Install the retaining ring and tighten it securely using a hammer and punch (or the specialized tool). Ensure the ring is fully engaged.
- Reconnect Fuel Lines and Electrical Connectors: Reconnect the fuel lines and electrical connectors. Ensure they click into place securely.
- Reinstall the Fuel Tank: If you lowered the fuel tank, carefully raise it back into position and secure it with the straps. Ensure all straps are properly tightened.
- Final Checks: Before reconnecting the battery, double-check all connections and ensure nothing is loose or leaking.
- Reconnect the Battery: Reconnect the negative battery terminal.
- Test the Fuel System: Turn the ignition key to the "ON" position (without starting the engine) for a few seconds. This will allow the fuel pump to prime the system. Repeat this process a few times. Check for any fuel leaks around the fuel pump assembly, fuel lines, and fuel filter.
- Start the Engine: Start the engine and let it idle for a few minutes. Continue to monitor for leaks.
- Test Drive: Take the vehicle for a test drive to ensure the fuel pump is functioning correctly under varying loads.
Common Issues and Maintenance Concerns
- Fuel Pump Failure: Symptoms include difficulty starting, stalling, loss of power, and a noticeable whining noise from the fuel tank area.
- Clogged Fuel Filter: Can restrict fuel flow and cause similar symptoms to a failing fuel pump. Replace the fuel filter regularly as part of your maintenance schedule.
- Contaminated Fuel: Debris in the fuel tank can damage the fuel pump and clog the fuel filter. Avoid running your fuel tank extremely low, as this can suck up sediment from the bottom of the tank.
- Electrical Issues: Faulty wiring, relays, or fuses can prevent the fuel pump from operating correctly. Use a multimeter to check for proper voltage and continuity.
- Incorrect Fuel Pressure: Can be caused by a faulty fuel pressure regulator or a failing fuel pump. Check fuel pressure with a fuel pressure gauge.
Do's and Don'ts / Best Practices
Do's:
- Do use the correct fuel pump for your vehicle's make, model, and year.
- Do replace the fuel strainer/sock with the new pump.
- Do use new fuel line disconnect tools if necessary.
- Do clean the area around the fuel pump assembly before removing it.
- Do properly torque all fasteners to the manufacturer's specifications.
- Do check for fuel leaks after installation.
Don'ts:
- Don't smoke or use open flames near the fuel system.
- Don't reuse old fuel lines or hoses that are cracked or damaged.
- Don't over-tighten fasteners, as this can damage the fuel tank or pump assembly.
- Don't ignore warning signs of a failing fuel pump.
- Don't start the car inside a garage or enclosed area after working on the fuel system due to risk of fume build up.
Conclusion
Replacing a fuel pump is a manageable task for the experienced DIYer with the right tools and a methodical approach. By understanding the fuel system, following the step-by-step instructions, and adhering to safety precautions, you can successfully complete this repair and save money on labor costs. However, if you're uncomfortable working with fuel or electrical systems, it's always best to consult a qualified mechanic. Remember that safety should be the utmost priority. Always double-check your work and never hesitate to seek professional help if needed. Regularly changing your fuel filter will increase the lifespan of your pump and save you money in the long run.