How To Install Aftermarket Rpm Gauge
Installing an aftermarket RPM gauge, also known as a tachometer, can provide valuable insights into your engine's performance. It allows you to accurately monitor engine speed, helping you optimize gear changes, identify potential engine problems, and simply add a cool, sporty look to your vehicle's interior. This article will guide you through the process, from choosing the right gauge to completing the installation safely and effectively.
Why Installing an Aftermarket RPM Gauge Matters
While many modern vehicles come equipped with a factory-installed tachometer, some don't, especially older models or those with a more basic trim level. Even when present, the factory gauge might not offer the accuracy or visual clarity preferred by enthusiasts. Here's why installing an aftermarket RPM gauge can be beneficial:
- Improved Performance Monitoring: Accurately tracking your engine's RPM allows for precise gear shifting, maximizing acceleration and fuel efficiency. You can avoid over-revving the engine, which can cause serious damage.
- Early Problem Detection: Unusual RPM fluctuations can indicate underlying engine issues, such as misfires, vacuum leaks, or fuel delivery problems. An aftermarket gauge can provide an early warning, allowing you to address problems before they escalate.
- Enhanced Aesthetics: Aftermarket gauges come in a wide variety of styles and colors, allowing you to customize your vehicle's interior to your liking. They can add a sporty, high-performance feel to the cabin.
- Increased Accuracy: Some factory gauges aren't known for their precision. A quality aftermarket gauge offers a more accurate representation of your engine's RPM.
- Customization: Many aftermarket gauges offer features not found in factory units, such as peak RPM recall, shift lights, and programmable warning settings.
How to Choose the Right RPM Gauge
Selecting the appropriate RPM gauge for your vehicle and needs is crucial. Consider these factors:
Gauge Type:
- Analog: Traditional gauges with a needle that sweeps across a dial. Often preferred for their classic look and ease of readability at a glance. Look for gauges with clear markings and a well-lit face.
- Digital: Display RPM readings numerically on an LCD or LED screen. Offer more precise readings and often include additional features. Consider the screen's visibility in direct sunlight.
RPM Range:
Choose a gauge with an RPM range that matches your engine's capabilities. Most gasoline engines redline somewhere between 6,000 and 8,000 RPM. Diesel engines typically have a lower RPM range. Select a gauge that comfortably exceeds your engine's maximum RPM.
Gauge Size:
The size of the gauge will affect its visibility and how it fits into your vehicle's interior. Common sizes range from 2 1/16 inches to 5 inches in diameter. Consider the available mounting space and your personal preference. A larger gauge is generally easier to read.
Number of Cylinders:
RPM gauges are designed to work with specific engine configurations. Make sure the gauge you choose is compatible with the number of cylinders in your engine (e.g., 4-cylinder, 6-cylinder, 8-cylinder). Using an incompatible gauge will result in inaccurate readings. Many modern gauges are configurable.
Features:
Consider whether you want additional features such as:
- Shift Light: A visual indicator that alerts you when to shift gears.
- Peak RPM Recall: Remembers the highest RPM reached during a driving session.
- Programmable Warning Settings: Allows you to set custom RPM limits and receive a warning when those limits are exceeded.
- Backlighting Color Options: Enables you to customize the gauge's lighting to match your vehicle's interior.
Brand and Quality:
Opt for a reputable brand known for producing reliable and accurate gauges. Reading reviews and doing your research can help you avoid low-quality products that may provide inaccurate readings or fail prematurely. Some popular brands include Auto Meter, Stewart Warner, and Innovate Motorsports. Investing in a quality gauge will save you headaches in the long run.
How to Install an Aftermarket RPM Gauge: A Step-by-Step Guide
Disclaimer: This guide provides general instructions. Specific installation procedures may vary depending on the gauge and your vehicle. Consult the gauge's instruction manual and your vehicle's repair manual for detailed instructions and safety precautions. If you are not comfortable working with electrical systems, it's best to have the gauge installed by a qualified mechanic.
Tools and Materials Needed:
- Aftermarket RPM gauge
- Wiring harness (usually included with the gauge)
- Wire stripper/crimper
- Electrical tape or heat shrink tubing
- Screwdrivers (Phillips and flathead)
- Socket set
- Multimeter (optional but recommended)
- Drill (if mounting requires drilling)
- Mounting bracket or cup (usually included with the gauge)
- Zip ties
- Safety glasses
Step 1: Disconnect the Battery
Safety first! Disconnect the negative (-) terminal of your vehicle's battery to prevent electrical shock or damage to the electrical system. This is a crucial step that should never be skipped.
Step 2: Choose a Mounting Location
Select a location for the gauge that is easily visible while driving and doesn't obstruct your view of the road. Common mounting locations include the dashboard, A-pillar, or steering column. Ensure there is enough space behind the mounting location for the gauge and its wiring.
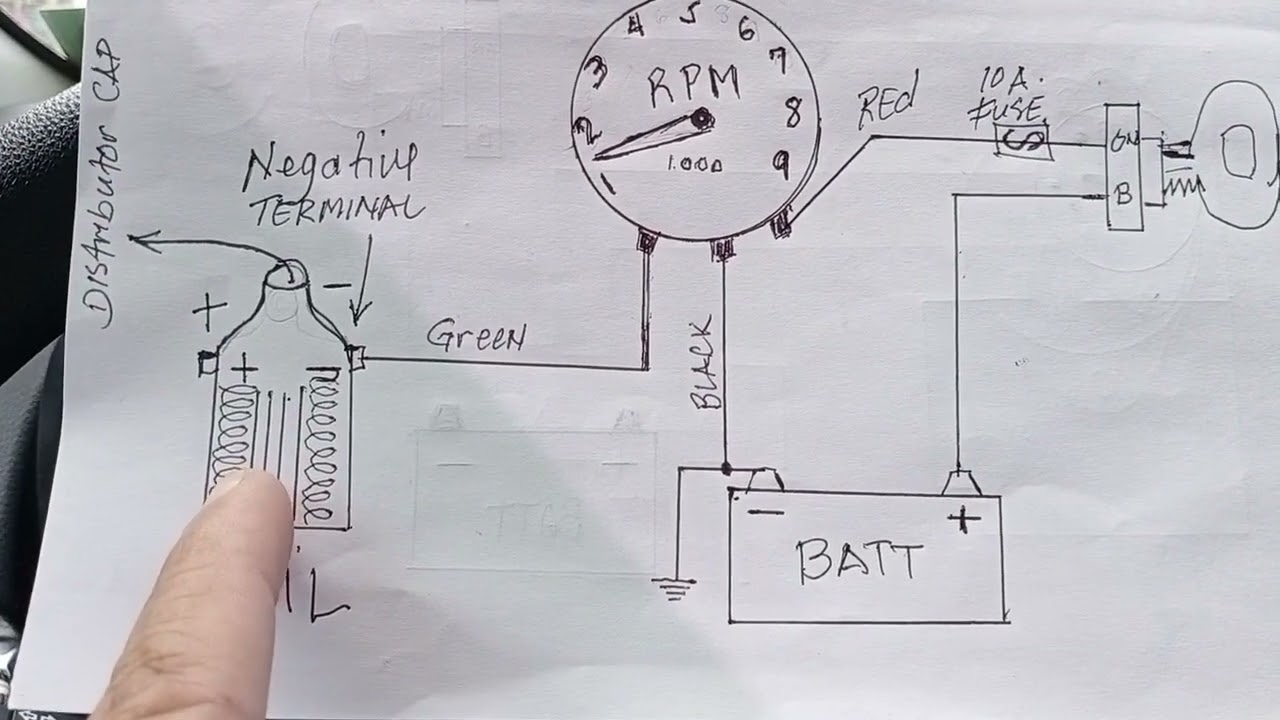
Step 3: Connect the Wiring
Most RPM gauges require three or four connections:
- Power (12V+): Connect this wire to a switched 12V+ power source. This means the gauge will only turn on when the ignition is on. You can tap into an existing wire in the fuse box or use an add-a-circuit fuse tap. Use a multimeter to verify that the wire you choose only receives power when the ignition is on.
- Ground (12V-): Connect this wire to a solid ground point on the vehicle's chassis. A clean, unpainted metal surface is ideal.
- Signal Wire: This wire receives the RPM signal from the engine. There are two common types of signal wires:
- Ignition Coil Negative (-): On older vehicles, connect this wire to the negative (-) terminal of the ignition coil.
- Tach Output Wire: On newer vehicles with electronic ignition systems, there is often a dedicated "tach output" wire in the ECU (Engine Control Unit) or instrument cluster wiring harness. Consult your vehicle's repair manual to identify the correct wire.
- Illumination (Optional): If your gauge has a separate illumination wire, connect it to the parking light circuit. This will dim the gauge's backlighting when the headlights are turned on.
Use proper wiring techniques. Strip the ends of the wires, twist them together securely, and crimp on connectors or solder them together. Insulate all connections with electrical tape or heat shrink tubing to prevent shorts. Never leave bare wires exposed.
Step 4: Mount the Gauge
Secure the gauge in its mounting location using the provided mounting bracket or cup. If drilling is required, use a drill bit that is the correct size for the mounting hardware. Ensure the gauge is securely mounted and doesn't vibrate excessively.
Step 5: Test the Gauge
Reconnect the battery's negative (-) terminal. Start the engine and observe the gauge. It should accurately reflect the engine's RPM. Rev the engine slightly to ensure the gauge responds properly. If the gauge does not work correctly, double-check all wiring connections and consult the gauge's troubleshooting guide.
Step 6: Secure the Wiring
Use zip ties to secure the wiring harness and prevent it from rubbing against sharp edges or interfering with moving parts. Ensure the wiring is routed safely and doesn't create a hazard.
Real-World Owner Experiences
Many car enthusiasts have shared their experiences installing aftermarket RPM gauges. Some common themes include:
- Improved Driving Experience: Owners often report a more engaging and enjoyable driving experience after installing an RPM gauge, particularly in vehicles without a factory gauge.
- Better Shifting: Accurate RPM monitoring allows for more precise gear changes, leading to smoother acceleration and improved fuel efficiency.
- Early Problem Detection: Some owners have been able to identify and address potential engine problems early on, thanks to the RPM gauge.
- Customization: Owners appreciate the ability to customize their vehicle's interior with a gauge that matches their personal style.
Frequently Asked Questions (FAQs)
Q: Can I install an RPM gauge on any vehicle?
A: Yes, RPM gauges are compatible with most vehicles, but you need to choose a gauge that is appropriate for your engine type and number of cylinders.
Q: Do I need any special tools to install an RPM gauge?
A: The basic tools needed include wire strippers/crimpers, screwdrivers, a socket set, and electrical tape or heat shrink tubing. A multimeter is also highly recommended for testing wiring connections.
Q: Where is the best place to mount an RPM gauge?
A: The best location depends on your vehicle and personal preference. Common locations include the dashboard, A-pillar, or steering column. Choose a location that is easily visible while driving and doesn't obstruct your view of the road.
Q: What if my RPM gauge doesn't work after installation?
A: Double-check all wiring connections, consult the gauge's troubleshooting guide, and verify that the gauge is compatible with your engine. If you are still unable to resolve the issue, consult a qualified mechanic.
Q: Is it safe to install an RPM gauge myself?
A: If you are comfortable working with electrical systems and follow the instructions carefully, it is generally safe to install an RPM gauge yourself. However, if you are unsure about any part of the process, it is best to have the gauge installed by a qualified mechanic.