How To Install An Ignition Switch
The ignition switch: it's the gateway to your car's engine. Without it, you're going nowhere. Replacing a faulty ignition switch might seem daunting, but with the right knowledge and tools, it's a task many experienced DIYers can tackle. This article will provide a comprehensive guide to installing an ignition switch, covering the technical aspects, potential pitfalls, and best practices to ensure a successful replacement.
Background: The Ignition System
To understand the ignition switch, it's important to understand the basics of the ignition system itself. The ignition system's primary function is to provide the spark needed to ignite the air-fuel mixture in the engine cylinders, initiating combustion and powering your vehicle. It works in a carefully orchestrated sequence:
- Battery Power: The system begins with the car's 12-volt battery, which stores the electrical energy needed to start and run the engine.
- Ignition Switch Activation: Turning the key in the ignition switch closes circuits, allowing battery power to flow to other components.
- Starter Motor Engagement: The ignition switch activates the starter motor, a powerful electric motor that cranks the engine, initiating the piston's movement.
- Coil Charging: The ignition coil (or coils in modern coil-on-plug systems) takes the low-voltage battery power and transforms it into high-voltage electricity, typically in the range of 20,000 to 40,000 volts.
- Distributor/ECU Control: In older vehicles, a distributor mechanically directs the high-voltage current to the correct spark plug at the precise time. Modern vehicles use the Engine Control Unit (ECU), a sophisticated computer, to manage this process electronically, offering greater precision and control.
- Spark Plug Ignition: The high-voltage electricity travels through the spark plug wires to the spark plugs, which are located in the engine cylinders. The electricity creates a spark across the spark plug gap, igniting the air-fuel mixture.
The ignition switch is the critical first step in this chain, controlling the flow of electricity and initiating the entire process.
Technical Breakdown: How the Ignition Switch Works
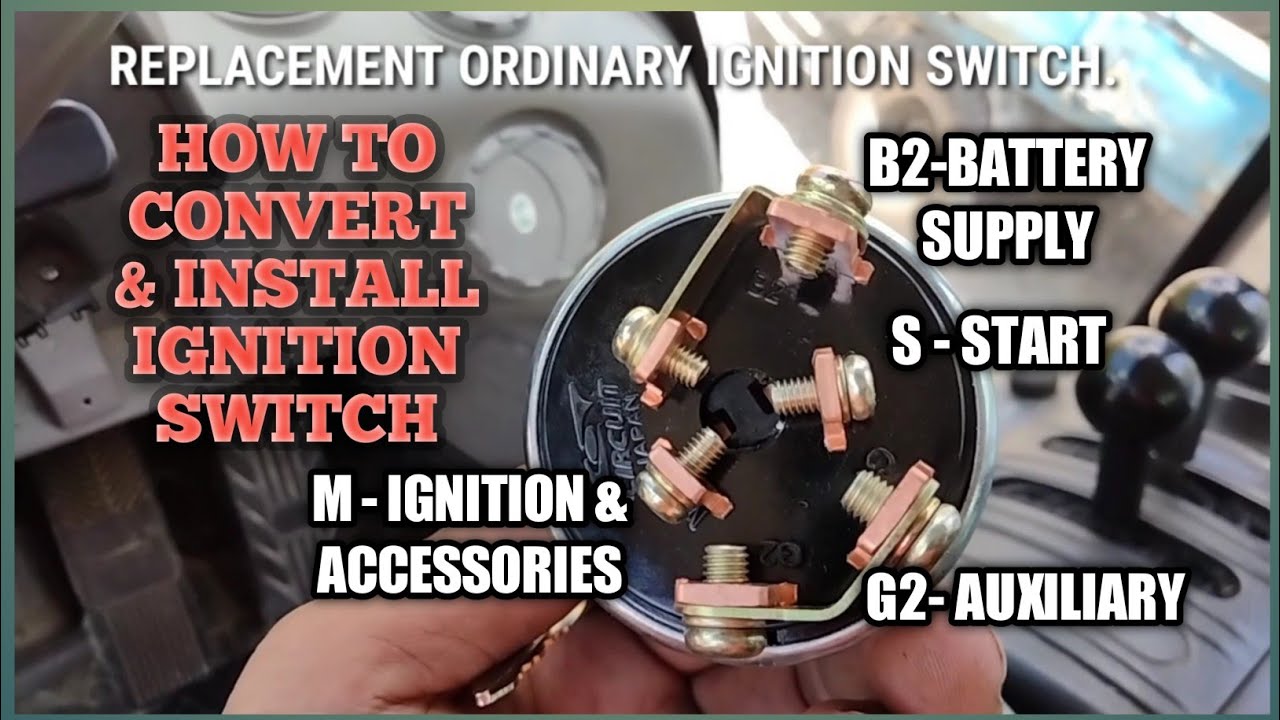
The ignition switch is more than just an on/off button. It's a multi-position switch with several distinct functions, often denoted by positions like LOCK, ACC (Accessory), ON, and START.
- LOCK: In this position, the steering wheel is often locked (if equipped), and the key can be inserted or removed. The electrical circuits are generally off, preventing the engine from starting. Sometimes, the accessory circuit might be active for limited use.
- ACC (Accessory): This position allows you to power certain electrical components like the radio, wipers, and interior lights without starting the engine. This is useful for listening to music or using other features while the car is parked.
- ON (Run): This is the primary operating position. In the ON position, the ignition system is powered, and the engine can run. All essential electrical systems, including the fuel pump, ignition coil, and sensors, are active.
- START: This position engages the starter motor, cranking the engine until it starts. The ignition switch typically uses a spring-loaded mechanism to return to the ON position once the key is released.
Internally, the ignition switch is a complex arrangement of contacts and circuits. Each position of the switch closes or opens specific circuits, routing power to the appropriate components. These circuits are typically protected by fuses, which prevent damage in case of a short circuit. The switch itself is often connected to the steering column and requires careful removal and installation to avoid damaging other components.
Tools and Materials Required:
- New ignition switch (matching your vehicle's make, model, and year)
- Screwdrivers (Phillips and flathead)
- Socket set and wrenches
- Steering wheel puller (if required)
- Multimeter (for testing circuits)
- Penetrating oil (for loosening stubborn bolts)
- Wiring diagrams for your vehicle (crucial for identifying circuits)
- Safety glasses and gloves
- Anti-theft bypass tool (if necessary for your vehicle, see below)
Step-by-Step Installation Process:
- Disconnect the Battery: Safety First! Disconnect the negative terminal of the battery to prevent electrical shocks or accidental activation of electrical components.
- Remove Steering Wheel (if necessary): Some vehicles require removing the steering wheel to access the ignition switch. Consult your vehicle's service manual for the correct procedure. Use a steering wheel puller if needed; do *not* hammer on the steering shaft.
- Remove Steering Column Covers: Remove the plastic covers surrounding the steering column to expose the ignition switch. These are typically held in place by screws or clips.
- Locate and Disconnect the Electrical Connectors: Carefully identify and disconnect the electrical connectors attached to the ignition switch. Take photos or label each connector before disconnecting them to ensure proper reconnection later. Be gentle; avoid pulling on the wires.
- Remove the Old Ignition Switch: The ignition switch is usually held in place by screws, bolts, or a retaining clip. Loosen or remove these fasteners and carefully remove the old switch. Penetrating oil might be helpful if the fasteners are rusted or seized.
- Install the New Ignition Switch: Install the new ignition switch in the reverse order of removal. Ensure that it is securely fastened and properly aligned.
- Reconnect the Electrical Connectors: Reconnect all the electrical connectors to the new ignition switch, matching them to their original positions. Double-check your photos or labels to ensure correct connections.
- Reinstall Steering Column Covers: Reinstall the plastic covers surrounding the steering column.
- Reinstall Steering Wheel (if removed): If you removed the steering wheel, reinstall it according to the service manual's instructions, ensuring it is properly aligned and secured.
- Reconnect the Battery: Reconnect the negative terminal of the battery.
- Test the Ignition Switch: Test the new ignition switch by turning the key to each position (LOCK, ACC, ON, START). Verify that all electrical components function correctly in each position.
Anti-Theft Systems (Immobilizers):
Many modern vehicles are equipped with anti-theft systems or immobilizers. These systems use a transponder chip in the key to communicate with the vehicle's ECU. If the ECU doesn't recognize the key, it will prevent the engine from starting. Replacing the ignition switch in a vehicle with an immobilizer may require additional steps, such as reprogramming the key or using a bypass tool. Consult your vehicle's service manual or a qualified mechanic for specific instructions. Attempting to bypass an immobilizer without proper knowledge and tools can damage the ECU.
Common Issues and Maintenance Concerns
Ignition switches are subjected to constant use and can wear out over time. Common issues include:
- Difficulty turning the key: This could be due to worn-out tumblers inside the switch.
- Key getting stuck: Similar to the above, worn tumblers are often the culprit.
- Intermittent starting problems: This could indicate a faulty electrical connection within the switch.
- Electrical components not working in certain positions: This suggests a problem with specific circuits within the switch.
- The car starting but immediately stalling: This can point to immobilizer issues after a switch replacement.
Regular maintenance is limited, but using the correct key and avoiding excessive force when turning the key can help prolong the life of the ignition switch. Applying graphite lubricant (sparingly!) to the keyway can sometimes alleviate key sticking issues.
Do's and Don'ts / Best Practices
Do's:
- Consult a Service Manual: Always refer to your vehicle's service manual for specific instructions and torque specifications.
- Take Pictures: Photograph wiring and component positions before disassembly.
- Label Everything: Label connectors and components to avoid confusion during reassembly.
- Use the Right Tools: Use the correct tools for each task to avoid damaging components.
- Test Circuits: Use a multimeter to test circuits for continuity and voltage.
- Double-Check Connections: Ensure all connections are secure and properly seated.
Don'ts:
- Force Anything: If something doesn't come apart easily, don't force it. Investigate the cause and use the appropriate tools or techniques.
- Work Without Disconnecting the Battery: Always disconnect the battery to prevent electrical shocks.
- Ignore Warning Signs: Address problems with the ignition switch promptly to avoid more serious issues.
- Over-tighten Fasteners: Follow torque specifications to avoid damaging components.
- Neglect Anti-Theft Systems: Be aware of immobilizer systems and take necessary steps to ensure proper operation.
Conclusion
Replacing an ignition switch is a moderately complex task that requires careful attention to detail and a solid understanding of your vehicle's electrical system. While many experienced DIYers can successfully complete this project, it's essential to approach it with caution and respect for the complexity involved. If you're uncomfortable working with electrical systems or anti-theft systems, it's always best to consult a qualified mechanic. However, with the right preparation, tools, and knowledge, you can confidently tackle this repair and restore your vehicle's starting capabilities. Remember, a properly installed ignition switch is crucial for the reliable operation of your vehicle and your peace of mind.