How To Install An Infant Car Seat
Alright, let's dive into something crucial for the safety of your little one: installing an infant car seat. This isn't just about following instructions; it's about understanding why those instructions are there, ensuring a perfect fit, and knowing you've done everything possible to protect your child. We're approaching this like we would any other modification or repair on your vehicle – with precision and a solid understanding of the mechanics involved.
Purpose
You might be thinking, "Why do I need a detailed guide? The instructions that came with the car seat should be enough." And you're right, they *should* be. However, those instructions often lack the depth and clarity to address common issues and variations in vehicle and car seat designs. This guide aims to provide that deeper understanding, empowering you to confidently install the car seat correctly, even if you encounter unexpected challenges. This knowledge is crucial for a proper install and is especially useful if you're installing a seat into a different vehicle, troubleshooting issues, or even just learning more about the safety features of your vehicle.
Key Specs and Main Parts
Before we get started, let's familiarize ourselves with the key components and their specifications. These are the essential elements you'll be working with:
- Infant Car Seat Carrier: This is the detachable portion that you'll carry your baby in. It clicks into the base.
- Base: This part stays installed in your vehicle. It provides a secure and level platform for the carrier. Key features include:
- LATCH connectors (Lower Anchors and Tethers for Children): These are metal hooks that connect to dedicated anchor points in your vehicle. More on this later.
- Lock-off devices: Mechanisms that lock the vehicle's seat belt in place, preventing it from loosening. Not all bases have these.
- Recline adjuster: Used to achieve the correct recline angle for the baby. Critical for safety and comfort.
- Level indicator: A bubble level or other indicator to ensure the base is installed at the correct angle.
- Vehicle Seat Belts: Your car's existing seat belts. You will be using either these or the LATCH system to secure the base.
- Top Tether Strap: A strap extending from the top of the car seat that connects to a tether anchor in your vehicle. Always use this if available and applicable. This limits forward movement in a crash.
Key Specs: These are general guidelines. Always consult your car seat and vehicle manuals for specific recommendations.
- Recline Angle: Typically between 30 and 45 degrees. Check the car seat manual for the specific range.
- LATCH Weight Limit: Most LATCH systems have a weight limit for the car seat plus the child. This limit is often around 65 lbs combined. Exceeding this weight requires using the seatbelt installation method.
- Tether Anchor Location: Usually located on the rear shelf, the back of the vehicle seat, or the ceiling. Consult your vehicle manual.
Symbols
Since there are no diagrams in this article, understanding the visual language used in car seat and vehicle manuals is crucial. Here's a breakdown of common symbols and their meanings:
- Arrows: Indicate direction of force or movement. For example, an arrow might show which way to tighten a strap.
- Lock Symbols: Indicate a locking mechanism. A closed lock means the mechanism is engaged, while an open lock means it is disengaged.
- Warning Symbols: Typically a triangle with an exclamation point, indicating a potential hazard or critical instruction.
- Color Coding: Red often indicates a latch release mechanism or a critical safety feature.
- Icons: Little pictures to represent types of installation (seatbelt or LATCH), recline adjustment, and other actions.
How It Works
The basic principle of car seat installation is to create a rigid and secure connection between the car seat base and the vehicle. This prevents excessive movement in the event of a crash, minimizing the risk of injury to the child.
There are two primary methods for securing the car seat base:
- LATCH System Installation: This utilizes the Lower Anchors and Tethers for Children (LATCH) system. The LATCH system consists of two lower anchor points in the vehicle seat bight (the crack where the seat back and bottom meet) and a top tether anchor.
- Locate the LATCH anchors in your vehicle. Refer to your vehicle manual.
- Attach the LATCH connectors on the car seat base to the vehicle's LATCH anchors. You should hear a click.
- Tighten the LATCH straps to eliminate slack. This often involves pulling on a strap near the LATCH connectors.
- Attach the top tether strap to the top tether anchor in your vehicle. Tighten the tether strap.
- Test for movement. The base should move less than 1 inch side-to-side or front-to-back when pulled at the belt path.
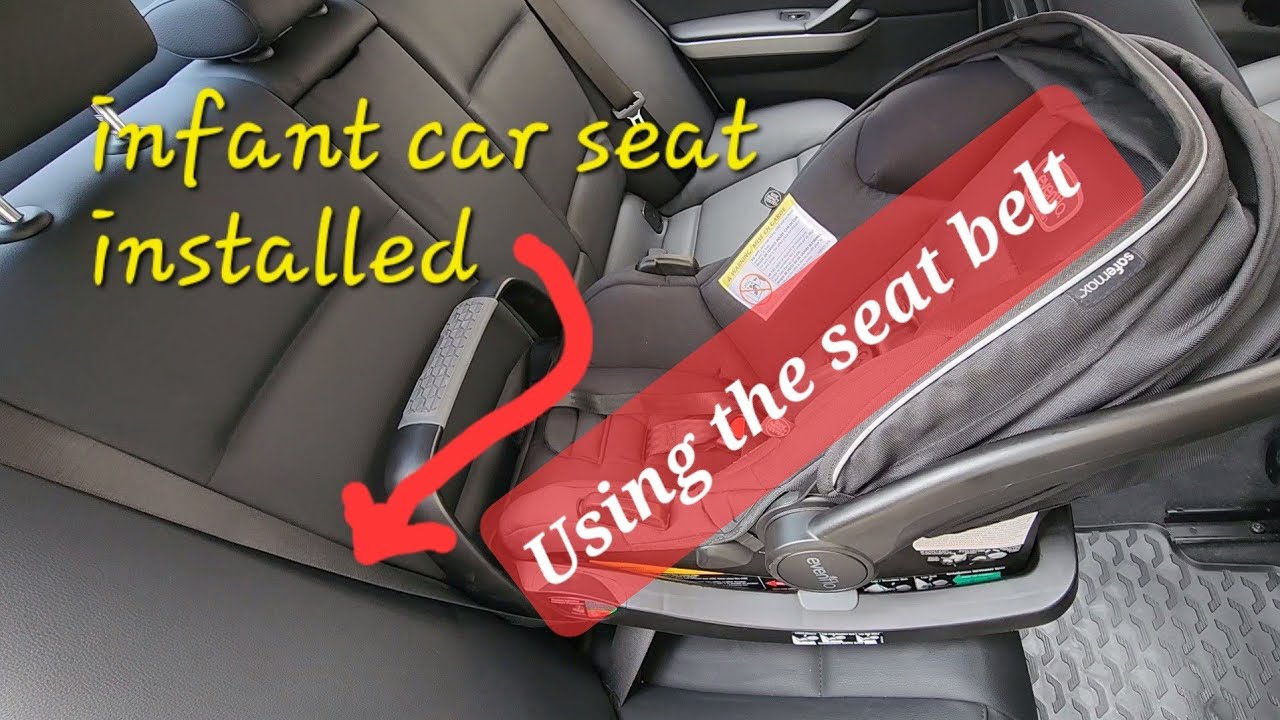
- Seat Belt Installation: This method utilizes the vehicle's seat belts to secure the car seat base.
- Place the car seat base on the vehicle seat.
- Thread the vehicle's seat belt through the belt path on the car seat base. Refer to the car seat manual for the correct belt path.
- Buckle the seat belt.
- Engage the locking mechanism of the seat belt. This varies depending on your vehicle. Many vehicles have Automatic Locking Retractors (ALR). To engage the ALR, pull the seat belt all the way out until it stops, then slowly let it retract. The belt will now be locked. Some vehicles may require using a locking clip (provided with the car seat).
- Tighten the seat belt to eliminate slack. Push down firmly on the car seat base while tightening the seat belt.
- If your car seat base has lock-off devices, engage them to further secure the seat belt.
- Attach the top tether strap to the top tether anchor in your vehicle. Tighten the tether strap.
- Test for movement. The base should move less than 1 inch side-to-side or front-to-back when pulled at the belt path.
Real-World Use – Basic Troubleshooting Tips
Even with careful attention, installation issues can arise. Here are some common problems and their solutions:
- Difficulty Tightening LATCH Straps or Seat Belts: Ensure the straps or seat belts are routed correctly through the car seat base. Double-check the manual. If using seatbelts, apply pressure downward on the base while tightening the belt.
- Base Doesn't Sit Level: Use the recline adjuster on the base to achieve the correct recline angle. Some car seats allow the use of rolled towels or pool noodles *only* if the manufacturer allows it in the car seat manual to achieve the correct angle.
- LATCH Connectors Won't Click In: Ensure you are targeting the correct LATCH anchor points. Sometimes, the upholstery can obscure the anchors. Use your fingers to locate them.
- Excessive Movement After Installation: Double-check all connections and ensure the straps or seat belts are as tight as possible. Verify that the top tether is connected and tightened. If using seatbelts, make sure you have activated the locking mechanism (ALR or locking clip).
Safety – Highlight Risky Components
Certain components and procedures are particularly critical for safety. These are the areas where errors can have the most severe consequences:
- Tether Strap: Always use the top tether strap if one is available and compatible. This significantly reduces head excursion in a crash. Failure to use the tether can dramatically increase the risk of head and neck injuries.
- Recline Angle: Incorrect recline angle can compromise the baby's airway. Too upright, and the baby's head can slump forward, restricting breathing. Too reclined, and the baby might not be adequately protected in a crash.
- Loose Installation: A loose car seat is a dangerous car seat. The less movement, the better. Ensure the base moves less than 1 inch in any direction.
- Expired Car Seats: Car seats have expiration dates. Plastics degrade over time, compromising their structural integrity. Check the expiration date on your car seat and replace it if it's expired.
- Used Car Seats with Unknown History: Avoid using car seats if you don't know their history. A car seat that has been in a crash may have unseen damage that compromises its safety.
- Incompatible LATCH Systems and Car Seat Weights: Exceeding the LATCH weight limit is dangerous. The LATCH system is only certified to a certain weight. Beyond that you *must* use the seat belt.
By understanding these crucial safety considerations, you can significantly reduce the risk of injury to your child.
Installing an infant car seat correctly requires attention to detail and a thorough understanding of the components involved. While we don't have a downloadable diagram here, remember to consult your vehicle and car seat manuals for specific instructions and illustrations tailored to your equipment. Always double-check your work, and if you're unsure about anything, seek assistance from a certified Child Passenger Safety Technician (CPST).