How To Install Car Seat Base
So, you're looking to install a car seat base yourself? Excellent! It's a task that, while seemingly straightforward, demands precision and an understanding of the underlying mechanics to ensure the safety of your precious cargo. This guide isn’t just about following instructions; it's about understanding why those instructions exist and how to troubleshoot common issues. We’ll assume you’re comfortable with basic hand tools and have a decent understanding of automotive systems. This isn't a project where "close enough" is good enough; proper installation is absolutely critical.
Purpose and Importance
Why even bother understanding the intricacies of car seat base installation? Well, the primary purpose is, of course, safety. A properly installed car seat base provides a secure foundation for the car seat, minimizing movement and maximizing the seat's ability to protect a child in the event of a collision. A loose or incorrectly installed base can significantly reduce the effectiveness of the car seat, potentially leading to serious injury. Secondly, understanding the installation process allows for proper maintenance and adjustments as your child grows or when you move the base to a different vehicle. This guide aims to empower you to handle these tasks with confidence and competence.
Key Specs and Main Parts
Before we dive into the installation process, let's familiarize ourselves with the key components and specifications you'll be dealing with. Understanding these will make the whole process much clearer.
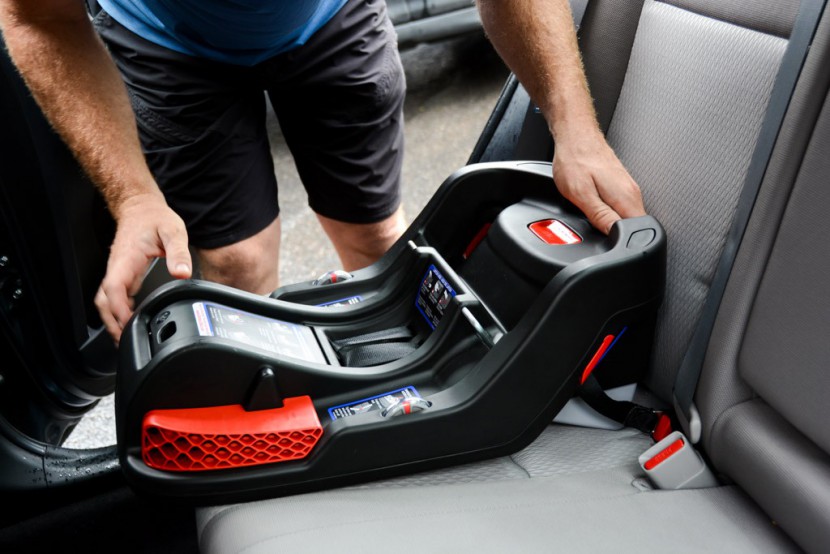
Main Parts:
- Base: The main structure that attaches to the vehicle's seat. It usually incorporates the LATCH system and/or belt routing guides.
- LATCH Connectors (Lower Anchors and Tethers for Children): These are the metal hooks that connect to the lower anchor points in your car. They may be rigid or flexible straps.
- Top Tether Strap: A strap that connects the top of the car seat base to an anchor point in the vehicle (usually on the rear deck or seatback). This is *crucial* for forward-facing installations.
- Belt Routing Guides: Grooves or channels on the base that direct the vehicle's seat belt for secure installation if you’re not using LATCH.
- Locking Clip (if needed): A metal or plastic clip used to prevent the seat belt from loosening, especially in older vehicles without automatic locking retractors (ALR).
- Recline Adjustment: A mechanism to adjust the angle of the base to ensure the car seat is properly reclined. This is essential for infants and younger children.
- Level Indicator: A bubble level or other indicator to help you achieve the correct recline angle.
Key Specs:
- Weight Limits: Every car seat and base has weight and height limits. Never exceed these limits. Check your manual!
- LATCH Weight Limit: LATCH systems have weight limits that include the child's weight *plus* the weight of the car seat itself. These limits vary, but are typically around 65 lbs total weight. Beyond this, you must use the vehicle seat belt for installation. This is critically important and often overlooked.
- Compatibility: Not all car seat bases are compatible with all car seats or vehicles. Always check the manufacturer's compatibility charts before purchasing or installing.
- Expiration Date: Car seats and bases have expiration dates, typically 6-10 years from the date of manufacture. The plastic can degrade over time, compromising its integrity.
Understanding the Installation Process
There are two primary methods for installing a car seat base: using the LATCH system or using the vehicle's seat belt. Let's walk through each one.
LATCH System Installation:
- Locate the Lower Anchors: These are typically found in the crease of the vehicle's seat. Consult your vehicle's owner's manual for their exact location. They're usually covered by small flaps or indentations.
- Attach the LATCH Connectors: Connect the LATCH connectors on the base to the lower anchors in your vehicle. Make sure they click or lock into place.
- Tighten the LATCH Straps: Tighten the LATCH straps to remove any slack. Use a ratcheting mechanism or pull firmly on the strap end. The base should be snug, with less than 1 inch of movement side to side or front to back.
- Attach the Top Tether Strap: Locate the top tether anchor point in your vehicle. Again, consult your vehicle's owner's manual. Attach the top tether strap to the anchor and tighten it to remove slack. This is especially crucial for forward-facing installations.
- Verify the Recline Angle: Use the level indicator on the base to ensure the car seat is reclined at the correct angle. Adjust the recline foot or mechanism as needed.
Seat Belt Installation:
- Route the Seat Belt: Thread the vehicle's seat belt through the belt routing guides on the car seat base. Refer to the base's instructions for the correct routing path.
- Buckle the Seat Belt: Buckle the seat belt and ensure it's securely fastened.
- Lock the Seat Belt: Engage the vehicle's locking mechanism to prevent the seat belt from loosening. There are two common types:
- Automatic Locking Retractor (ALR): Pull the seat belt all the way out until it clicks. Then, slowly feed the belt back in. It will lock in place and prevent further loosening.
- Switchable Retractor: Some vehicles have a switchable retractor that can be locked by pulling the belt all the way out.
- Locking Clip: If your vehicle doesn't have ALR or a switchable retractor, you'll need to use a locking clip. Follow the instructions that came with the clip to install it correctly. This involves positioning the clip near the buckle to prevent the belt from retracting.
- Tighten the Seat Belt: Put your weight into the base and pull up on the seat belt near the buckle to remove any slack. The base should be snug, with less than 1 inch of movement.
- Attach the Top Tether Strap (if applicable): As with LATCH, attach the top tether strap to the anchor point and tighten it.
- Verify the Recline Angle: Use the level indicator to ensure the correct recline angle.
Real-World Use – Basic Troubleshooting Tips
Even with careful installation, you might encounter some common issues. Here are a few troubleshooting tips:
- Base Won't Stay Tight: Ensure the LATCH connectors are securely attached and that the straps are tightened adequately. If using a seat belt, double-check that the locking mechanism is engaged correctly. A common mistake is not engaging the ALR properly. Also, ensure the locking clip, if needed, is installed correctly and tightly near the buckle.
- Recline Angle is Incorrect: Double-check the level indicator and adjust the recline foot or mechanism until the base is level. Some vehicles have sloped seats that make achieving the correct angle challenging. You may need to use a rolled-up towel or pool noodle *approved by the car seat manufacturer* to help level the base. *Never* use unauthorized materials.
- LATCH Connectors Won't Attach: Make sure you're using the correct LATCH connectors and that they're aligned properly with the lower anchors in your vehicle. Sometimes, the anchors can be difficult to locate. Consult your vehicle's owner's manual.
- Top Tether Anchor is Hard to Find: Refer to your vehicle's owner's manual for the location of the top tether anchor point. It's usually located on the rear deck or seatback. Some vehicles have multiple anchor points, so make sure you're using the correct one.
Safety – Highlight Risky Components
The most significant safety concern is improper installation. A loose or incorrectly installed car seat base can significantly reduce its effectiveness in a crash. Pay particular attention to the following:
- Exceeding Weight Limits: Never exceed the weight or height limits of the car seat or base. This is a non-negotiable safety requirement.
- Incorrect Recline Angle: An incorrect recline angle can compromise the child's airway, especially for infants. Always use the level indicator and adjust the recline as needed.
- Loose Installation: A loose base can move excessively in a crash, reducing its ability to protect the child. Ensure the base is snug, with less than 1 inch of movement.
- Using Damaged Components: Never use a car seat base that has been damaged in a crash or that has expired.
- Ignoring Compatibility: Ensure the car seat and base are compatible with each other and with your vehicle.
Remember, when in doubt, consult a certified Child Passenger Safety Technician (CPST). They can inspect your installation and provide expert guidance.
We have a detailed diagram of a typical car seat base installation, including exploded views and component callouts, available for download. This diagram visually reinforces the concepts we've discussed and can be a valuable resource during your installation process. It includes all the elements discussed above.