How To Install Doona Car Seat
So, you've got yourself a Doona car seat – a pretty ingenious piece of kit, really. But getting it installed correctly is paramount for your little one's safety. This article serves as a comprehensive guide, a sort of 'exploded view' of the installation process, if you will. We'll go beyond the basic manual and delve into the nuances, ensuring you achieve a rock-solid and, most importantly, safe installation. Consider this your advanced installation course.
Purpose: Beyond the Manual
Why bother with an in-depth understanding beyond the manufacturer's manual? Several reasons. Firstly, familiarity breeds confidence. Knowing *why* a step is necessary, not just *how* to do it, lets you adapt to different vehicle configurations. Secondly, it equips you to troubleshoot common issues. A rattle? A seat that shifts slightly? Understanding the mechanics empowers you to diagnose and address these problems efficiently. Thirdly, this detailed knowledge is invaluable if you ever need to reinstall the seat after removing it for cleaning or travel. Finally, let's be honest, understanding how things work is just plain satisfying for those of us who like to tinker.
Key Specs and Main Parts
Before we dive into the installation, let's quickly review the critical specifications and components. This is your "parts diagram" overview:
- Doona Car Seat/Stroller Frame: The core unit, encompassing both the car seat and the integrated stroller. Key specs include weight limits (typically newborn to 35 lbs) and height limits (usually up to 32 inches).
- ISOFIX/LATCH Connectors (if applicable): Some Doona models feature these integrated connectors for direct attachment to the vehicle's ISOFIX/LATCH anchor points. Check your specific model. ISOFIX (International Standards Organisation FIX) and LATCH (Lower Anchors and Tethers for CHildren) are standardized attachment systems.
- Vehicle Seat Belt Guides: Grooves or channels on the Doona that guide the vehicle's seat belt to secure the seat. Correct belt routing is absolutely critical.
- Rebound Bar (if applicable): A bar that rests against the vehicle seat back, helping to minimize rebound in the event of a collision.
- Level Indicator: A bubble level or other indicator to ensure the seat is at the correct recline angle for optimal infant safety. The ideal angle is crucial for preventing head slump.
- Headrest Adjustment: Adjustable headrest to accommodate the growing child and provide optimal side-impact protection.
- Harness System: The 5-point harness that secures the child within the seat. Ensure it's properly adjusted and snug.
- Base (Optional): Some Doona models can be used with a separate base for easier installation and removal. If you are using a base, follow the base installation instructions *before* installing the Doona.
Decoding the Diagram: Symbols and Conventions
While we don't have a traditional wiring diagram here, the installation process can be visualized as a series of steps, each represented by actions and checks. Here's how to interpret them:
- Arrows: Indicate the direction of movement. For example, an arrow might show how to thread the seatbelt through the guides.
- Checkmarks: Represent verification steps. Ensure the level indicator is within the acceptable range. Verify the seat is securely locked in place.
- Exclamation Points (within a triangle): These highlight critical safety considerations. Pay extra attention to these points. This symbol usually warns about potential injury or incorrect installation issues.
- Color Coding: Some instructions might use color to differentiate between different components or steps. For instance, blue might represent the vehicle's seatbelt, while red might indicate a locking mechanism.
- Torque Values (if applicable): If the Doona requires any bolted connections (usually only relevant for base installations), the correct torque value will be specified. Use a torque wrench to ensure proper tightness. *Overtightening can damage components, while undertightening can compromise safety.*
How It Works: The Mechanics of Secure Installation
The Doona, at its core, relies on secure attachment to the vehicle, distributing impact forces effectively in the event of a collision. The following general concepts apply:
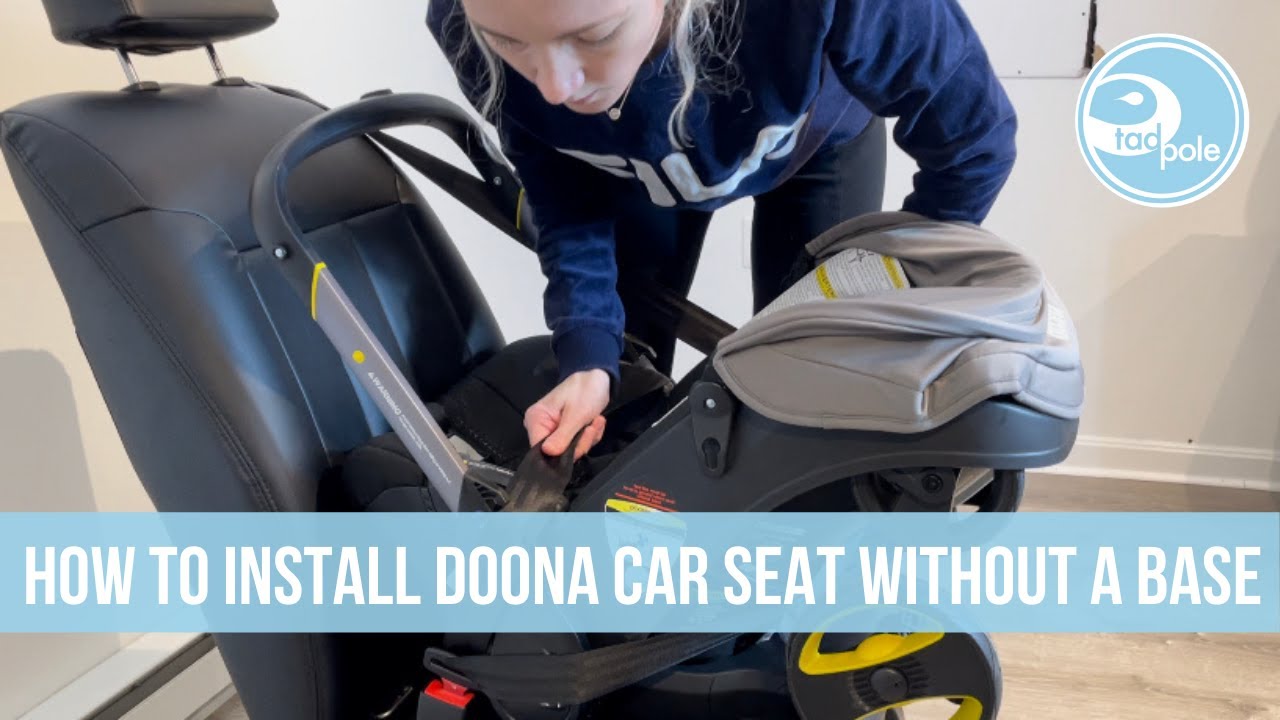
Seatbelt Installation (Most Common):
- Routing: The vehicle's seatbelt is threaded through designated guides on the Doona. The routing path is *critical*. Incorrect routing can severely compromise the seat's effectiveness.
- Locking: Many vehicles have seatbelts that lock in certain positions. You need to engage this locking mechanism to prevent the seatbelt from loosening during normal use. Usually, this is achieved by pulling the seatbelt all the way out and then slowly letting it retract. The belt should ratchet as it retracts.
- Tightening: Once the seatbelt is routed and locked, you need to eliminate any slack. Push down firmly on the Doona while pulling the seatbelt tight. This creates a secure and stable connection.
ISOFIX/LATCH Installation (If Applicable):
- Connecting: The Doona's ISOFIX/LATCH connectors click into the corresponding anchor points in the vehicle. You should hear an audible "click" and see a visual indicator (often a green marker) confirming proper engagement.
- Tether (if applicable): Some ISOFIX/LATCH installations also require a top tether. This tether attaches to an anchor point on the vehicle's rear shelf or seatback, further stabilizing the seat.
- Verification: Once connected, vigorously shake the Doona to ensure it's securely attached. There should be minimal movement.
Recline Angle:
The recline angle is critical for infants. Too upright and their head can slump forward, obstructing their airway. Too reclined and they may not be properly restrained in a collision. Use the level indicator on the Doona and adjust as necessary to achieve the correct angle. Some vehicles may require the use of a rolled towel or pool noodle under the base to achieve the correct angle. *Always consult your Doona's manual for the recommended angle range*.
Real-World Use: Troubleshooting Tips
Even with a clear understanding of the installation process, issues can arise. Here are some common problems and their solutions:
- Seat Not Secure: This is the most common problem. Double-check the seatbelt routing. Ensure the seatbelt is locked. If using ISOFIX/LATCH, confirm the connectors are fully engaged and the tether (if applicable) is attached.
- Rattling: Rattling is often caused by loose connections or contact between the Doona and the vehicle's interior. Check all attachment points. Consider using foam padding to eliminate contact points.
- Difficulty Locking Seatbelt: Some vehicle seatbelts can be tricky to lock. Try adjusting the seat's position slightly. Ensure the seatbelt webbing is not twisted. In some cases, a seatbelt extender may be necessary (but consult your Doona manual first, as extenders can affect safety).
- Incorrect Recline Angle: Use a rolled towel or pool noodle to adjust the recline angle. *Always follow the manufacturer's instructions for acceptable recline angle adjustments.*
Safety: High-Risk Components and Considerations
Car seat installation is not a place for shortcuts. Several components are particularly critical for safety:
- Seatbelt Routing: As mentioned earlier, incorrect seatbelt routing is a major safety hazard. Double-check the routing path against the manufacturer's instructions.
- ISOFIX/LATCH Connectors: Ensure these connectors are fully engaged and locked. A loose connection can lead to catastrophic failure in a collision.
- Harness System: The harness must be snug and properly adjusted to restrain the child effectively. Loose harnesses are a common cause of injury.
- Recline Angle: As previously emphasized, the recline angle is crucial for infant safety. Adhere to the manufacturer's recommendations.
- Rebound Bar (if applicable): If your Doona has a rebound bar, ensure it's properly positioned against the vehicle seat back.
- Never use a car seat that has been involved in an accident. Even if there is no visible damage, the seat may have internal damage that could compromise its safety.
Important Note: This article provides general guidance. Always consult the specific installation instructions provided by Doona for your particular model. The manufacturer's instructions take precedence.
We have the comprehensive installation diagram file available for you to download. This diagram includes exploded views, detailed component breakdowns, and step-by-step instructions for optimal installation and maintenance.