How To Install Driver Side Window
Replacing a driver's side window can seem daunting, but with the right tools, preparation, and a bit of patience, it's a task many car owners can accomplish themselves. This article provides a comprehensive guide on how to install a driver's side window, ensuring a secure and functional result.
Why This Matters: The Importance of a Properly Installed Driver's Side Window
A functioning driver's side window is crucial for several reasons, extending beyond just comfort. Here's why a properly installed window is important:
- Safety: A broken or missing window poses a significant safety risk. It compromises the structural integrity of the vehicle in the event of an accident. Properly installed windows also provide crucial protection from the elements and flying debris while driving.
- Security: An open or poorly sealed window provides easy access for theft and vandalism. A securely fitted window acts as a deterrent and protects your belongings.
- Weather Protection: Leaks caused by a poorly installed window can lead to water damage inside the vehicle, including mold growth, rust, and electrical issues. A correctly installed window provides a weather-tight seal, protecting your car's interior.
- Comfort: A functioning window allows you to control airflow, reduce wind noise, and regulate the temperature inside your car. A properly installed window creates a comfortable driving experience.
- Legality: In many jurisdictions, driving with a damaged or missing window is illegal and can result in fines. Ensuring your window is properly installed helps you comply with local laws.
How to Choose the Right Driver's Side Window Replacement
Selecting the correct replacement window is paramount for a successful installation. Consider these factors:
1. Identify Your Vehicle's Make, Model, and Year
This is the most crucial step. The replacement window must be specifically designed for your vehicle. Check your car's registration, owner's manual, or the Vehicle Identification Number (VIN) – usually located on the dashboard near the windshield or on the driver's side doorjamb – to determine the exact specifications. Many online auto parts retailers allow you to search for compatible parts using your VIN.
2. Window Type: Power vs. Manual
Determine whether your original window was manually operated or power-operated. Power windows require additional components, such as a motor and wiring harness. If your car has power windows, ensure the replacement window is compatible with the existing power window mechanism. Consider purchasing a complete window assembly, including the motor and regulator, for easier installation.
3. Glass Type and Tint
Most vehicles use tempered glass for side windows, which shatters into small, relatively harmless pieces upon impact. Ensure your replacement window is made of tempered glass and meets safety standards. Consider the tint level. Some vehicles come with factory tint, which can reduce glare and heat. If you want to maintain the original look and feel, choose a replacement window with a similar tint level. Check your local laws regarding window tinting to ensure compliance.
4. Quality and Brand
Opt for a reputable brand or supplier known for producing high-quality auto glass. Cheaper, generic windows might not fit properly or offer the same level of durability as OEM (Original Equipment Manufacturer) or aftermarket windows from established manufacturers. Read reviews and compare prices from different suppliers before making a purchase.
5. New or Used?
You can choose between a new or used replacement window. New windows are typically more expensive but offer the best quality and warranty. Used windows can be a more affordable option, but carefully inspect them for cracks, chips, scratches, and delamination before buying. Ensure the used window comes from a reliable source and is compatible with your vehicle.
6. Hardware and Components
When purchasing the replacement window, consider whether it includes necessary hardware, such as clips, seals, and weather stripping. If not, you may need to purchase these separately. Having all the necessary components on hand before starting the installation will save you time and frustration.
How to Install a Driver's Side Window: Step-by-Step Guide
Disclaimer: This guide provides general instructions. Always consult your vehicle's repair manual for specific procedures and safety precautions. If you are not comfortable performing this task, seek professional assistance.
Tools and Materials You'll Need:
- Replacement window
- Socket set and wrench set
- Screwdrivers (Phillips and flathead)
- Panel removal tools (or a flathead screwdriver with tape)
- Gloves
- Safety glasses
- Shop towels or rags
- Painter's tape
- Plastic sheeting (to protect interior)
- Glass cleaner
- New window regulator (optional, but recommended if old one is worn)
Step-by-Step Instructions:
- Prepare the Vehicle: Disconnect the negative battery cable to prevent electrical shocks. Cover the interior of the door with plastic sheeting to protect it from debris. Wear safety glasses and gloves throughout the process.
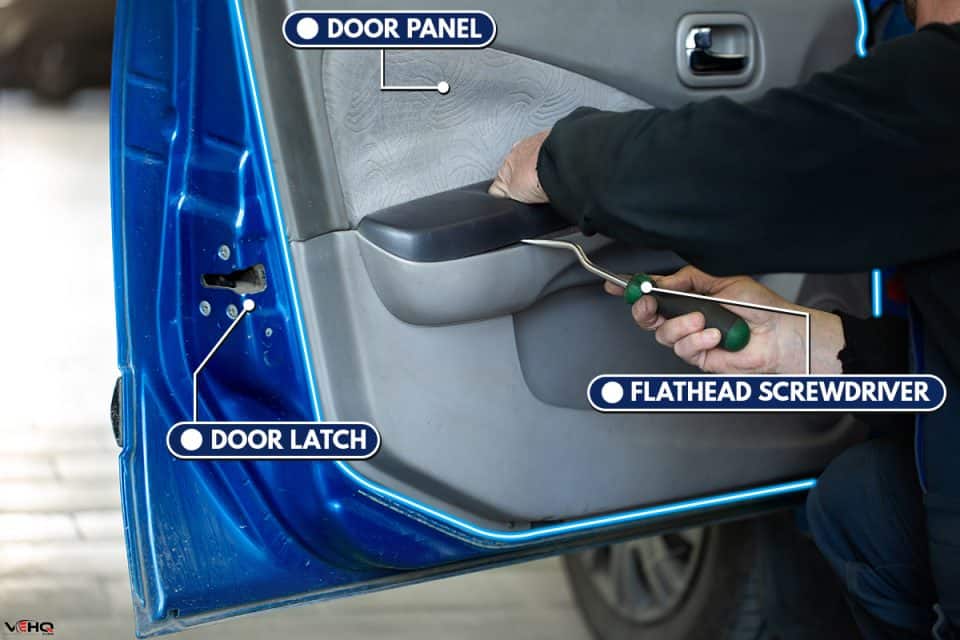
- Remove the Door Panel: Use panel removal tools or a flathead screwdriver (carefully wrapped in tape to avoid scratches) to pry off the door panel. Start at the bottom and work your way around the edges. Disconnect any wiring harnesses connected to the door panel, such as the power window switch and door lock switch.
- Remove the Old Window (If Applicable): If the old window is still in place, carefully remove any remaining glass shards. Use painter's tape to secure any loose pieces to prevent them from falling into the door. If the window is shattered, use a vacuum cleaner to remove any small glass fragments.
- Access the Window Regulator: The window regulator is the mechanism that raises and lowers the window. It's usually located inside the door. Remove any plastic or metal shields covering the regulator.
- Disconnect the Window from the Regulator: Carefully detach the old window from the regulator. This may involve removing clips, screws, or bolts. Note the orientation of the window and regulator for reassembly. If you're replacing the regulator, now is the time to remove the old one.
- Install the New Window Regulator (If Applicable): If replacing the regulator, install the new one in the same location as the old one. Secure it with the appropriate screws or bolts.
- Install the New Window: Carefully insert the new window into the door frame, aligning it with the regulator. Reattach the window to the regulator using the clips, screws, or bolts you removed earlier. Ensure the window is properly seated and aligned within the door frame.
- Test the Window Operation: Reconnect the negative battery cable. Test the window operation by raising and lowering it several times. Check for smooth movement and proper alignment. If the window doesn't move smoothly or is misaligned, adjust the regulator or window position as needed.
- Reinstall the Door Panel: Reconnect any wiring harnesses to the door panel. Align the door panel with the door frame and snap it back into place. Ensure all clips and fasteners are securely attached.
- Final Inspection: Inspect the window for proper fit and alignment. Clean the glass with glass cleaner. Check for any leaks or gaps around the window seal.
Real-World Owner Experiences
Many car owners have successfully replaced their driver's side windows, saving money on labor costs. Here are a few common experiences:
- "The hardest part was removing the door panel without breaking any clips. Take your time and use the right tools!"
- "Make sure you order the correct window regulator for your vehicle's year and model. I ordered the wrong one and had to wait another week for the replacement."
- "Watch a few YouTube videos before you start. Seeing someone else do it can be really helpful."
- "Don't be afraid to ask for help! If you're stuck, a friend or family member can provide an extra set of hands."
Frequently Asked Questions (FAQs)
Q: How much does it cost to replace a driver's side window?
A: The cost varies depending on the vehicle's make and model, the type of window (power or manual), and whether you hire a professional or do it yourself. A new window can range from $50 to $300, and professional installation can add another $100 to $300.
Q: Can I drive with a broken driver's side window?
A: It's generally not recommended and may be illegal. A broken window compromises safety and security and exposes you to the elements. It's best to repair or replace the window as soon as possible.
Q: How long does it take to replace a driver's side window?
A: With the right tools and experience, replacing a driver's side window can take between 1 to 3 hours.
Q: Do I need any special tools to replace a driver's side window?
A: While not strictly necessary, panel removal tools can make the job easier and prevent damage to the door panel. A window regulator tool can also be helpful for disconnecting the window from the regulator.
Q: What if I damage my car while trying to replace the window?
A: If you are not comfortable performing the task or worried about damaging your car, it's best to seek professional assistance from an auto glass repair shop or mechanic.
Q: Where can I buy a replacement driver's side window?
A: You can purchase replacement windows from auto parts stores, online retailers, or salvage yards.