How To Install Lower Control Arm Bushings
The dreaded clunk. That unsettling thump emanating from your vehicle's front end, especially when navigating potholes or uneven roads. More often than not, the culprit isn't a catastrophic failure, but rather the humble, yet crucial, lower control arm bushings. Neglecting these seemingly insignificant components can lead to a cascade of problems, from degraded handling to premature tire wear, and eventually, compromise your vehicle's safety. This guide will delve into the intricacies of lower control arm bushing installation, providing you with the knowledge and understanding to tackle this task with confidence.
The Problem: A Silent Degradation
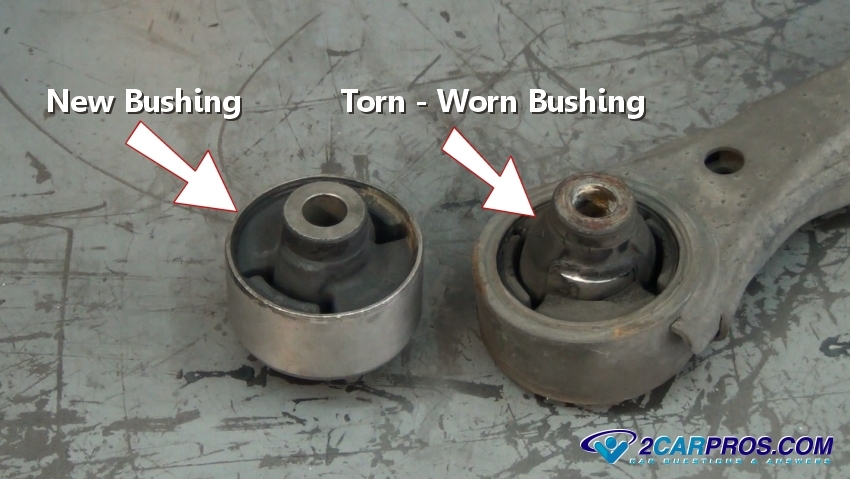
Imagine your car's suspension as a complex system of joints and ligaments, much like the human body. The lower control arm acts as a critical connecting link, managing wheel movement and absorbing road imperfections. The bushings, typically made of rubber or polyurethane, are the cushions that allow this arm to articulate smoothly while mitigating noise and vibration. Over time, these bushings endure constant stress from road impacts, temperature fluctuations, and exposure to the elements. This leads to cracking, tearing, and eventual disintegration.
Think of it like this: A brand new running shoe provides excellent support and cushioning. After months of intense use, the soles wear down, losing their ability to absorb impact. Similarly, worn control arm bushings fail to isolate vibrations and allow excessive movement within the suspension. This manifests as a sloppy feeling in the steering, increased body roll during cornering, and that telltale clunking sound.
Understanding the Mechanical System
The lower control arm (LCA) is typically a triangular or A-shaped component bolted to the vehicle's frame at one or two points and to the steering knuckle (or hub) at another. The bushings are strategically pressed into the LCA at the frame mounting points. Their purpose is twofold:
- Allow Articulation: They permit the LCA to pivot up and down as the suspension travels over bumps and dips. Without bushings, metal-on-metal contact would result in harsh vibrations and rapid wear.
- Isolate Noise and Vibration: The bushings act as a buffer, absorbing road noise and preventing it from transmitting directly into the vehicle's chassis.
When bushings fail, the LCA can move excessively within its mounting points. This unwanted movement throws off wheel alignment, particularly camber and caster, which are critical for proper tire wear and handling. Furthermore, the impact forces are transferred directly to the chassis, leading to a harsher ride and potential damage to other suspension components.
The installation process, while seemingly straightforward, requires precision and the right tools. Removing the old bushings often necessitates specialized presses or bushing removal tools. Incorrect installation can damage the new bushings or even the control arm itself, leading to premature failure and potentially dangerous handling characteristics.
Bushing Materials: Rubber vs. Polyurethane
The choice of bushing material is a critical factor influencing ride quality and performance. The two primary options are rubber and polyurethane (poly).
Rubber Bushings
Pros:
- Excellent noise and vibration damping.
- More compliant ride quality.
- Typically less expensive.
- OEM (Original Equipment Manufacturer) standard.
Cons:
- Shorter lifespan compared to polyurethane.
- More prone to cracking and deterioration due to exposure to the elements.
- Softer, leading to more suspension flex and slightly reduced handling precision.
Use Cases: Daily drivers, vehicles where ride comfort is a priority, budget-conscious repairs.
Manufacturer Examples: Most OEM suspension systems utilize rubber bushings for their optimal balance of comfort and cost.
Polyurethane Bushings
Pros:
- Significantly longer lifespan.
- More resistant to wear and tear.
- Stiffer, resulting in improved handling precision and reduced body roll.
Cons:
- Harsher ride quality due to increased stiffness.
- Can transmit more noise and vibration into the cabin.
- More expensive than rubber bushings.
- May require lubrication to prevent squeaking.
Use Cases: Performance vehicles, track cars, vehicles where handling is a priority, off-road vehicles.
Manufacturer Examples: Performance aftermarket companies like Energy Suspension and Prothane offer a wide range of polyurethane bushings for various vehicles.
The Installation Process (General Overview)
Disclaimer: This is a general overview. Always consult your vehicle's service manual for specific instructions and torque specifications. Safety is paramount; always use jack stands and wear appropriate safety gear.
- Preparation: Safely lift and support the vehicle. Remove the wheel.
- Disassembly: Disconnect the sway bar link (if applicable) and any other components attached to the lower control arm. Carefully detach the LCA from the steering knuckle. This may require a ball joint separator tool.
- Removal: Remove the LCA from the vehicle.
- Bushing Removal: This is often the most challenging step. Specialized bushing removal/installation tools or a hydraulic press are typically required. Applying heat (carefully!) can sometimes aid in loosening stubborn bushings.
- Cleaning and Inspection: Clean the LCA thoroughly and inspect it for any cracks or damage. Repair or replace the LCA if necessary.
- Bushing Installation: Use the appropriate tool to press the new bushings into the LCA, ensuring they are properly aligned and seated.
- Reassembly: Reinstall the LCA onto the vehicle, connecting it to the steering knuckle and the vehicle frame.
- Torque Specifications: Tighten all bolts to the manufacturer's specified torque values. This is crucial for ensuring proper suspension function and preventing component failure.
- Final Steps: Reconnect the sway bar link (if applicable), reinstall the wheel, and lower the vehicle.
- Alignment: Crucially, have the vehicle's wheel alignment checked and adjusted by a qualified technician after replacing control arm bushings. This is essential for proper handling, tire wear, and safety.
Important Considerations:
- Rust and Corrosion: Vehicles in regions with harsh winters or coastal environments are particularly susceptible to rust and corrosion. This can make bushing removal significantly more difficult. Penetrating oil and patience are your allies.
- Ball Joints: While you're replacing the bushings, it's a good opportunity to inspect the ball joints on the lower control arm. If they show signs of wear (excessive play), consider replacing them simultaneously.
- Pre-Assembled LCAs: For some vehicles, purchasing a pre-assembled LCA with new bushings and ball joints can be a more convenient option, saving you the hassle of pressing out old bushings and installing new ones. However, this is generally a more expensive route.
Manufacturer Examples of Lower Control Arms
Many manufacturers provide options for their Lower Control Arms, with some being more robust or higher quality than others. Here are a few notable examples:
- Moog: Known for their premium quality and durable construction. Moog control arms often feature enhanced bushings and ball joints, making them a popular choice for replacements.
- Mevotech: Provides a balance of affordability and reliability. Mevotech offers a range of control arms suitable for various vehicle makes and models, with a focus on direct-fit replacements.
- ACDelco: As the OE supplier for General Motors, ACDelco control arms are designed to meet strict quality standards. They offer both original equipment and aftermarket options.
- Delphi: A global supplier of automotive parts, Delphi control arms are known for their engineering and manufacturing excellence. Their control arms are designed for optimal performance and durability.
These examples highlight the importance of selecting reputable brands when choosing lower control arms, as the quality and durability of these components can significantly impact your vehicle's performance and safety.
Real-World Insights and Recommendations
Replacing lower control arm bushings is a project that requires a blend of mechanical aptitude, patience, and the right tools. While it's certainly achievable for the DIY enthusiast, it's crucial to assess your skill level honestly. If you're uncomfortable working on suspension components or lack the necessary tools, it's best to entrust this task to a qualified mechanic.
From practical experience, I've found that investing in quality bushing removal/installation tools is worth the expense, especially if you anticipate performing this task on multiple vehicles. A hydraulic press, while not essential, can significantly simplify the process. Furthermore, remember that penetrating oil is your friend when dealing with rusted or seized components. Apply it liberally and allow it to soak for an extended period before attempting to remove anything.
Finally, don't underestimate the importance of a proper wheel alignment after replacing control arm bushings. Even if you carefully mark the original positions of the control arm bolts, slight variations in bushing size or installation can affect wheel alignment. A professional alignment will ensure optimal handling, tire wear, and overall safety. By carefully considering all these factors, you can confidently tackle this project and restore your vehicle's handling and ride quality.