How To Install Tail Light Bulb
A burnt-out tail light is more than just a minor inconvenience; it's a serious safety issue. Driving with a malfunctioning tail light significantly increases your risk of an accident, particularly at night or in adverse weather conditions. Replacing a tail light bulb is often a simple and cost-effective repair you can tackle yourself, saving you time and money compared to a visit to the mechanic. This article will guide you through the process, ensuring you get back on the road safely and legally.
Recognizing the Problem: Is Your Tail Light Bulb Out?
Identifying a burnt-out tail light bulb is usually straightforward. Here are some common symptoms to look out for:
- Complete darkness: The most obvious sign is when one of your tail lights completely fails to illuminate when the headlights are on.
- Dim or flickering light: The bulb may be working intermittently, producing a weak or flickering light output. This indicates the bulb is nearing the end of its lifespan.
- Dashboard warning light: Many modern vehicles are equipped with bulb failure sensors that trigger a warning light on your dashboard (often a lightbulb icon) when a tail light bulb burns out. Consult your owner's manual to identify the specific warning light.
- One side darker than the other: If you have dual tail lights on each side, compare their brightness. A noticeable difference in illumination suggests a problem with the dimmer side's bulb.
- Brake light also affected: In some vehicles, the tail light and brake light use the same bulb with dual filaments. If your brake light on one side isn't working either, the tail light bulb is a prime suspect.
Understanding the Root Cause
The most common reason for a tail light bulb failure is simply its lifespan expiring. Like any incandescent bulb, tail light bulbs have a limited operating life, typically ranging from 1,000 to 2,000 hours. Over time, the filament inside the bulb weakens due to heat and vibration, eventually burning out. Other factors that can contribute to premature bulb failure include:
- Voltage surges: Spikes in your vehicle's electrical system can damage the bulb's filament.
- Loose connections: Corrosion or loose wiring in the tail light assembly can create resistance, generating excessive heat and shortening the bulb's lifespan.
- Moisture intrusion: Water leaking into the tail light housing can cause corrosion and bulb failure.
- Physical damage: Impact from road debris or a minor collision can damage the bulb or its housing.
The Consequences of Ignoring a Burnt-Out Tail Light
Ignoring a burnt-out tail light can have serious consequences:
- Increased accident risk: Reduced visibility, especially at night or in bad weather, makes it harder for other drivers to see you, increasing the risk of rear-end collisions.
- Legal penalties: Driving with a non-functional tail light is illegal in most jurisdictions and can result in a traffic ticket and fines.
- Vehicle inspection failure: A burnt-out tail light will cause your vehicle to fail a safety inspection, preventing you from renewing your registration.
- Reduced resale value: Neglecting even minor maintenance issues like a burnt-out bulb can negatively impact your vehicle's resale value.
The Fix: Replacing the Tail Light Bulb
Replacing a tail light bulb is generally a straightforward process that can be completed with basic tools. Here's a step-by-step guide:
- Gather your tools and supplies: You'll need the correct replacement bulb (check your owner's manual for the bulb type), a screwdriver (usually Phillips or flathead), and possibly a pair of gloves.
- Turn off the engine and headlights: Ensure the vehicle is parked safely and the ignition is off.
- Access the tail light assembly: The access point is usually located inside the trunk or cargo area, behind a panel or lining. Refer to your owner's manual for specific instructions. Some vehicles may require you to remove the entire tail light assembly from the outside.
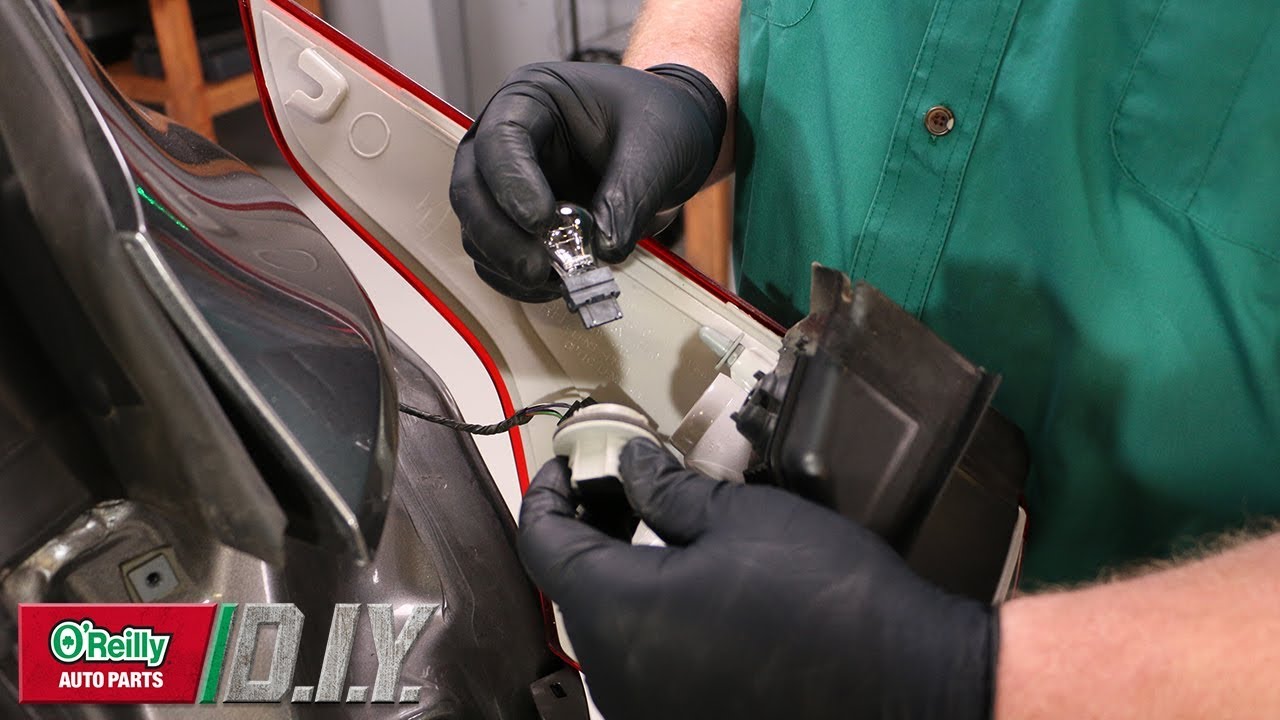
- Remove the bulb socket: Once you have access, locate the bulb socket corresponding to the faulty tail light. Twist the socket counterclockwise (usually about a quarter turn) to release it from the tail light housing.
- Remove the old bulb: Depending on the bulb type, it may either pull straight out of the socket or require a twist-and-lock motion. Examine the bulb closely to determine the removal method.
- Install the new bulb: Carefully insert the new bulb into the socket, ensuring it's properly seated and locked in place. Avoid touching the glass portion of the bulb with your bare hands, as oils from your skin can shorten its lifespan. Use a clean cloth or gloves if necessary.
- Reinstall the bulb socket: Align the socket with the opening in the tail light housing and twist it clockwise to lock it in place.
- Test the tail light: Turn on the headlights and check that the new bulb is working correctly. Also, test the brake lights and turn signals on that side to ensure everything is functioning as it should.
- Reassemble the tail light assembly: Replace any panels or linings you removed to access the tail light.
- Repeat on the other side (if necessary): If you notice the other tail light is dim or nearing the end of its life, it's a good idea to replace it as well to prevent future problems.
Cost Considerations and Shop Advice
The cost of a replacement tail light bulb is relatively inexpensive, typically ranging from $5 to $20 depending on the bulb type and brand. The entire repair can often be completed in under 30 minutes. By performing the repair yourself, you can save on labor costs, which can range from $50 to $100 at a repair shop.
However, there are situations where professional help may be necessary:
- Difficulty accessing the tail light assembly: Some vehicles have complicated tail light designs that make it difficult to access the bulbs.
- Corrosion or damage to the wiring: If you notice significant corrosion or damage to the wiring or connectors, it's best to have a qualified mechanic diagnose and repair the problem.
- Malfunctioning tail light assembly: If the entire tail light assembly is damaged or cracked, it may need to be replaced, which is a more complex repair.
If you choose to take your vehicle to a repair shop, be sure to get a written estimate before authorizing any work. Ask the mechanic to explain the repair process and any potential additional costs. If you're concerned about the cost of parts, consider asking for a quote using aftermarket parts, which are often less expensive than OEM (Original Equipment Manufacturer) parts.
Credibility and Additional Information
While tail light bulb failures are generally not addressed by specific Technical Service Bulletins (TSBs), various online automotive forums and communities are filled with discussions about bulb types, replacement procedures, and troubleshooting tips for specific vehicle makes and models. These forums can be a valuable resource for finding information and getting advice from other owners. For example, many forums note that certain bulb types, like those used in some Honda and Toyota models, have a slightly shorter lifespan than others due to their design or the voltage they're subjected to.
Furthermore, many drivers report experiencing tail light bulb failures around the 50,000 to 75,000-mile mark, suggesting that this is a common mileage range for bulb replacement. Keeping an eye on your tail lights and addressing any issues promptly can help ensure your safety and prevent more costly repairs down the road.
By following these guidelines, you can confidently diagnose and replace a burnt-out tail light bulb, ensuring you stay safe and legal on the road.