How To Keep A Clean Car
Maintaining a clean car isn't just about aesthetics; it's about preserving its value, preventing corrosion, and ensuring a comfortable driving experience. A well-maintained interior and exterior protect your investment and contribute to a safer and more enjoyable ride. This guide delves into the technical aspects of car cleaning, providing you with the knowledge and techniques to achieve a showroom-worthy finish.
The Importance of Regular Cleaning
Think of your car's paint as a complex, multi-layered system. The clear coat, the outermost layer, is particularly vulnerable to environmental damage. Debris like road salt, bird droppings (highly acidic!), and industrial fallout can etch into the clear coat, leading to permanent blemishes and, eventually, rust. Regular washing removes these contaminants before they can cause significant damage. Similarly, a clean interior prevents the buildup of dust, allergens, and bacteria, creating a healthier environment for you and your passengers.
Purpose: Why This Matters
Understanding the principles behind proper car cleaning allows you to make informed decisions about products and techniques. It also enables you to identify potential problems early on, such as failing clear coat or the onset of rust, and take preventative measures. Knowledge is power, and in this case, it translates to a longer-lasting and better-looking vehicle.
Exterior Cleaning: The Technical Breakdown
Exterior cleaning involves a series of steps, each designed to remove specific types of contaminants and protect the paint. Let's break down the process:
Key Specs and Main Parts (Of the Process):
- Pre-Rinse: Removal of loose debris. Key tools: Pressure washer (optional, but highly effective), hose with nozzle.
- Wash: Removal of bonded contaminants. Key products: pH-balanced car wash soap, microfiber wash mitt, two buckets (one for soap, one for rinse).
- Decontamination: Removal of embedded contaminants. Key products: Clay bar or clay mitt, lubricant.
- Polishing (Optional): Correction of minor paint defects. Key products: Polishing compound, dual-action (DA) polisher, polishing pads.
- Protection: Application of a protective layer. Key products: Wax, sealant, or ceramic coating.
Symbols & Techniques: Understanding the Process
- Two-Bucket Method: Employs one bucket with soapy water and another with clean water for rinsing the wash mitt. This prevents re-introducing dirt back onto the paint. Imagine the soapy bucket represented by a green circle (🧼) and the rinse bucket by a blue circle (💧). This greatly minimizes the amount of swirl marks.
- Microfiber: Woven synthetic material that is extra soft and gentle when cleaning. Represented by (🧶).
- Directional Washing: Washing in straight, overlapping lines, rather than circular motions, to minimize swirl marks.
How It Works: Step-by-Step
- Pre-Rinse: Use a pressure washer or hose to thoroughly rinse the entire vehicle, removing loose dirt and grime. Pay particular attention to wheel wells and undercarriage.
- Wash: Fill two buckets with water. Add car wash soap to one bucket according to the manufacturer's instructions. Soak your microfiber wash mitt in the soapy water, wring out excess, and wash a small section of the car using straight, overlapping lines. Rinse the mitt in the clean water bucket to remove dirt before re-soaking it in the soapy water. Repeat this process, working your way around the entire car.
- Rinse: Thoroughly rinse the car with clean water.
- Decontamination (Clay Bar/Mitt): After washing, even seemingly clean paint may still have embedded contaminants. Lubricate the surface with a clay bar lubricant and gently glide a clay bar or clay mitt over the paint. The clay will pick up these contaminants, leaving the surface smooth. Regularly fold and knead the clay to expose a clean surface.
- Polishing (Optional): If your paint has swirl marks or other minor imperfections, you can use a DA polisher and polishing compound to correct them. This requires practice and caution. Always start with a test spot in an inconspicuous area.
- Protection: Apply a layer of wax, sealant, or ceramic coating to protect the paint from UV rays, oxidation, and other environmental damage. Follow the manufacturer's instructions carefully.
Real-World Use: Basic Troubleshooting
- Water Spots: Hard water can leave unsightly water spots. Try using a water spot remover or distilled water for rinsing.
- Swirl Marks: Caused by improper washing techniques or abrasive materials. Polishing can remove swirl marks, but it's best to prevent them by using the two-bucket method and microfiber wash mitts.
- Bird Dropping Etching: Remove bird droppings as soon as possible to prevent etching. If etching has already occurred, polishing may be necessary.
Safety: Risky Components
- Electrical Components: Avoid spraying water directly into engine bay openings or areas with exposed wiring. Use a damp cloth instead.
- Brakes: Avoid getting cleaning products directly on brake rotors or pads, as this can affect braking performance.
- Polishing: Incorrect polishing can damage the clear coat. Always practice on a test spot and use appropriate pads and compounds.
Interior Cleaning: A Deeper Dive
The interior of your car is a breeding ground for dust, allergens, and bacteria. Regular cleaning is essential for maintaining a healthy and comfortable environment.
Key Specs and Main Parts (Of the Process):
- Vacuuming: Removal of loose dirt and debris. Key tools: Vacuum cleaner with attachments.
- Surface Cleaning: Cleaning of hard surfaces. Key products: All-purpose cleaner, microfiber cloths.
- Upholstery Cleaning: Cleaning of seats and carpets. Key products: Upholstery cleaner, carpet extractor (optional).
- Leather Conditioning (If Applicable): Protecting and moisturizing leather surfaces. Key products: Leather conditioner.
How It Works: Step-by-Step
- Vacuuming: Thoroughly vacuum the entire interior, including seats, carpets, floor mats, and crevices. Use attachments to reach tight spaces.
- Surface Cleaning: Spray all-purpose cleaner onto a microfiber cloth and wipe down all hard surfaces, including the dashboard, center console, door panels, and steering wheel.
- Upholstery Cleaning: For fabric upholstery, spray upholstery cleaner onto the surface and agitate with a brush. Blot with a clean microfiber cloth. For heavily soiled areas, consider using a carpet extractor.
- Leather Conditioning (If Applicable): Apply leather conditioner to leather surfaces according to the manufacturer's instructions.
Real-World Use: Basic Troubleshooting
- Stains: Treat stains as soon as possible. Different types of stains require different cleaning solutions.
- Odors: Baking soda can be used to absorb odors. Sprinkle baking soda on carpets and upholstery, let it sit for several hours, and then vacuum it up.
- Mold: Mold can grow in damp environments. Use a mold and mildew cleaner to remove mold and prevent its recurrence.
Safety: Risky Components
- Airbag System: Avoid spraying cleaning products directly onto airbag covers. Wipe gently with a damp cloth.
- Electronics: Avoid getting cleaning products into electronic components, such as the radio or navigation system.
Advanced Cleaning Techniques
For the truly dedicated car detailer, there are several advanced cleaning techniques that can take your car cleaning to the next level:
- Steam Cleaning: Steam cleaning can be used to sanitize and deodorize interior surfaces.
- Ozone Generators: Ozone generators can be used to eliminate stubborn odors.
- Paint Correction: More advanced paint correction techniques involve using rotary polishers and multiple stages of polishing to remove deeper scratches and imperfections.
By understanding the principles of car cleaning and applying the techniques outlined in this guide, you can keep your car looking its best and protect your investment. Remember to always use high-quality products and follow the manufacturer's instructions carefully.
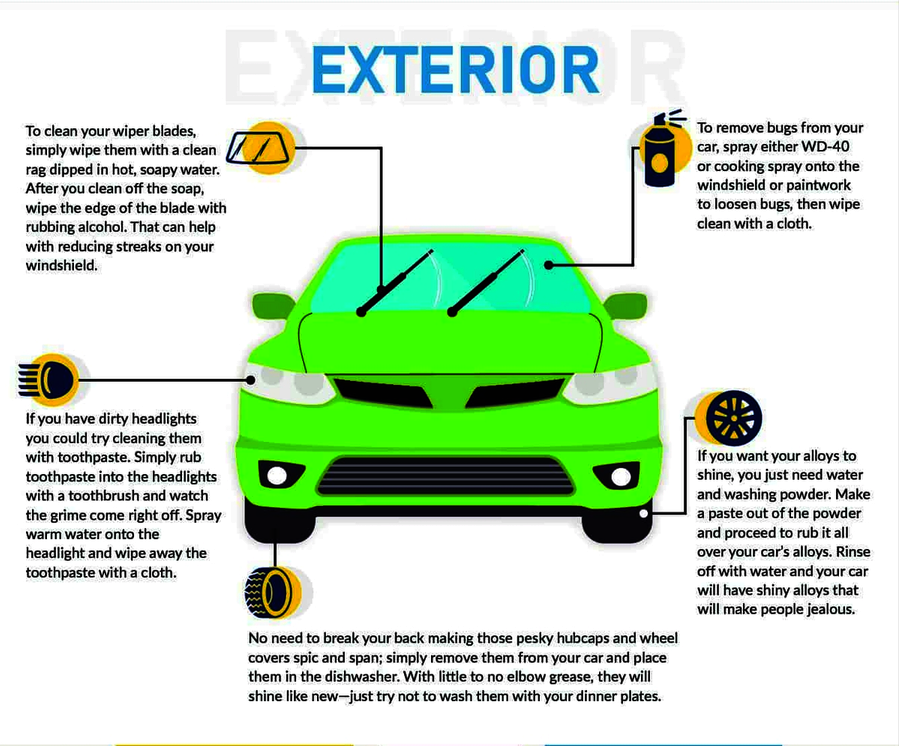
We have a detailed diagram of the car washing process available for download. This diagram outlines each step of the process, from pre-rinsing to protecting your paint. It also includes helpful tips and troubleshooting advice. You can download the diagram to your computer or mobile device and use it as a reference guide while you are cleaning your car.