How To Kill Mold In A Car
Mold in your car. Just the thought makes you itch, right? Beyond the unpleasant smell and potential health concerns, unchecked mold can damage your interior and decrease your car's value. As an experienced DIYer, you're likely already familiar with basic car care, but dealing with mold requires a slightly different approach than your standard detailing. This guide will walk you through the process of effectively and safely eliminating mold from your vehicle, providing you with the knowledge and techniques to tackle this common problem.
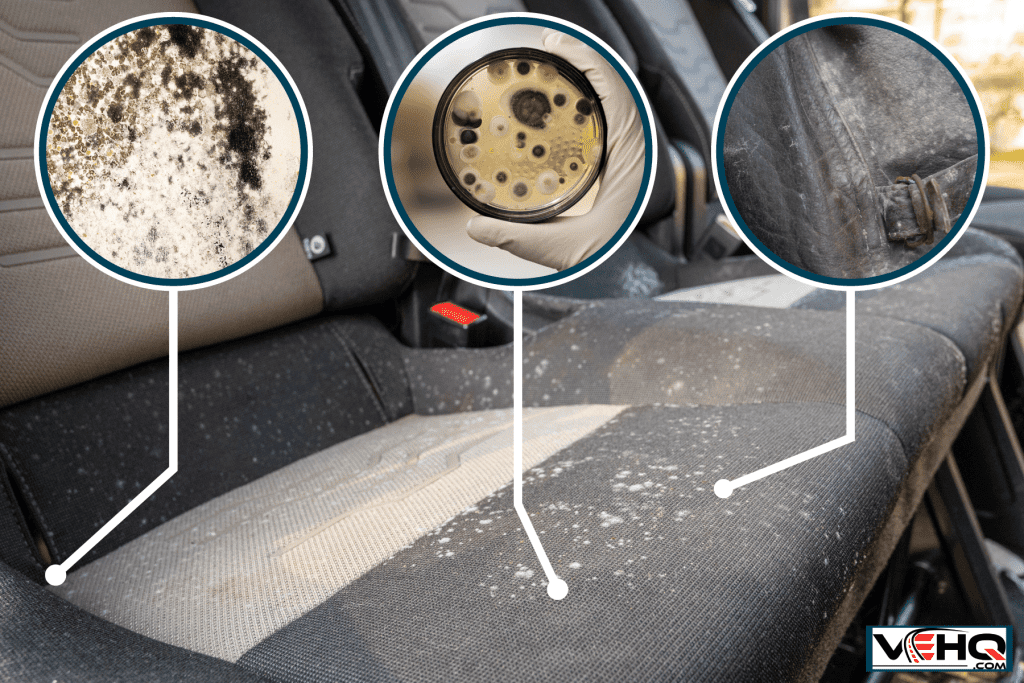
Understanding the Enemy: Why Mold Thrives in Your Car
Before we dive into eradication, let's understand why mold sets up shop in your vehicle in the first place. Mold spores are everywhere, both indoors and outdoors. They're opportunistic organisms that need moisture, a food source (organic matter), and a suitable temperature to flourish. Your car, unfortunately, often provides the perfect environment.
- Moisture: Leaky windows, spilled drinks, tracked-in rain or snow, and even condensation from your AC system can create damp conditions.
- Food Source: Dust, dirt, food crumbs, pet dander, and even the fibers in your upholstery provide a delicious meal for mold.
- Temperature: The interior of a car, especially during warmer months, can reach temperatures ideal for mold growth.
Therefore, removing mold requires addressing all three of these factors: eliminating the moisture source, cleaning away the food source, and creating an environment less hospitable to mold.
Step-by-Step Mold Removal Process
1. Initial Assessment and Preparation
Before you start scrubbing, carefully assess the extent of the mold infestation. Wear appropriate personal protective equipment (PPE) – a respirator (at least an N95 rating), gloves, and eye protection are essential. Open all doors and windows to ensure good ventilation during the entire process. This is critical to prevent you from inhaling mold spores and to allow cleaning products to dry effectively. Consider parking the car in direct sunlight to further aid in drying.
2. Vacuuming and Loose Debris Removal
Use a powerful wet/dry vacuum cleaner with a HEPA filter to thoroughly vacuum all affected areas. A HEPA (High-Efficiency Particulate Air) filter traps very small particles, including mold spores, preventing them from being recirculated into the air. Pay special attention to carpets, upholstery, floor mats, and any crevices where moisture might accumulate. Discard the vacuum bag or empty the canister immediately after use in a sealed plastic bag to prevent spore dispersal.
3. Identifying and Addressing the Moisture Source
This is perhaps the most crucial step. If you don't fix the underlying cause of the moisture, the mold will inevitably return. Look for:
- Leaky Windows or Sunroof: Check seals and weather stripping for damage.
- Clogged Drain Holes: Clean out drain holes in the doors, sunroof, and under the cowl (the area under the windshield wipers).
- AC System Condensation: Make sure the AC drain is clear and functioning properly. A musty smell when running the AC is a strong indicator of mold growth in the system. Consider using an AC evaporator cleaner to kill mold within the system itself.
- Water Leaks: Inspect the interior for signs of water staining or dampness, particularly around the floorboards and under the seats.
4. Cleaning with Appropriate Solutions
Now, the real work begins. Several effective mold-killing solutions exist, but it's crucial to test them in an inconspicuous area first to ensure they don't damage the material. Here are some options:
- Vinegar: A natural and effective option for mild mold growth. Spray undiluted white vinegar onto the affected area, let it sit for about an hour, and then scrub with a brush and wipe clean.
- Baking Soda: Mix baking soda with water to form a paste. Apply the paste to the mold, let it dry, and then vacuum or wipe clean.
- Commercial Mold Removers: Numerous commercial mold removers are available specifically for automotive use. Always follow the manufacturer's instructions carefully. Be sure to choose a product that is safe for the specific material you are cleaning (e.g., fabric, leather, vinyl).
- Diluted Bleach (For Non-Fabric Surfaces Only): In cases of severe mold growth on hard, non-porous surfaces like plastic or rubber, a diluted bleach solution (1 part bleach to 10 parts water) can be used. Never use bleach on fabric, as it will damage and discolor it. Always wear gloves and eye protection when working with bleach and ensure adequate ventilation.
After applying the cleaning solution, scrub the affected area thoroughly with a stiff brush. Use circular motions to dislodge the mold. Wipe away any residue with a clean, damp cloth. Repeat the process as needed.
5. Drying and Disinfection
Thorough drying is essential to prevent the mold from returning. Use a dehumidifier or a fan to circulate air and speed up the drying process. Open the car doors and windows to allow for maximum ventilation. If possible, park the car in direct sunlight to further aid in drying and disinfection. UV radiation from the sun is a natural mold killer.
6. Ozone Treatment (Optional but Recommended)
For stubborn mold or lingering odors, consider an ozone treatment. An ozone generator produces ozone gas (O3), a powerful oxidizer that kills mold spores and eliminates odors. However, ozone can be harmful to humans and pets, so it's crucial to use it responsibly. Follow these precautions:
- Remove all people and pets from the vehicle and the surrounding area during the treatment.
- Follow the manufacturer's instructions carefully.
- Ventilate the vehicle thoroughly after the treatment before entering.
Real-World Use: Troubleshooting Tips
- Persistent Odor: Even after cleaning, a musty odor may linger. Place bowls of baking soda or activated charcoal inside the car to absorb odors. Replace them every few days.
- Mold Returning: If the mold reappears, re-evaluate the moisture source. You may need to take more drastic measures, such as replacing damaged carpets or upholstery.
- HVAC System Mold: If the mold is primarily in your HVAC system, you may need to have it professionally cleaned. Some AC evaporator cleaners can be sprayed into the system to kill mold, but severe infestations may require disassembly and cleaning.
Safety: Risky Components and Precautions
When working with mold and cleaning chemicals, safety is paramount:
- Respirator: Always wear a respirator to protect yourself from inhaling mold spores and chemical fumes. An N95 respirator is the minimum requirement, but a respirator with a higher rating is recommended for heavy infestations.
- Gloves and Eye Protection: Protect your skin and eyes from contact with mold and cleaning chemicals.
- Ventilation: Ensure adequate ventilation to prevent the buildup of harmful fumes.
- Chemical Compatibility: Be aware of the chemicals you are using and ensure they are compatible with the materials you are cleaning. Never mix bleach with ammonia or other cleaning products, as this can create toxic fumes.
- Electrical Components: Be extremely cautious when working around electrical components. Avoid getting them wet. If you suspect that electrical components have been exposed to water or mold, have them inspected by a qualified mechanic.
Final Thoughts
Removing mold from your car can be a challenging but rewarding DIY project. By understanding the factors that contribute to mold growth, following a thorough cleaning process, and taking appropriate safety precautions, you can effectively eliminate mold and restore your car's interior to a clean and healthy condition. Remember, prevention is key. Regularly clean your car's interior, address moisture issues promptly, and maintain good ventilation to prevent mold from returning.
We have a detailed diagram outlining the most common leak points in vehicles that contribute to mold growth. This diagram includes illustrations of door seals, window seals, sunroof drains, and AC drain locations. This diagram, along with a checklist of recommended cleaning supplies, is available for download. It provides a visual aid to help you identify potential problem areas and ensure you have the right tools for the job.