How To Kill Mold In Car
Mold in your car isn't just unsightly and smelly; it's a health hazard. From respiratory issues to allergic reactions, the mycotoxins (toxic substances produced by mold) released can seriously impact your well-being. This guide provides a detailed, hands-on approach to identifying, removing, and preventing mold growth in your vehicle. We're approaching this as if you're an experienced DIYer – someone who understands the basics but wants a deeper dive into the "why" and "how" of mold remediation.
Purpose
This guide is designed for:
- Remediation: Effectively removing existing mold growth from your car's interior.
- Prevention: Understanding the conditions that promote mold growth and how to mitigate them.
- Learning: Expanding your knowledge of automotive maintenance and interior care.
- Cost Savings: Avoiding expensive professional detailing services by handling the problem yourself.
Key Specs and Main Parts
Before you start, let's outline the key areas of concern and the tools you'll need. Mold can thrive in several locations, each requiring a slightly different approach:
- Carpeting and Floor Mats: These are porous surfaces that readily absorb moisture. They're a prime breeding ground if spills or leaks aren't promptly addressed.
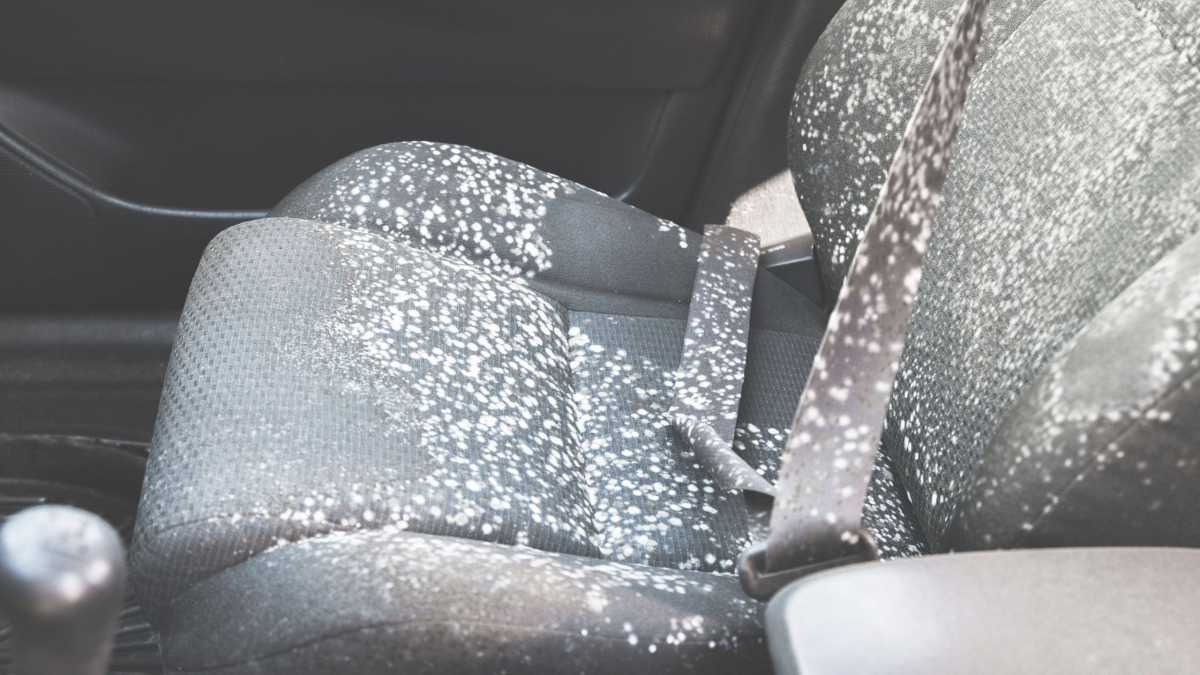
- Upholstery (Cloth and Leather): Like carpeting, cloth upholstery readily absorbs moisture. Leather, while more resistant, can still develop mold if exposed to prolonged dampness.
- Air Conditioning System: The evaporator core in your A/C system is constantly exposed to condensation. If this condensation doesn't drain properly, mold can flourish, leading to a musty smell when you turn on the A/C.
- Headliner: The fabric covering the roof of your car can trap moisture, especially in vehicles with leaky sunroofs or compromised weather stripping.
- Trunk: Often overlooked, the trunk can accumulate moisture from leaks or wet items stored inside.
Essential Tools and Materials:
- Personal Protective Equipment (PPE): Gloves, a mask (N95 or better), and eye protection are crucial. Mold spores are harmful to inhale and can irritate your skin.
- Wet/Dry Vacuum: Essential for removing loose debris and extracting moisture from carpets and upholstery.
- Detailing Brushes: Various sizes of soft-bristled brushes for agitating mold growth on different surfaces.
- Microfiber Cloths: For wiping down surfaces and absorbing moisture.
- Mold-Killing Solution: Options include:
- Commercial Mold Removers: Follow the manufacturer's instructions carefully. Ensure the product is safe for automotive interiors.
- Vinegar: A natural alternative. White vinegar is a mild acid that can kill many types of mold.
- Baking Soda: Another natural option. Baking soda can absorb moisture and deodorize.
- Tea Tree Oil: A powerful antifungal agent. Dilute it with water before use.
- Spray Bottles: For applying mold-killing solutions.
- Dehumidifier: To dry out the car interior after cleaning.
- Ozone Generator (Optional, Use with Extreme Caution): Ozone generators can kill mold and eliminate odors, but they can also be harmful to humans and animals. Use only in a well-ventilated area and never while the vehicle is occupied. Consult the vehicle manufacturer before using, as ozone can damage some materials.
How It Works: The Mold Removal Process
The core principle is to eliminate the moisture source, kill the mold, and thoroughly clean the affected areas. Here's a step-by-step breakdown:
- Identify the Source: Crucially important! Is it a leaking window, a clogged A/C drain, or a spill that wasn't cleaned up promptly? Addressing the root cause prevents recurrence.
- Ventilate the Vehicle: Open all doors and windows to improve airflow and reduce humidity.
- Initial Cleaning: Use a wet/dry vacuum to remove loose debris, dirt, and visible mold spores. Focus on carpets, upholstery, and floor mats.
- Apply Mold-Killing Solution:
- Spot Test: Before applying any solution to a large area, test it on an inconspicuous spot to ensure it doesn't damage the material.
- Application: Spray the chosen solution liberally onto the affected areas. Let it dwell for the recommended time (usually 10-15 minutes).
- Agitation: Use a detailing brush to gently scrub the mold-affected areas. This helps to dislodge the mold and allow the solution to penetrate deeper.
- Remove Residue: Wipe down the treated areas with clean, damp microfiber cloths to remove any remaining mold residue and solution.
- Dry Thoroughly:
- Sunlight: If possible, park the car in direct sunlight with the windows open to allow the interior to dry naturally.
- Dehumidifier: Place a dehumidifier inside the car to draw out moisture.
- Fans: Use fans to circulate air and speed up the drying process.
- Address the A/C System (If Applicable):
- Clean the Evaporator Core: Use an A/C cleaner specifically designed to kill mold and bacteria in the evaporator core. Follow the product instructions carefully. Many are sprayed into the fresh air intake with the A/C running.
- Check the Drain: Locate the A/C drain tube (usually under the car, near the firewall) and ensure it's not clogged. A clogged drain will cause condensation to back up into the system.
- Final Cleaning and Deodorizing: Once everything is dry, vacuum the entire interior again to remove any remaining debris. Use an odor eliminator spray or baking soda to neutralize any lingering musty smells.
Real-World Use – Basic Troubleshooting Tips
- Persistent Mold Smell: If the mold smell persists after cleaning, it indicates that you haven't completely eliminated the source or that mold is present in a hard-to-reach area. Consider professional detailing or further investigation.
- Stains: Mold can leave behind stains on upholstery and carpeting. You may need to use a dedicated stain remover or consider professional upholstery cleaning.
- Recurring Mold: If mold keeps coming back, you haven't addressed the underlying moisture problem. Double-check for leaks, clogged drains, and areas where moisture tends to accumulate.
- Severe Infestation: In cases of severe mold infestation, especially if you have respiratory sensitivities, it's best to consult a professional mold remediation specialist.
Safety – Highlight Risky Components
Mold remediation involves potential hazards:
- Mold Spores: Inhaling mold spores can cause respiratory problems and allergic reactions. Always wear a mask (N95 or better) and gloves.
- Chemicals: Commercial mold removers can contain harsh chemicals. Follow the manufacturer's instructions carefully and avoid contact with skin and eyes. Ensure proper ventilation when using these products.
- Ozone Generators: These machines produce ozone, a powerful oxidizing agent that can damage your lungs and irritate your eyes. Use them with extreme caution and only in a well-ventilated area. Never occupy the vehicle while an ozone generator is running. Research potential damage to vehicle materials caused by ozone exposure.
- Electrical Components: Be cautious when working around electrical components, especially when using liquids. Disconnect the battery if necessary.
Important Note on Disassembly: Depending on the location of the mold, you might need to remove seats or interior trim panels. If you're unfamiliar with these procedures, consult a repair manual or online resources specific to your vehicle. Incorrect disassembly can damage components.
We have a detailed diagram illustrating common mold locations in vehicle interiors and the steps outlined in this guide. This visual aid can be especially helpful in identifying hard-to-reach areas and understanding the airflow patterns that contribute to mold growth. You can download the diagram in PDF format here.