How To Know If You Need Struts
So, you're suspecting your struts might be on their way out? Good on you for being proactive! Worn struts can significantly impact your vehicle's handling, ride comfort, and even safety. This article will give you the knowledge you need to diagnose your strut situation and decide whether it's time for a replacement. We'll cover the key components, how they work, common failure symptoms, and some troubleshooting tips to get you started. Think of me as your trusted mechanic, breaking down the complexities into manageable chunks. Plus, stick around until the end; we've got a handy diagram you can download to help visualize everything we're discussing.
Purpose: Why Understand Struts?
Understanding your struts is crucial for several reasons. First and foremost, maintaining a safe and comfortable ride. Worn struts compromise your vehicle's ability to absorb bumps, maintain tire contact with the road, and control body roll during cornering. Secondly, recognizing strut problems early can prevent further damage to other suspension components like ball joints, tie rod ends, and even your tires. Lastly, knowledge is power when it comes to auto repairs. You'll be better equipped to communicate with your mechanic, understand their recommendations, and potentially even tackle the replacement yourself, saving money and gaining valuable experience. This knowledge can also inform modification decisions if you are looking to enhance your vehicle’s performance.
Key Specs and Main Parts of a Strut Assembly
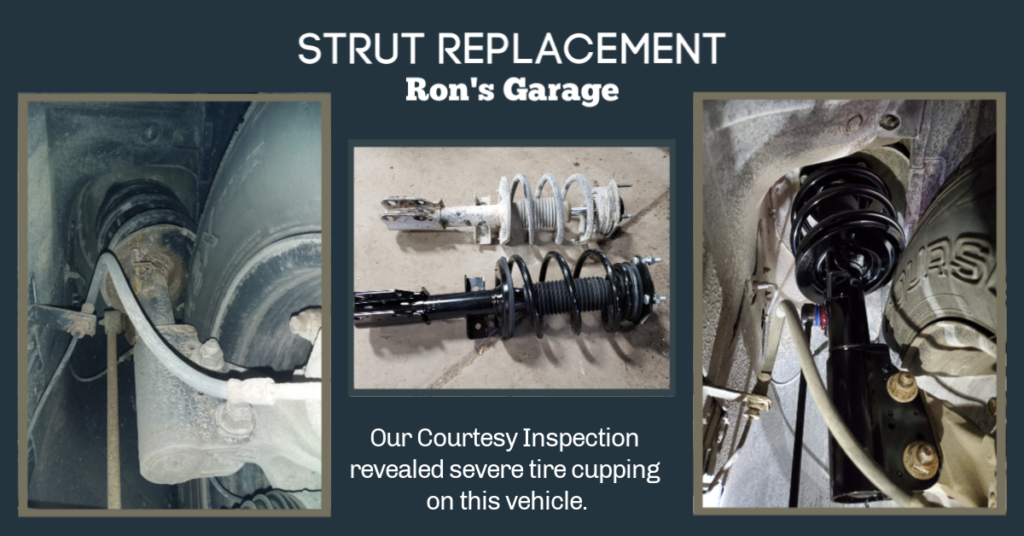
A strut assembly is a crucial part of your vehicle's suspension system. Unlike a shock absorber, which only dampens movement, a strut provides structural support, replacing the upper control arm and ball joint found in some suspension designs. Here’s a breakdown of the key parts:
- Strut Body (Shock Absorber): This is the core component, containing a piston moving within a fluid-filled cylinder. This movement generates resistance to dampen oscillations (bouncing). Think of it like a hydraulic damper.
- Coil Spring: The spring is responsible for supporting the vehicle's weight and absorbing initial impacts. Its spring rate (measured in lbs/in or N/mm) determines how much force is required to compress it a certain distance.
- Strut Mount: This crucial component connects the strut assembly to the vehicle's chassis. It often contains a bearing that allows the strut to rotate when steering. Failure here often causes noises.
- Jounce Bumper (Bump Stop): This prevents the suspension from bottoming out, protecting the strut from damage during extreme compression.
- Dust Boot/Shield: Protects the strut shaft from dirt, debris, and moisture, extending its lifespan.
Key specifications to consider when replacing struts include:
- Vehicle Year, Make, and Model: Struts are vehicle-specific.
- Strut Type: (e.g., gas-charged, hydraulic). Gas-charged struts often provide better performance and longer lifespan.
- Spring Rate: (If replacing springs as well) This should match the original spring rate or be chosen according to your desired ride characteristics.
- Overall Length and Travel: Ensuring the new strut has the correct dimensions is crucial for proper fitment and suspension geometry.
Symbols: Understanding Suspension Diagrams
Suspension diagrams can seem intimidating, but understanding the basic symbols makes them much more approachable. Here's a quick guide:
- Solid Lines: Typically represent physical components like the strut body, control arms, and chassis. Thicker lines often indicate more substantial components.
- Dashed Lines: Often indicate hidden or less-critical components or represent movement paths.
- Coil Spring Symbol: A coiled line, sometimes with arrows indicating the direction of force.
- Strut Mount Symbol: Varies depending on the diagram, but often a simplified representation of the mounting hardware.
- Arrows: Indicate direction of movement or force.
- Color Coding: Some diagrams use color to differentiate between different types of components or systems (e.g., steering vs. suspension).
Pay attention to the legend or key provided with the diagram, as it will explain any specific symbols or color codes used.
How It Works: The Strut's Role in Your Suspension
Let's break down how a strut actually works. When your vehicle encounters a bump, the wheel moves upwards, compressing the coil spring. This spring stores energy and then releases it, causing the wheel to bounce. The strut's job is to control this bouncing motion, preventing it from becoming excessive and uncomfortable. Inside the strut body, a piston moves through hydraulic fluid. This movement is resisted by valves within the piston, creating a damping force. The amount of damping force is tuned to match the spring rate and the vehicle's weight. During compression (when the wheel moves upwards), the strut provides resistance, slowing down the upward motion. During rebound (when the wheel returns to its original position), the strut again provides resistance, preventing the wheel from bouncing excessively. Essentially, the strut converts kinetic energy into heat, dissipating the energy of the bump. Without properly functioning struts, your vehicle would continue to bounce long after hitting a bump, resulting in a poor ride and reduced handling.
Real-World Use: Basic Troubleshooting Tips for Strut Issues
Here are some common symptoms of worn struts and how to troubleshoot them:
- Excessive Bouncing: This is the most obvious sign. Push down firmly on each corner of your vehicle and release. If the vehicle bounces more than two or three times, the strut is likely worn.
- Poor Handling: Worn struts can cause your vehicle to feel unstable, especially during cornering or braking. You might notice increased body roll or difficulty maintaining a straight line.
- Nose Dive During Braking: If the front of your vehicle dips excessively when braking, it could indicate worn front struts.
- Uneven Tire Wear: Worn struts can cause your tires to wear unevenly, particularly cupping (scalloped wear patterns).
- Leaking Fluid: Inspect the strut body for signs of leaking hydraulic fluid. A small amount of weeping is normal, but excessive leakage indicates a problem.
- Noises: Clunking or rattling noises coming from the suspension can indicate worn strut mounts or other suspension components. Use a stethoscope or long screwdriver (carefully!) to try to pinpoint the source of the noise.
- Visual Inspection: Check for damaged dust boots, bent strut rods, or corroded components.
Important Note: Always replace struts in pairs (both front or both rear) to ensure balanced handling and braking performance.
Safety: Risky Components and Precautions
Strut replacement involves working with compressed springs, which store a tremendous amount of energy. This is extremely dangerous! If the spring is released uncontrolled, it can cause serious injury or even death.
- Compressed Springs: Never attempt to disassemble a strut assembly without using a properly rated spring compressor. Ensure the compressor is in good working order and follow the manufacturer's instructions carefully. If you are not comfortable using a spring compressor, take the strut assembly to a professional.
- Brake Lines and ABS Sensors: Be careful not to damage brake lines or ABS sensors during strut removal and installation.
- Proper Support: Always use jack stands to support the vehicle when working on the suspension. Never rely solely on a jack.
- Torque Specifications: Use a torque wrench to tighten all bolts and nuts to the manufacturer's specified torque values. Over-tightening can damage components, while under-tightening can lead to loosening and failure.
- Eye Protection: Always wear safety glasses when working on your vehicle.
If you're unsure about any aspect of strut replacement, it's always best to consult a qualified mechanic. Your safety and the safety of others on the road depend on it.
Okay, you've made it this far. Now, about that diagram I promised... We've got a detailed, downloadable diagram of a typical strut assembly available. (Imagine link or call to action to download it here) It breaks down each component visually, helping you understand its function and placement within the overall assembly. Download it, print it out, and keep it handy as you diagnose and address your strut issues. Good luck!