How To Know Shocks Are Bad
Let's talk shocks. You might think they're just those bouncy things that make your ride comfortable, but they're actually a critical part of your vehicle's suspension system, impacting handling, braking, and even tire wear. Knowing when your shocks are failing is essential for safety and preventing more costly repairs down the road. This article will give you the knowledge you need to diagnose bad shocks like a pro.
Purpose of Understanding Shock Condition
Why bother learning about bad shocks? Several reasons. First, diagnosing suspension problems early saves money. A failing shock can lead to uneven tire wear, reduced braking performance, and damage to other suspension components like springs and bushings. Second, safety is paramount. Worn shocks significantly affect your vehicle's stability, especially during emergency maneuvers or on uneven surfaces. Finally, understanding your suspension allows you to make informed decisions about upgrades or replacements. This knowledge is invaluable for any DIY mechanic or car enthusiast looking to maintain or improve their vehicle's performance.
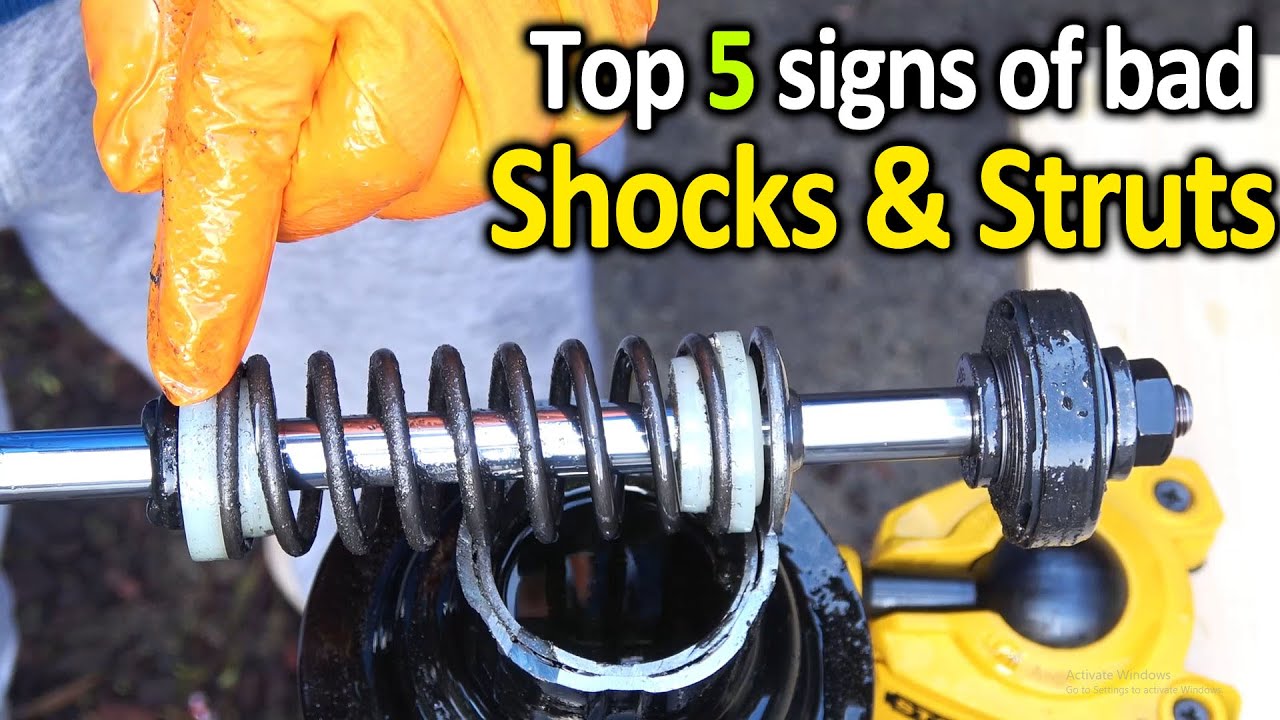
Key Specs and Main Parts of a Shock Absorber
Before we dive into diagnosing problems, let's quickly review the anatomy of a typical shock absorber and some key specifications to be aware of:
- Cylinder/Body: The main housing that contains the working fluid and internal components.
- Piston: A component that moves within the cylinder, forcing fluid through valves to dampen motion.
- Piston Rod: Connects the piston to the vehicle's chassis or suspension arm.
- Valving: Internal components (usually shims and orifices) that control the flow of fluid, determining the damping characteristics.
- Mounting Points/Bushings: Where the shock attaches to the vehicle's frame and suspension components. These are usually rubber or polyurethane.
- Dust Boot/Shield: Protects the piston rod from debris.
Key specifications to consider when replacing shocks include:
- Length (Extended & Collapsed): Critical for proper fitment and suspension travel.
- Damping Force (Compression & Rebound): How much resistance the shock provides during compression (bump) and rebound (extension). These values significantly impact ride quality and handling.
- Mounting Type: Eye-to-eye, stem-to-eye, etc. Ensures compatibility with your vehicle's suspension.
- Gas-Charged vs. Hydraulic: Gas-charged shocks typically offer better performance and reduced fade (loss of damping) over time, but can be stiffer.
How a Shock Absorber Works
Think of a shock absorber as a sophisticated oil pump. When your wheel encounters a bump, the spring compresses and then wants to extend back. Without a shock, this would result in uncontrolled bouncing. The shock absorber provides resistance to this motion, dampening the spring's oscillation. The piston moves within the cylinder, forcing fluid through small orifices (valving). The size and configuration of these orifices determine the damping force. When the wheel compresses (compression stroke), the fluid is forced through one set of valves. When the wheel rebounds (rebound stroke), the fluid is forced through a different set of valves. By precisely controlling the fluid flow, the shock absorber controls the spring's movement, preventing excessive bouncing and maintaining tire contact with the road.
Different shock designs, like monotube and twin-tube, achieve this damping in slightly different ways, but the underlying principle remains the same.
Real-World Use: Basic Troubleshooting Tips for Bad Shocks
Now, let's get to the practical stuff. How do you know if your shocks are bad?
- The Bounce Test: This is a classic, but not always reliable. Push down firmly on each corner of your vehicle (over the wheel) and release. Observe how many times the vehicle bounces. Ideally, it should rebound once and settle. More than two bounces indicates worn shocks. However, this test isn't foolproof as it's affected by spring rate and vehicle weight.
- Visual Inspection: This is crucial. Look for the following:
- Fluid Leaks: Oil or fluid leaking from the shock body is a major sign of failure. Even a small amount of seepage is cause for concern. The seals have failed, and the shock is losing its damping ability.
- Damaged Bushings: Cracked, torn, or missing bushings at the mounting points create excessive play and noise.
- Dents or Damage: Any physical damage to the shock body or piston rod can compromise its function.
- Uneven Tire Wear: Cupping or scalloping patterns on your tires can indicate worn shocks, allowing the tires to bounce and lose contact with the road.
- The Ride Test: Pay attention to how your vehicle feels while driving:
- Excessive Bouncing or Floating: The vehicle feels unstable or floaty, especially after hitting bumps.
- Nose Dive During Braking: The front end dips excessively when braking hard.
- Body Roll During Turns: The vehicle leans excessively during cornering.
- Poor Handling: The vehicle feels less responsive and harder to control.
- Unusual Noises: Clunking or rattling sounds from the suspension, especially over bumps, can indicate worn shocks or damaged bushings.
- The Professional Test: A mechanic can perform a more thorough inspection using specialized equipment to measure damping forces and identify subtle issues. A shock dyno, for example, can measure a shock's damping characteristics across its entire stroke.
Safety Considerations When Inspecting and Replacing Shocks
Working on suspension components can be dangerous. Here are some essential safety precautions:
- Use Jack Stands: Never work under a vehicle supported only by a jack. Always use sturdy jack stands placed on designated jacking points.
- Compress Springs Safely: If you're replacing struts (which combine a shock and spring), never disassemble them without using a proper spring compressor. Compressed springs store immense energy and can cause serious injury if released unexpectedly. Leave this to professionals if you aren't comfortable.
- Wear Safety Glasses: Protect your eyes from debris and fluids.
- Loosen Lug Nuts Before Lifting: Always loosen the lug nuts on the wheel before jacking up the vehicle.
- Follow Torque Specifications: When reassembling the suspension, use a torque wrench to tighten all fasteners to the manufacturer's specifications. Over- or under-tightening can damage components.
Remember, suspension work directly impacts vehicle safety. If you're not confident in your abilities, seek the assistance of a qualified mechanic.
Conclusion and Further Resources
Diagnosing bad shocks requires a combination of visual inspection, road testing, and a good understanding of suspension principles. By following the tips outlined in this article, you can effectively assess the condition of your shocks and make informed decisions about repairs or replacements. Regularly inspecting your suspension will not only improve your vehicle's ride quality and handling but also enhance its safety and longevity.
We have a detailed diagram of a typical shock absorber assembly, including cutaways showing internal components and valving. This diagram provides a visual reference for understanding the shock's construction and operation. You can download it [link to downloadable file would go here]. Use it to deepen your understanding and aid in your diagnostic process.