How To Make A Book Cover From Paper
Creating a book cover from paper is a fantastic way to personalize your favorite novels, protect valuable hardcovers, or simply express your creativity. Whether you're aiming to preserve a cherished book, add a unique touch to your reading collection, or embark on a fun DIY project, crafting a paper book cover is a surprisingly simple and rewarding process.
Why Make a Book Cover From Paper?
There are several compelling reasons to make a book cover from paper:
- Protection: A paper cover acts as a barrier against dust, dirt, and scratches, helping to keep your book in pristine condition. This is especially useful for books you frequently carry around or those that hold sentimental value.
- Personalization: Ditch the generic covers and design something that truly reflects your style. You can use different colors, patterns, and embellishments to create a one-of-a-kind cover.
- Concealment: Sometimes you might want to read a book in public without revealing its title. A custom paper cover allows you to enjoy your reading discreetly. This is particularly handy for controversial or potentially embarrassing reads.
- Cost-Effective: Creating a paper book cover is significantly cheaper than buying a commercial book cover. You likely already have most of the necessary materials at home.
- Environmentally Friendly: Recycle old paper or cardboard to create your cover, reducing waste and giving materials a new life. This is a great way to be more sustainable.
- Creative Outlet: The process of designing and crafting a book cover is a fun and engaging creative activity. It's a chance to experiment with different techniques and express your artistic side.
How to Choose the Right Paper for Your Book Cover
The type of paper you choose will significantly impact the durability and aesthetic appeal of your book cover. Here's a breakdown of factors to consider:
Paper Weight and Thickness
Paper weight is measured in pounds (lbs) or grams per square meter (gsm). Heavier paper is thicker and more durable. For book covers, aim for something sturdier than standard printer paper. Here are some common options:
- Cardstock (65-110 lb or 176-300 gsm): This is a great all-around choice. It's sturdy enough to provide good protection but still flexible enough to fold easily.
- Construction Paper: A budget-friendly option, but less durable than cardstock. It's best for temporary covers or crafting with kids.
- Kraft Paper: Provides a rustic, natural look and is relatively strong. It's excellent for a minimalist aesthetic.
- Decorative Paper: Scrapbooking paper, patterned paper, or even wallpaper remnants can add unique visual appeal. Just ensure they are thick enough to provide adequate protection or reinforce them with a backing layer of cardstock.
Paper Finish
The finish refers to the surface texture and appearance of the paper:
- Matte: Offers a non-glossy finish that is easy to write on and doesn't show fingerprints easily. Ideal for a subtle, understated look.
- Glossy: Has a shiny, reflective surface that makes colors appear more vibrant. More prone to fingerprints and glare.
- Textured: Features a raised or embossed pattern that adds tactile interest. Can be a unique way to personalize your cover.
Color and Pattern
Consider the book's content and your personal preferences when choosing a color or pattern. Solid colors offer a clean, simple look, while patterns can add visual interest. You can also use techniques like stamping, painting, or drawing to customize your cover.
Durability and Water Resistance
If you plan to carry your book around frequently, consider paper with some level of water resistance. Laminating your finished cover or using a spray sealant can provide additional protection against moisture.
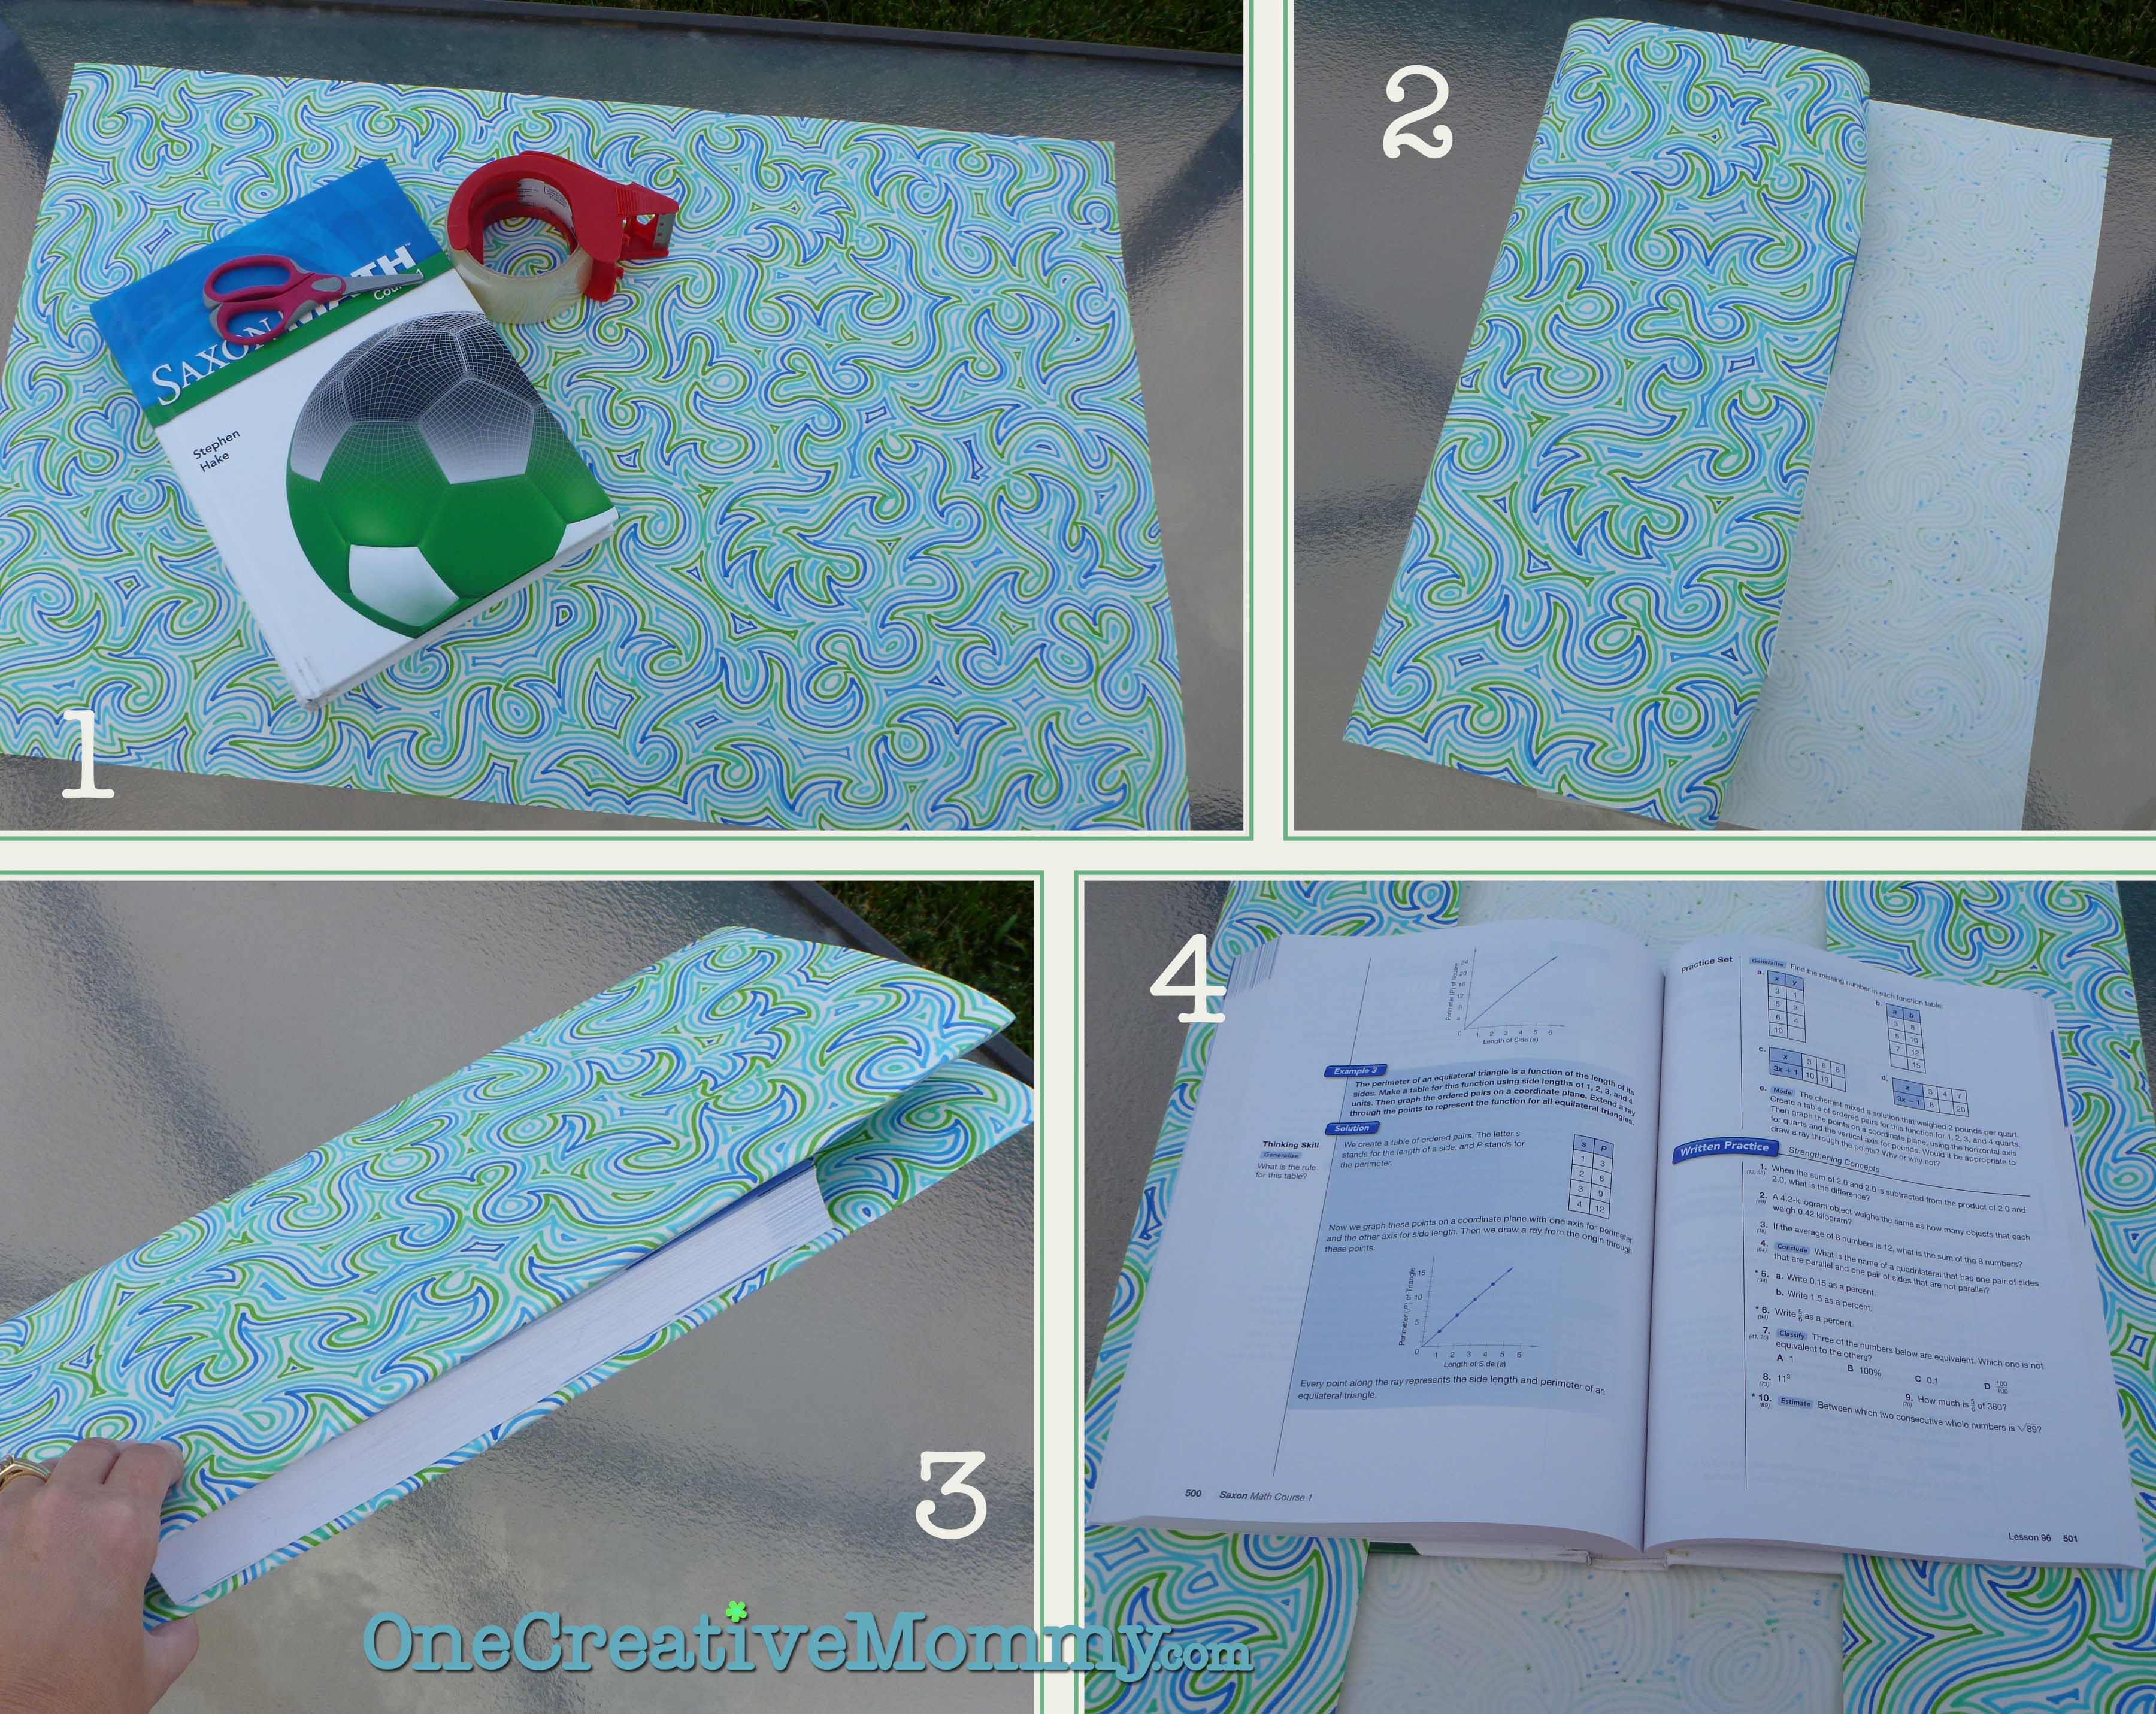
Step-by-Step Guide: Making a Paper Book Cover
Here's a detailed guide to creating a paper book cover:
- Gather Your Materials:
- Paper (cardstock, kraft paper, decorative paper, etc.)
- Ruler
- Pencil
- Scissors or craft knife
- Glue stick or double-sided tape
- Optional: Decorative elements (stickers, stamps, paint, markers, etc.)
- Measure Your Book:
- Open the book and lay it flat.
- Measure the height of the book.
- Measure the width of the book, including the spine.
- Add at least 2-3 inches to both the height and width to allow for flaps and folding. The more you add, the wider your flaps will be.
- Cut Your Paper:
- Using your measurements, cut a rectangular piece of paper to the appropriate size. Ensure the rectangle is large enough to wrap around the entire book with enough extra to fold into flaps.
- Create the Spine Creases:
- Place the book in the center of the cut paper.
- Align the spine of the book with the center of the paper's width.
- Carefully fold the paper along the edges of the spine, creating two vertical creases. These creases will form the spine of your cover. Use a ruler to ensure a clean, straight fold.
- Fold the Flaps:
- Fold the top and bottom edges of the paper over the top and bottom covers of the book. Crease these folds sharply.
- Fold the left and right edges of the paper inward, creating the flaps that will hold the book inside the cover. The width of these flaps depends on how much extra paper you added in step 2. Crease these folds sharply as well.
- Secure the Flaps (Optional):
- For extra security, you can glue or tape the flaps to the inside of the cover. This is especially helpful if you're using a thinner paper or if you want a more permanent fit.
- Use a glue stick or double-sided tape sparingly to avoid making the cover too stiff.
- Decorate Your Cover:
- Now comes the fun part! Personalize your cover with your chosen decorative elements.
- You can use paint, markers, stamps, stickers, or any other craft supplies you like.
- Consider adding the book's title and author's name for easy identification.
- Let any wet materials dry completely before handling the book.
- Insert Your Book:
- Carefully slide the front and back covers of your book into the flaps of the paper cover.
- Adjust the cover as needed to ensure a snug and secure fit.
Real-World Owner Experiences & Tips
Many book lovers find immense satisfaction in crafting their own paper covers. Here are some insights gathered from experienced DIYers:
- Reinforce High-Traffic Areas: "I always reinforce the spine and edges of my covers with clear packing tape. It helps them last longer, especially for books I carry in my bag," shares Sarah, an avid reader.
- Upcycle Materials: "I love using old maps or sheet music to create unique covers. It gives them a vintage feel and is a great way to recycle," says David, a history enthusiast.
- Experiment with Techniques: "Don't be afraid to try different techniques like watercolor painting or calligraphy on your cover. It's a fun way to learn new skills," advises Emily, a budding artist.
- Consider the Book's Genre: "I try to match the cover design to the book's genre. A fantasy novel might get a more elaborate cover with intricate designs, while a non-fiction book might get a simpler, more professional-looking cover," suggests Michael, a book blogger.
- Protect Against Water Damage: "I always spray my paper covers with a sealant to protect them from spills. It's saved my books from water damage more than once!" recommends Jessica, a busy mom.
- Use Templates: If you're struggling with measurements, search online for printable book cover templates. These can simplify the process, especially for beginners.
- Don't Overlook the Inside Flaps: The inside flaps can also be decorated with quotes, drawings, or even information about the author.
Frequently Asked Questions (FAQs)
What if my paper cover tears?
Reinforce the tear with tape (clear or decorative). For a more permanent fix, consider using archival tape designed for book repair. Alternatively, you can create a new cover using the old one as a template.
Can I use fabric instead of paper?
Yes, you can! Fabric offers greater durability and a different aesthetic. The process is similar, but you may need to use fabric glue or sew the edges for a more secure finish.
How do I make a cover for a very thick book?
Use a thicker, more durable paper like heavy cardstock or even thin cardboard. You may also need to add more allowance for the spine width when measuring and cutting your paper.
Can I print a design onto the paper before making the cover?
Absolutely! Print your design onto the paper using a printer before cutting and folding. This allows for more intricate and precise designs.
How do I keep the cover from slipping off the book?
Ensure the flaps are folded tightly and securely. You can also use small pieces of double-sided tape or glue to hold the flaps in place. Alternatively, consider using elastic bands to keep the cover snug around the book.
What's the best adhesive to use?
A glue stick is generally recommended for its clean application and minimal warping of the paper. Double-sided tape is another excellent option for a strong and instant bond. Avoid using liquid glue, as it can cause the paper to wrinkle and buckle.
How can I make my cover waterproof?
Laminate your finished cover or use a waterproof spray sealant. Laminating provides the most robust protection, while a sealant offers a less intrusive option. Test the sealant on a scrap piece of paper first to ensure it doesn't damage the ink or paper finish.
Creating a paper book cover is a simple yet rewarding project that allows you to personalize your reading experience, protect your books, and unleash your creativity. With a few basic materials and a little bit of effort, you can transform ordinary books into unique works of art.