How To Make A Tan Color
So, you want to mix up some tan? Whether you're touching up a faded interior panel, customizing a trim piece, or even experimenting with custom paint jobs, understanding how to create a specific color, like tan, is a crucial skill. This guide will break down the art and science of mixing tan, giving you the know-how to achieve that perfect shade. We'll cover color theory basics, mixing techniques, and troubleshooting common problems.
The Purpose of Understanding Color Mixing
Why bother learning the ins and outs of mixing tan paint? Several reasons jump to mind:
- Repair and Restoration: Accurately matching a factory tan color for interior components (dashboards, seats, door panels) is vital for seamless repairs. A poorly matched color sticks out like a sore thumb!
- Customization: Perhaps you're customizing your car's interior or exterior. Knowing how to create a specific tan shade opens up a world of possibilities for personalized aesthetics.
- Cost Savings: Mixing your own paint can be more cost-effective than purchasing pre-mixed colors, especially for smaller projects or touch-ups.
- Learning and Skill Development: Understanding color theory is a valuable skill that extends beyond automotive applications. It's a foundational element in design, art, and many other fields.
Key Specs and Main Parts (Colors)
The foundation of creating tan lies in understanding the primary and secondary colors, and how they interact. Think of these as the core ingredients:
- Primary Colors: Red, Yellow, and Blue. These colors cannot be created by mixing other colors.
- Secondary Colors: Orange (Red + Yellow), Green (Blue + Yellow), and Violet (Red + Blue). These are created by mixing two primary colors.
- Tertiary Colors: These are created by mixing a primary color with a neighboring secondary color. Examples include red-orange, yellow-orange, yellow-green, blue-green, blue-violet, and red-violet.
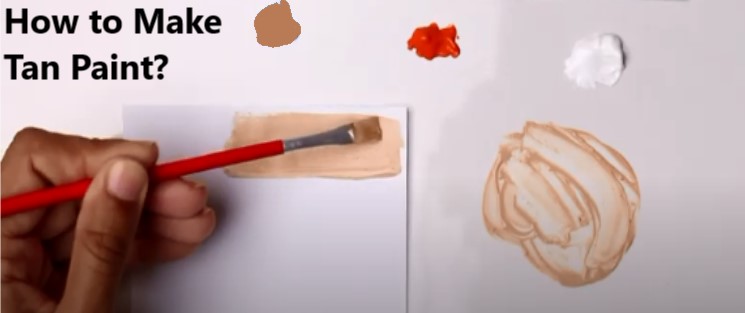
To create tan, you'll primarily be working with brown and white. Brown itself isn't a primary or secondary color; it's typically created by mixing all three primary colors (red, yellow, and blue). However, for ease of mixing, starting with a pre-mixed brown is often the most straightforward approach.
Let's break down the "recipe" for tan:
- Base: Start with a good quality brown paint. The exact shade of brown will influence the final tan color, so choose wisely.
- Lightener: White paint is used to lighten the brown, creating the tan hue.
- Adjustments: Depending on the desired tan shade, you might need small amounts of other colors, such as yellow (to warm the tan) or blue (to cool the tan). Red can add a bit more earthiness to the color.
Symbols (Ratios and Mixing Terminology)
Instead of using visual symbols, let's establish some terminology and ratios to guide your mixing process.
- Ratio Notation: We'll use ratios like X:Y:Z to represent the proportions of each color. For example, 4:1:0.5 would mean 4 parts of brown, 1 part of white, and 0.5 parts of yellow.
- Tinting Strength: This refers to how much a particular color affects the overall mixture. White generally has a high tinting strength, meaning a small amount can significantly lighten the mixture. Colors like blue often have a strong tinting strength as well, meaning a tiny amount can easily shift the color dramatically.
- Undertones: All colors have undertones, which are subtle hues that become more apparent when the color is mixed with other colors. Brown paints can have warm (reddish or yellowish) or cool (bluish or greenish) undertones, which you need to consider when adding other colors.
- Opacity: Opacity refers to how transparent or non-transparent a color is. Consider if the tan needs to be opaque to cover a surface or transparent to be used in a tinting process.
How It Works: The Color Mixing Process
Here's the step-by-step process for creating tan:
- Prepare Your Workspace: Protect your work surface with drop cloths or newspaper. Gather your paints (brown, white, and any adjustment colors), mixing containers, stirring sticks, measuring tools (syringes or graduated cups), and a clean rag.
- Start with the Base: Place a measured amount of brown paint into a mixing container. I recommend starting with a larger batch than you think you'll need, as it's easier to mix more than to try and perfectly recreate a small batch later.
- Add White Incrementally: Gradually add small amounts of white paint to the brown, stirring thoroughly after each addition. This is where precision is key. Use a ratio like 4:1 (brown to white) as a starting point, but adjust based on the darkness of your brown and the desired tan shade.
- Evaluate and Adjust: After each addition of white, compare the mixed color to your target tan shade. Use a small paintbrush to apply a sample to a piece of scrap material similar to what you'll be painting on your car. Let it dry completely, as the color can change slightly as it dries.
- Fine-Tune with Adjustment Colors: If the tan is too warm (reddish or yellowish), add a *tiny* amount of blue. If it's too cool (bluish or greenish), add a *tiny* amount of yellow or red. Remember, these adjustments should be minimal – less is more. A toothpick can be a helpful tool for adding small amounts of color.
- Document Your Ratios: Keep accurate records of the ratios of each color you've used. This will be invaluable if you need to mix more of the same tan later.
Real-World Use: Basic Troubleshooting Tips
Even with careful planning, things can sometimes go wrong. Here are some common problems and how to fix them:
- Tan is too dark: Add more white, but do so gradually.
- Tan is too light: Add a small amount of brown. If you've added too much white, you might need to start over with a new batch of brown and repeat the process with adjusted ratios.
- Tan has an unwanted undertone (e.g., too pink): Counteract the undertone with its opposite. For example, if it's too pink (red undertone), add a tiny amount of green (opposite of red).
- Paint dries a different color than when wet: This is normal. Always let a sample dry completely before making final adjustments.
- Inconsistent Color: Be sure to mix paint thoroughly to ensure all the pigments are fully dispersed.
Safety
While mixing paint might seem harmless, there are a few safety precautions to keep in mind:
- Ventilation: Work in a well-ventilated area to avoid inhaling paint fumes. Some paints contain volatile organic compounds (VOCs) that can be harmful.
- Skin Protection: Wear gloves to protect your skin from paint exposure. Some paints can cause irritation or allergic reactions.
- Eye Protection: Wear safety glasses to protect your eyes from splashes.
- Disposal: Dispose of waste paint and cleaning materials properly. Check your local regulations for guidelines on hazardous waste disposal.
- Paint Type Compatibility: Be mindful of the type of paint. For example, Mixing enamel and lacquer can be extremely dangerous and cause fires. Be absolutely sure what paint types you are dealing with.
Mastering the art of color mixing takes practice, but with a solid understanding of the principles outlined in this guide, you'll be well on your way to creating the perfect tan for your automotive projects. Don't be afraid to experiment and document your results. Every attempt, successful or not, is a learning opportunity.
We have a downloadable color mixing diagram available that provides a visual representation of the color wheel and how primary and secondary colors interact. Feel free to reach out to customer support if you need access.